¶ 1. Quick Start
¶ 1.1 Introduction to the Ray5 mini
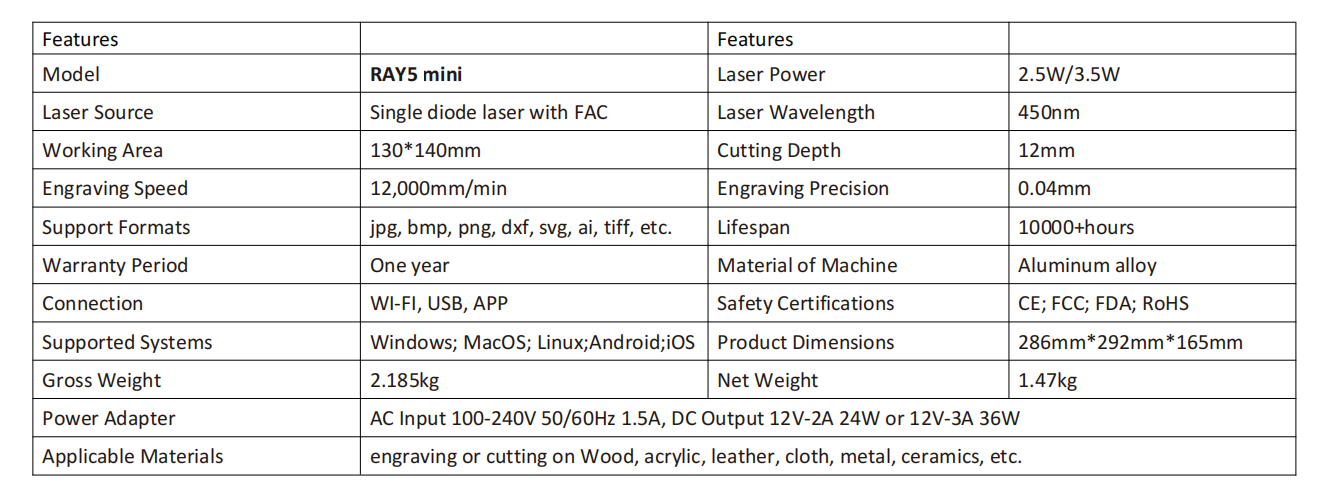
¶ 1.1.1 Product Specification
¶ 1.1.2 Introduction to Ray5 mini

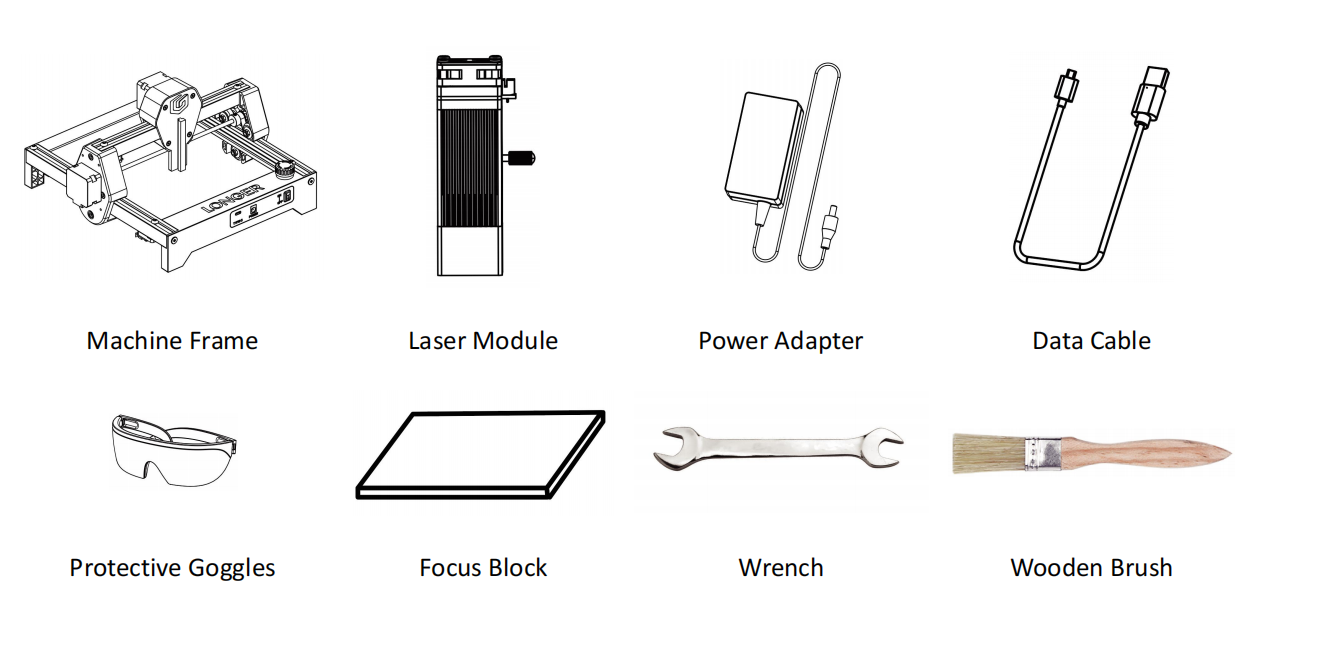
¶ 1.1.3 Supplementary instructions for accessories in the box
¶ 1.1.4 Quick Start Guide
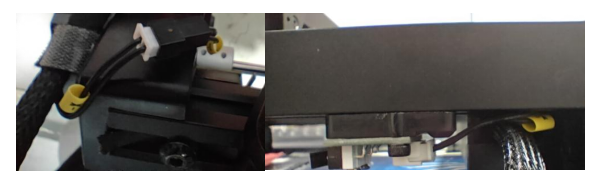
1.Install the Laser Module onto the X-axis Frame
(1)First install the laser module onto the X-axis frame, then tighten the M3*14 *handle screw to secure it in place.
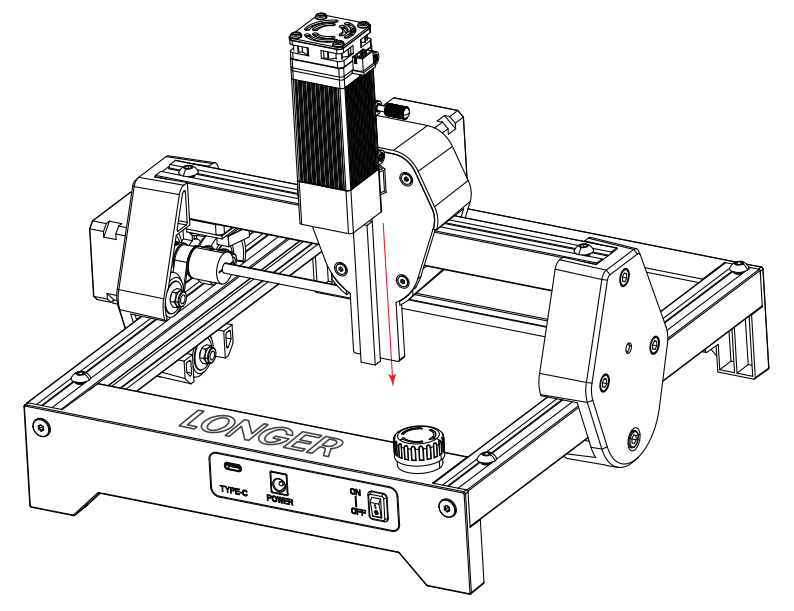
(2)Connect the cable to the laser module as shown in the figure.
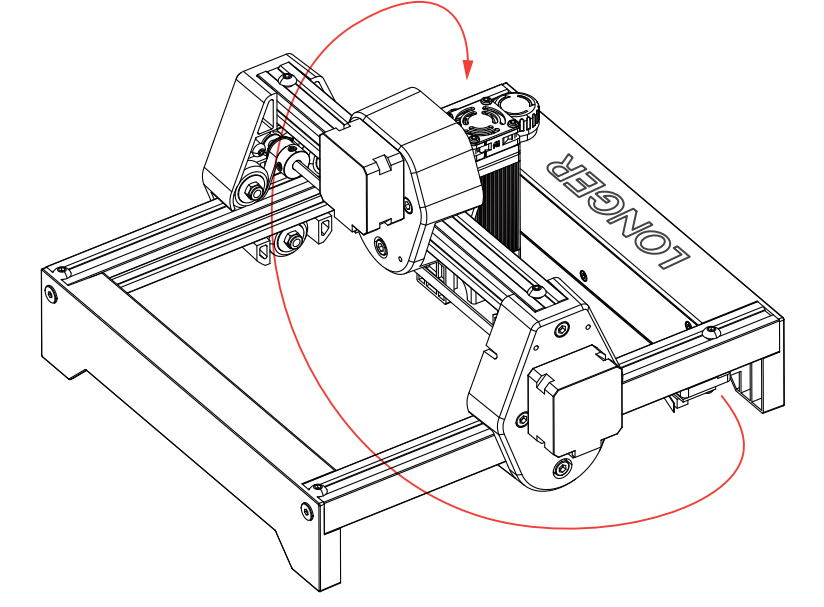
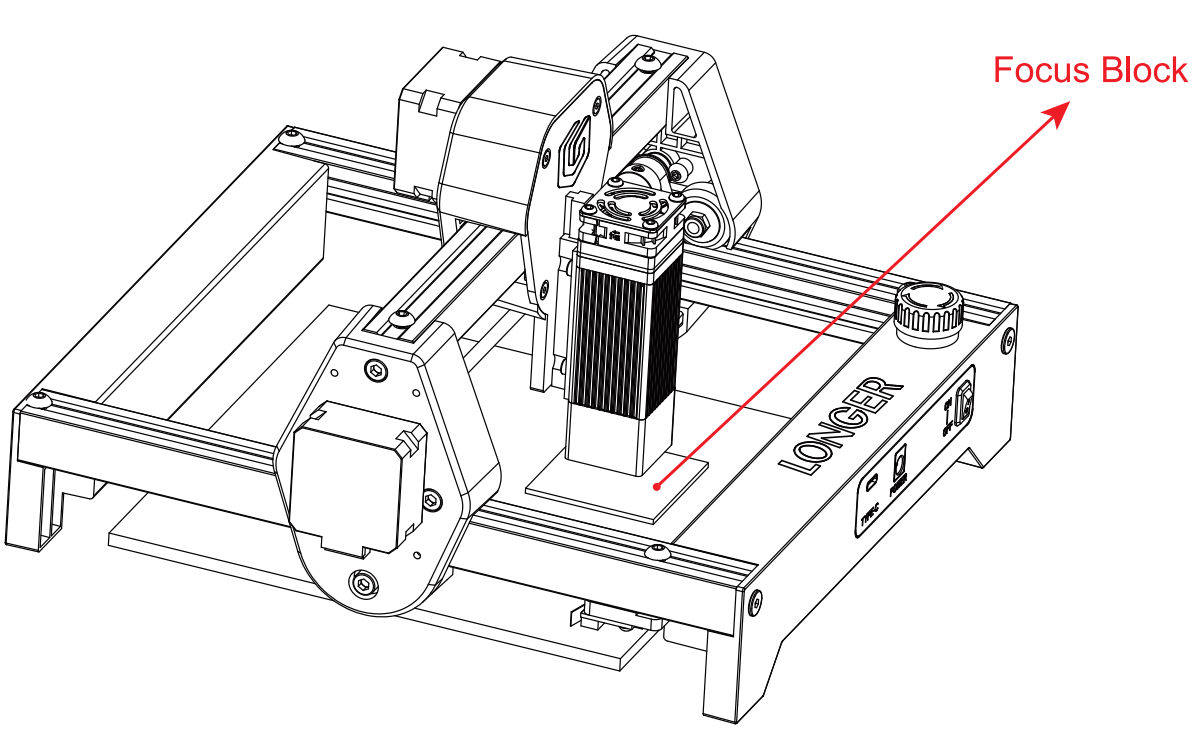
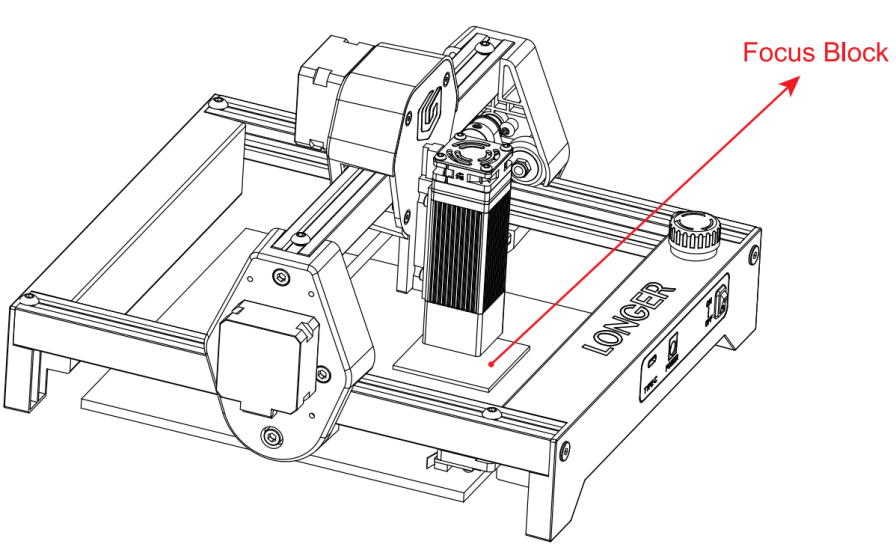
2.Adjust the Focus
Loosen the M314 handle screw. Place the 2mm focus block on the engraving surface. Move the laser module downward until the bottom of the light shield touches the surface of the focus block. Then, tighten the M314 handle screw.
¶ 1.1.5 Ray5 mini Series FAQ
¶ 1.How to update the firmware
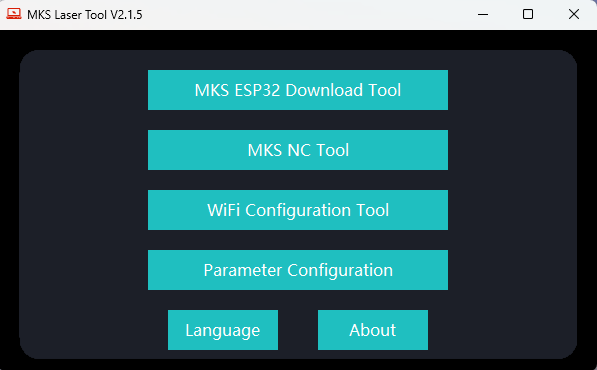
1)Update by MKSLaserTool software
Please download LaserTool from
https://github.com/LONGER3D/Longer-Laser and install it. Connect the laser engraver to computer with Type C cable, turn on the engraver.
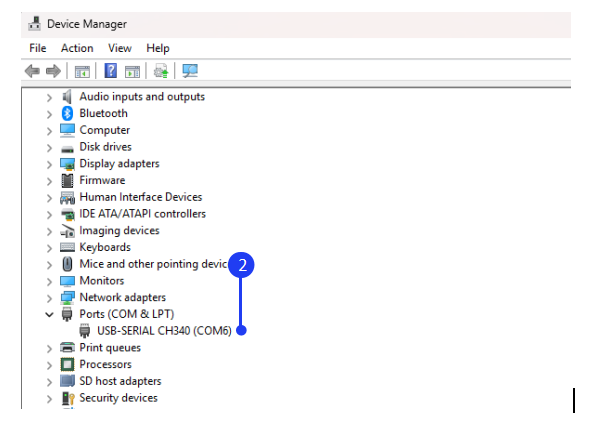
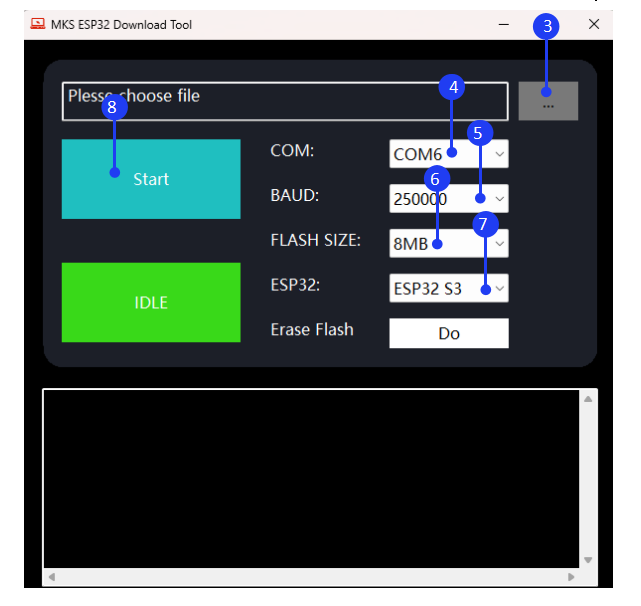
For Windows, right-click the computer and select Manage, click Device Manager, click to expand Ports, find the port corresponding to the CH340 driver. Run the MKSLaserTool and click MKS ESP32 Download Tool, select the right port which is corresponding to CH340 driver and the update firmware. Set baud to 25000, Flash size to 8MB, and select ESP32 S3, click Start, it will prompt firmware successfully flashed after the update is completed.
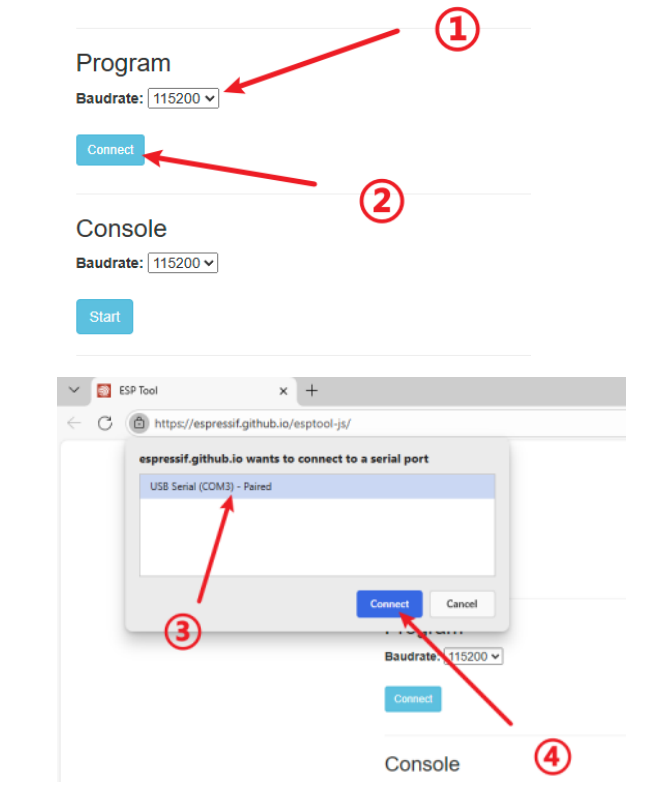
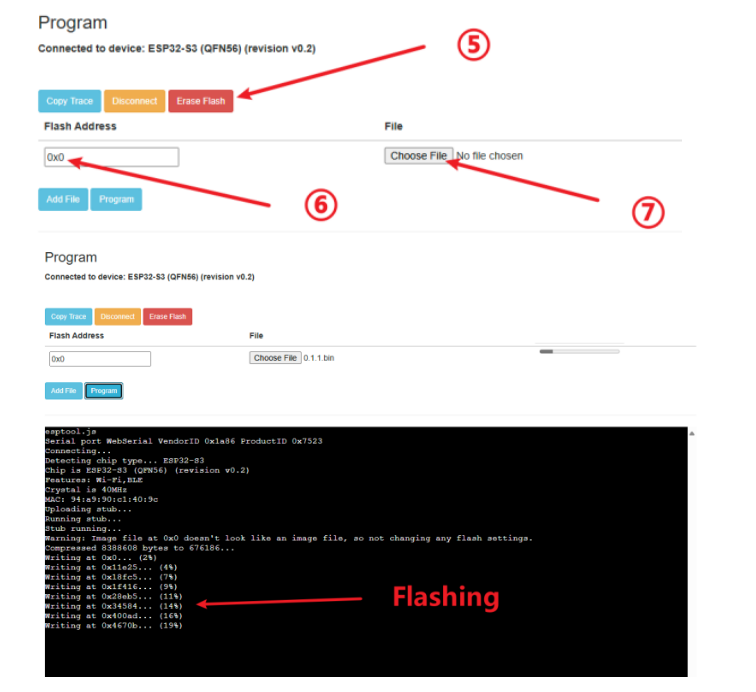
2)Update by ESPTool Web
Enter https://espressif.github.io/esptool-js/ in the browser. This webpage can connect to the serial port to flash the firmware online.Select the baud rate 115200 and connect to the CH340 serial port, then Click “Erase Flash” first, then enter the Flash address 0x0 and select the firmware, then click Program to start burning.
3)Update by LaserBurn APP
After the engraving machine is connected to the LaserBurn App, click Me→About→Firmware Update→RAY5 mini to upgrade the firmware.

¶ 2.Turn on the switch but it does not turn on
1)Check if the emergency stop switch is pressed. If it is pressed, turn it clockwise to open it.
2)Check if the power adapter is connected.
3)Check if there is green light on the power adapter.
4)Check if the connection on the motherboard is loose.
¶ 3.Unable to connect to LightBurn or LaserGBRL
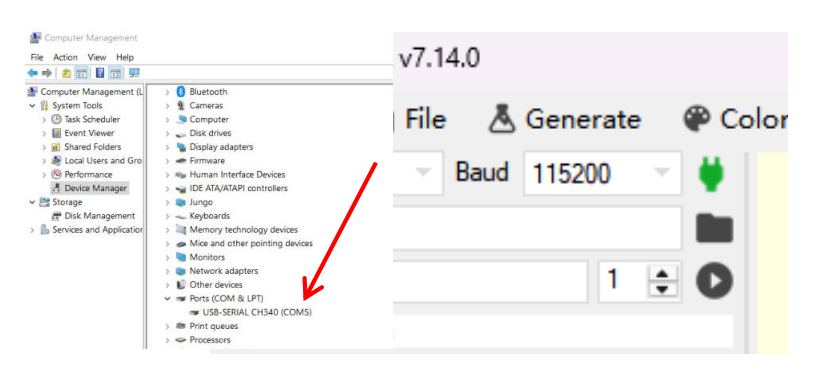
5)Can't find CH340 driver
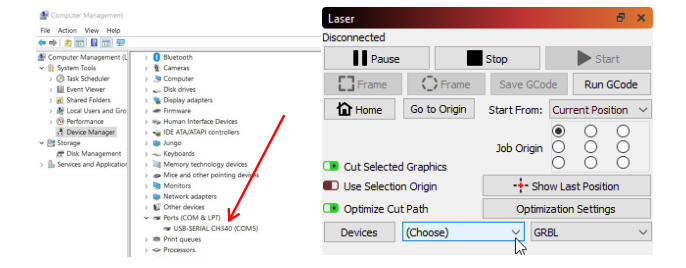
For Windows system, it needs to right-click the computer and select Manage, click Device Manager, click to expand Ports (COM & LPT), find the port corresponding to the CH340 driver, and then select this port in LightBurn or LaserGRBL.
For MacOS, please go to About this Mac > Overview > System Report, select USB under Hardware, there will be USB Serial if the driver is installed automatically, and select cu.wchusbserial14230 port in the LightBurn or LaserGRBL.
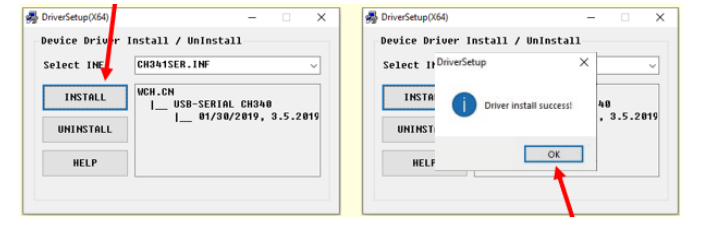
If no ports are listed in the expand Ports (COM & LPT), it means that no engravers were found, which could mean that it is not plugged in correctly, isn't powered, or the PC is missing a driver. It needs to download CH340 driver from the link and double click it to install:
https://drive.google.com/drive/folders/1Sc-TKuez-mz--38Vp6DeL-pGmQcQdHW4.
How to install CH340 driver of LightBurn for MacOS Sequoia system:
https://www.youtube.com/watch?v=JX-XsjLFei0
How to install CH340 driver of LightBurn for MacOS system:
https://www.youtube.com/watch?v=FBd1uEA9QUw
6)CH340 driver port is occupied
Before connecting, please make sure that the CH340 port is not occupied by software such as serial communication tools, cura, etc.
7)The Baud rate setting error
The Baud rate should be set to 115200. The wrong baud rate will cause the connection to the engraving machine to fail.
8)The configuration file is not imported or damaged
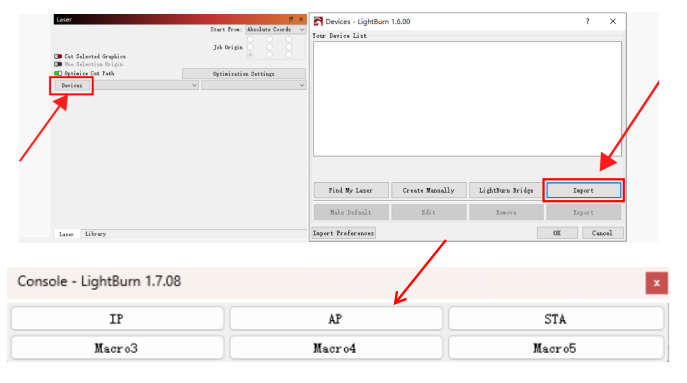
For LightBurn, click "Devices" in the laser control module to import the engraver. Click ‘Import’, select the Ray5 mini.lbdev file, and click OK to add the Ray5 mini configuration to LightBurn. The macro commands will be successfully added in the Console window and Ray5 mini device would appear in the list of devices to the right of the 'Devices' button in the Laser window when the configuration file is imported successfully.
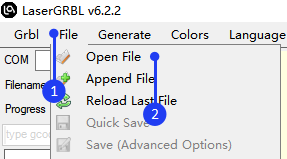
¶ 4.How to adjust the graphics position in LaserGRBL
Click File > Open File to add the design to be engraved, adjust the offset of X and Y in the target image window to change the position of the graphics to make sure which is in the range of 130*140mm.
¶ 5.LaserBurn APP cannot connect to WIFI
1)Update the app to the latest version
Please search for "LaserBurn" in Google play or Apple store to download and update to the latest version.
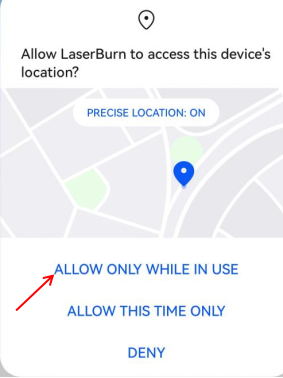
2)APP is not allowed to discover device’s location
When run the app for the first time, select ALLOW ONLY WHILE IN USE when prompted ‘Allow LaserBurn to access this device’s location?’, or the LongerLaser_XXXX WIFI can not be found. If have already selected DENY, it needs to change the app's location discovery permission in Settings.
3)Reset the WIFI
If WIFI of LongerLaser_XXXX can not be found, please click "AP" in the Lightburn macro definition button to switch the network mode, then search the WIFI list again.

4)Not connected to the same router or not 2.4G WIFI
In STA mode, it needs to connect the engraver and mobile phone to the same router WIFI. Make sure it is 2.4G WIFI. 5G WIFI is not supported yet.
5)WIFI signal is too weak
Switch to a router with better signal strength.
¶ 6.There are error or alarm during engraving
1)Manually moving the laser position during engraving causes limit triggering.

2) When you click Stop during engraving, this error will be reported, which is normal.

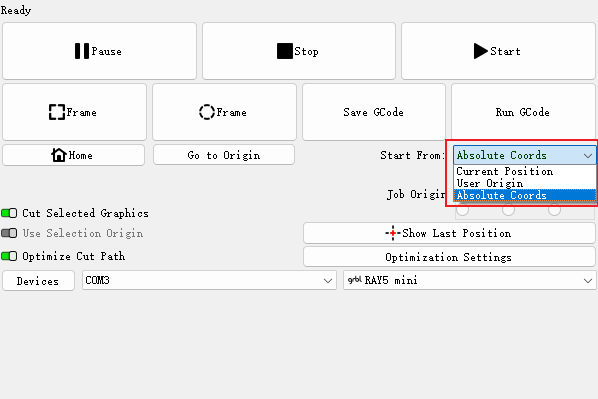
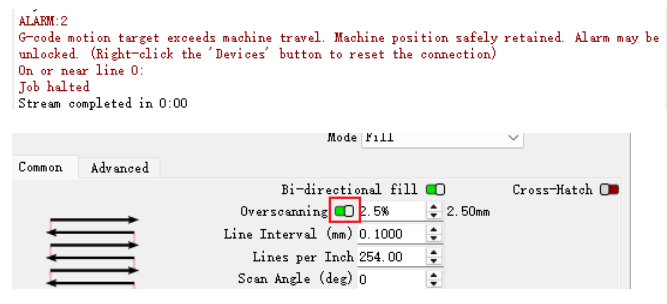
4)When engraving an image or vector filling at the current position, if the overscan function is turned on, the soft limit may be triggered and the engraving may not be possible. You need to change the coordinates to absolute coordinates. If you do not change the coordinate system, then reduce the pattern and put it in the middle, or turn off the overscan function.
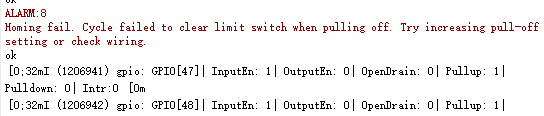
The machine continuously detects the signal of the limit switch, resulting in a zeroing abnormality.The solution is to confirm that the XY axis does not hit the limit switch after the XY axis completes zeroing.
¶ 7.The laser module keeps hitting the edge when returning to HOME
1)Check if the limit cable is loose. If it is loose, tighten the cable.
2)Check whether the limit position is too far back. When Homing, the laser cannot touch the limit and keeps hitting the edge. If so, adjust the limit position so that it is triggered just when returning to Home.
¶ 8.The engraved patterns are unclear
The failures of laser engraving mark is unclear may be due to incorrect focus, mismatch of parameters and materials, etc. Please refer to the following steps to check.
1)First make sure the focus is correct.
Use the focus block to adjust the focal length.
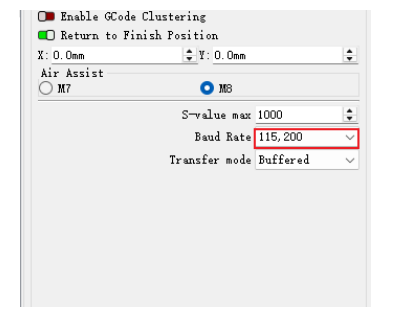
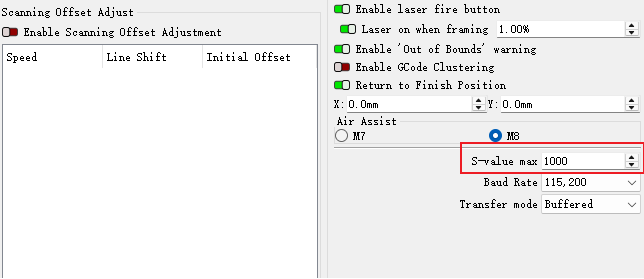
2)Check if the S value in Lightburn
That is click Lightburn-Edit-Device Setting and check whether the S-value MAX is 1000.
3)Check the parameters
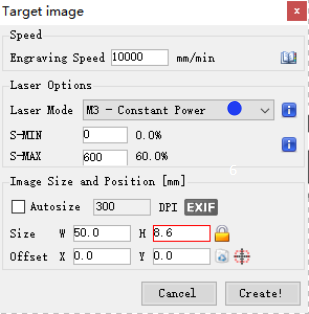
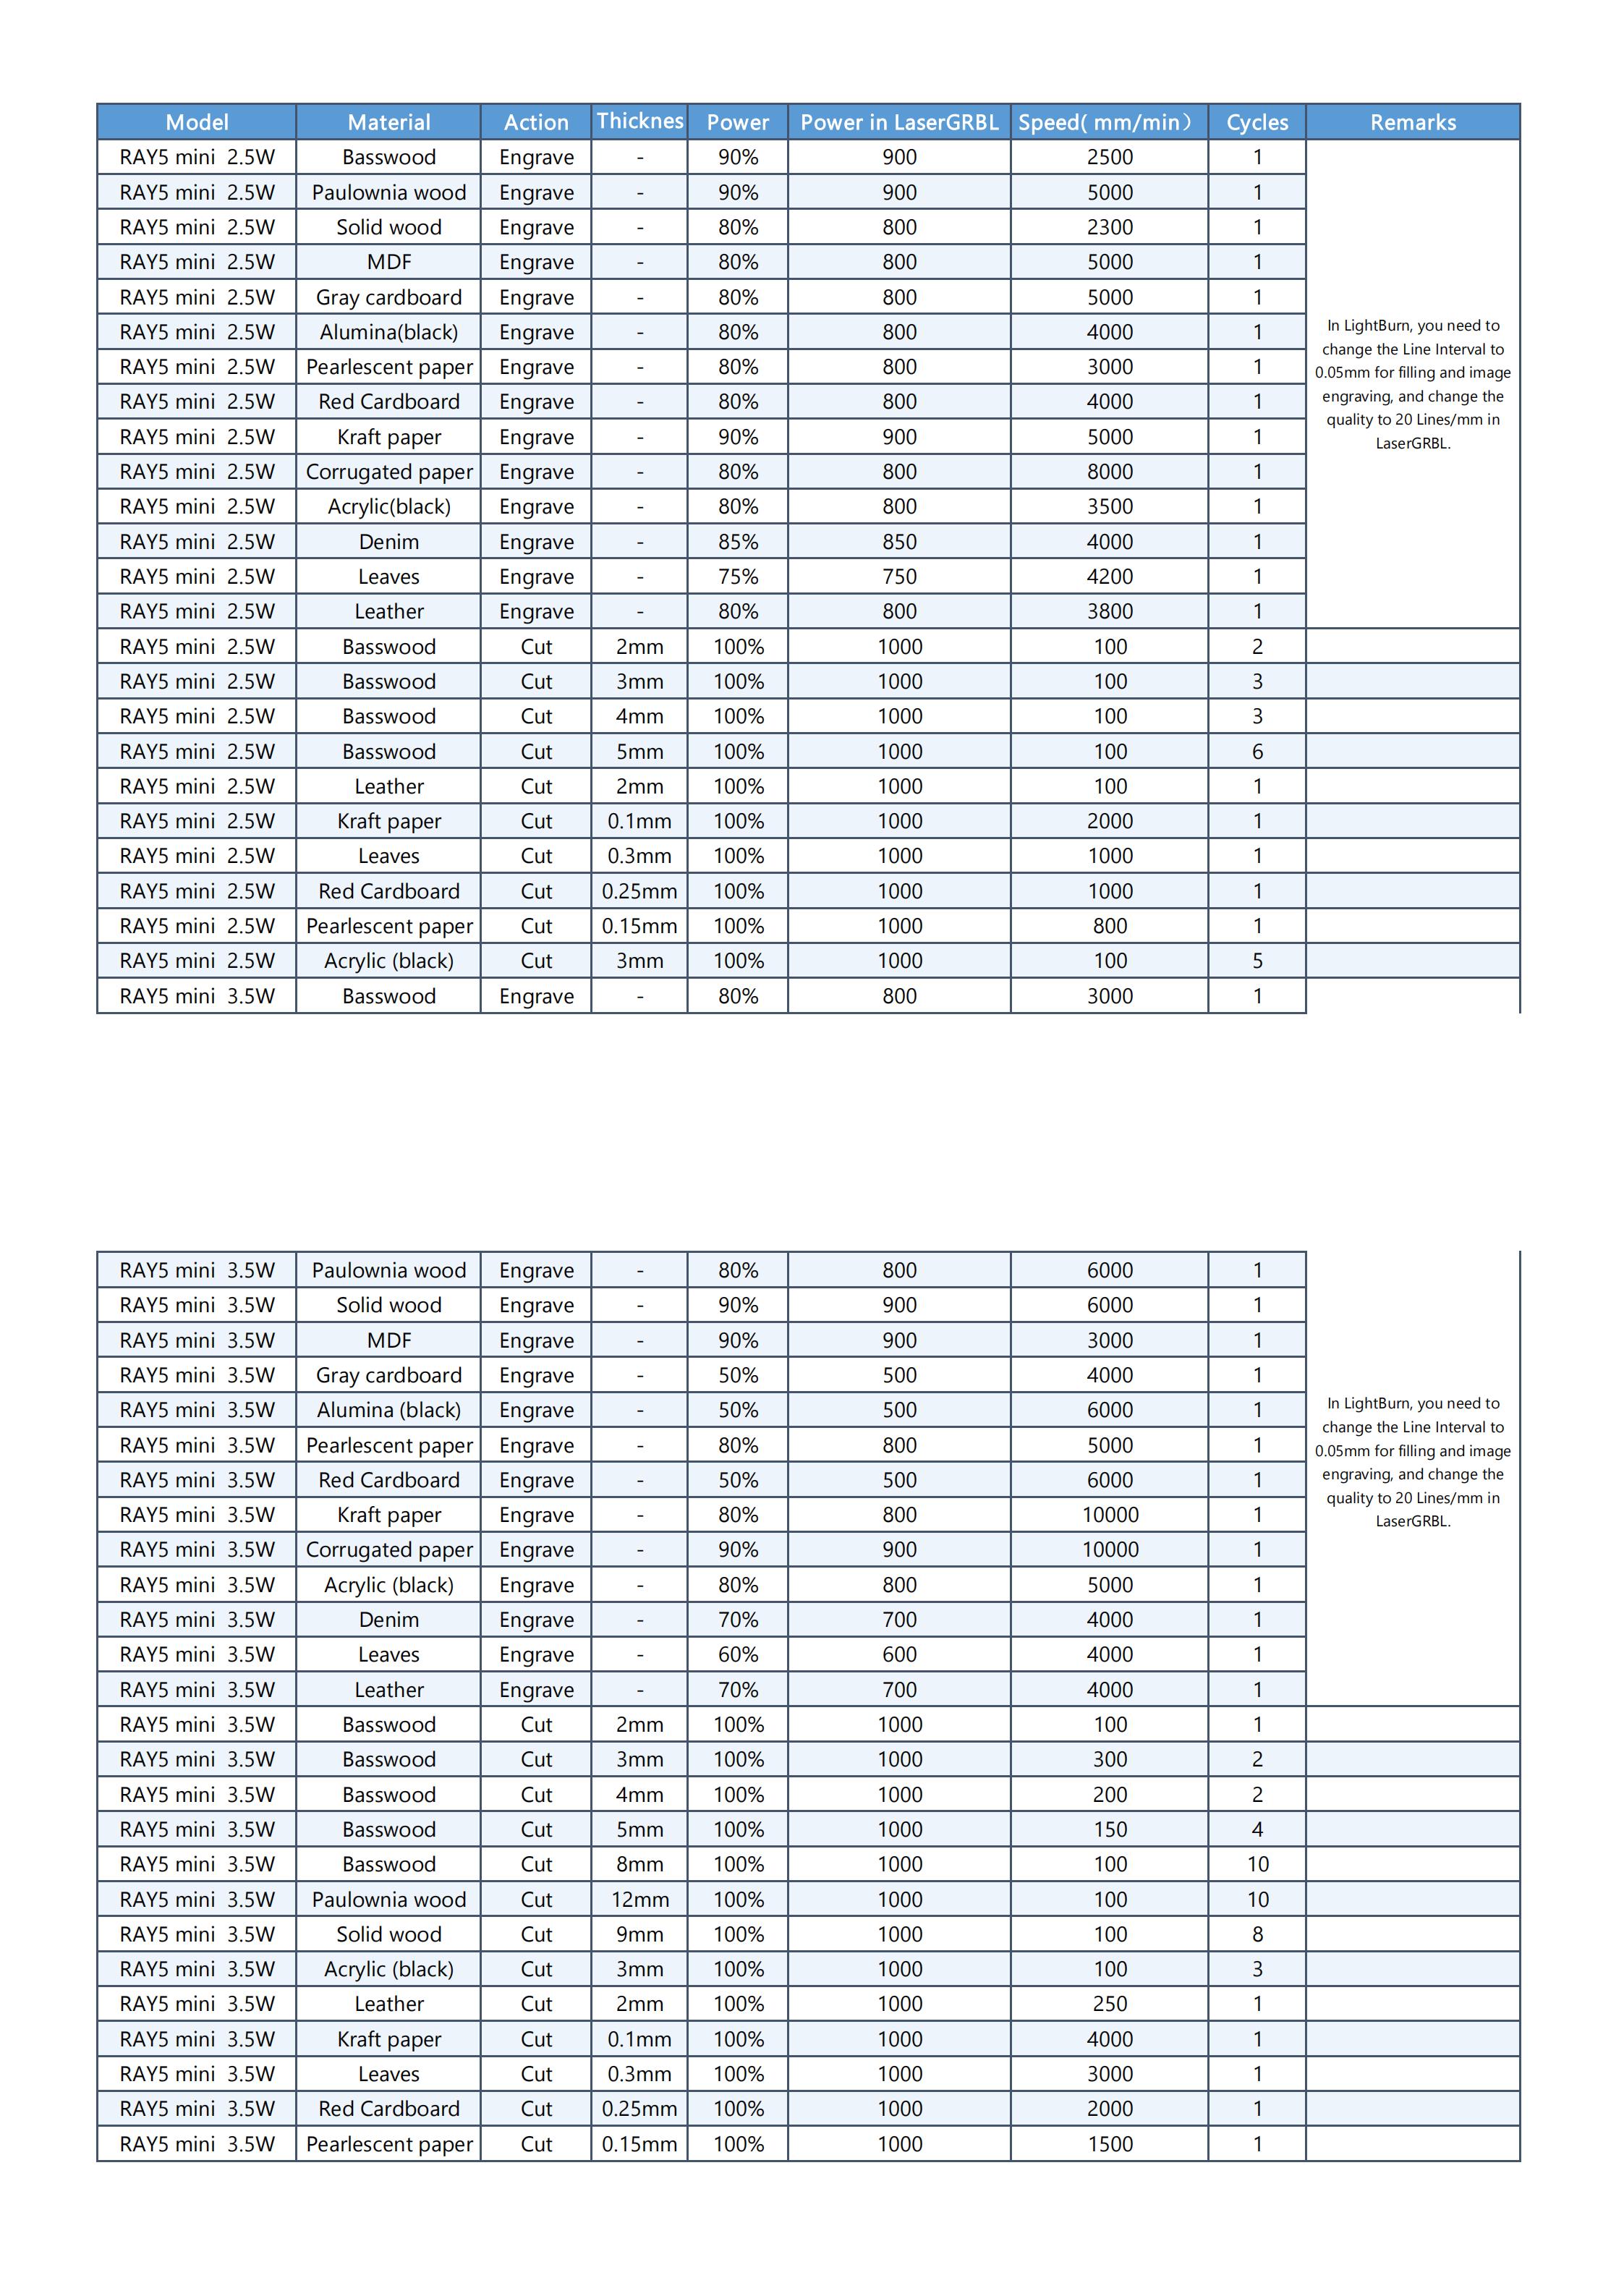
Check whether the engraving parameters are correct, especially the speed unit, please refer to the parameter table in the Official Website. And for the LaserGRBL software, the value of S-MAX is 10 times the target laser power, such as when the laser power is 100%, S-MAX needs to be set to 1000%
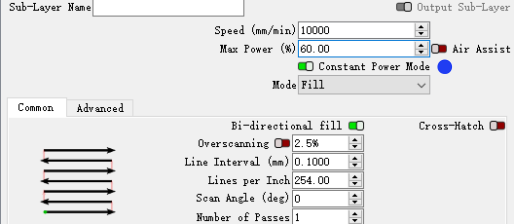
4)Turn on the constant power
When editing parameters, make sure the laser mode is set to constant power mode, as shown in the figure.
5)Check the window mirror
Check whether the window mirror of the laser head unit is contaminated. If there is contamination, it is recommended to use lens cleaning paper or a dust-free cloth soaked in alcohol to wipe gently to avoid damaging the coating.
9.How to transfer photos from PC to LaserBurn APP
1)Transfer photos from PC to phone
For iPhone: Connect iPhone using a USB-C cable, In the iTunes app on the PC , click the Devices button near the top left of the iTunes window.
Click Photos. Select Sync Photos, then choose an album or folder from the pop-up menu.
For android: With a USB cable, connect your device to your computer. On your device, tap the "Charging this device via USB" notification. Under "Use USB for," select File Transfer. A file transfer window will open on your computer. Use it to drag files.
2)Add photos to LaserBurn APP
Run LaserBurn, click Creation > ALBUM to add photo from phone.
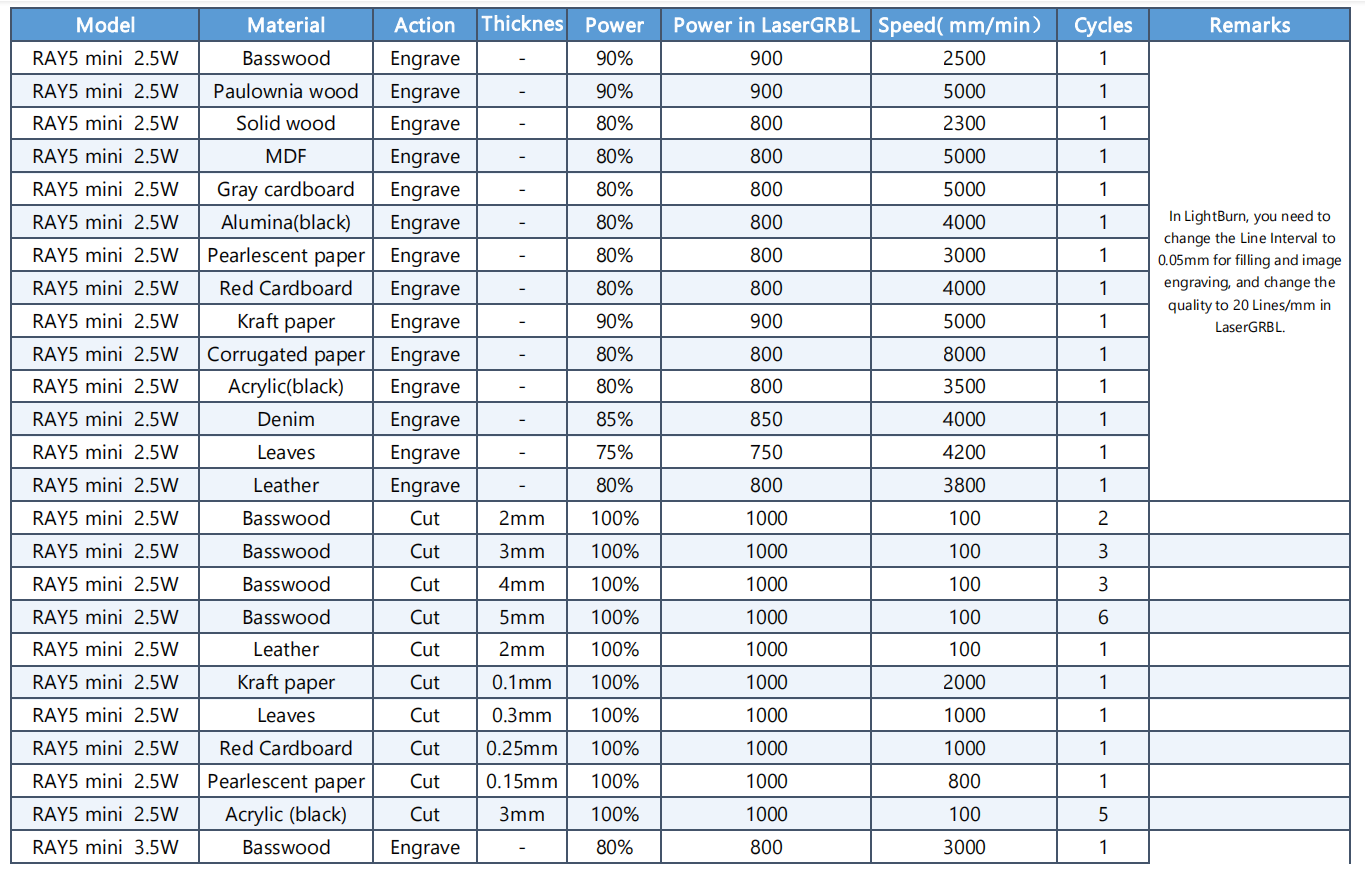
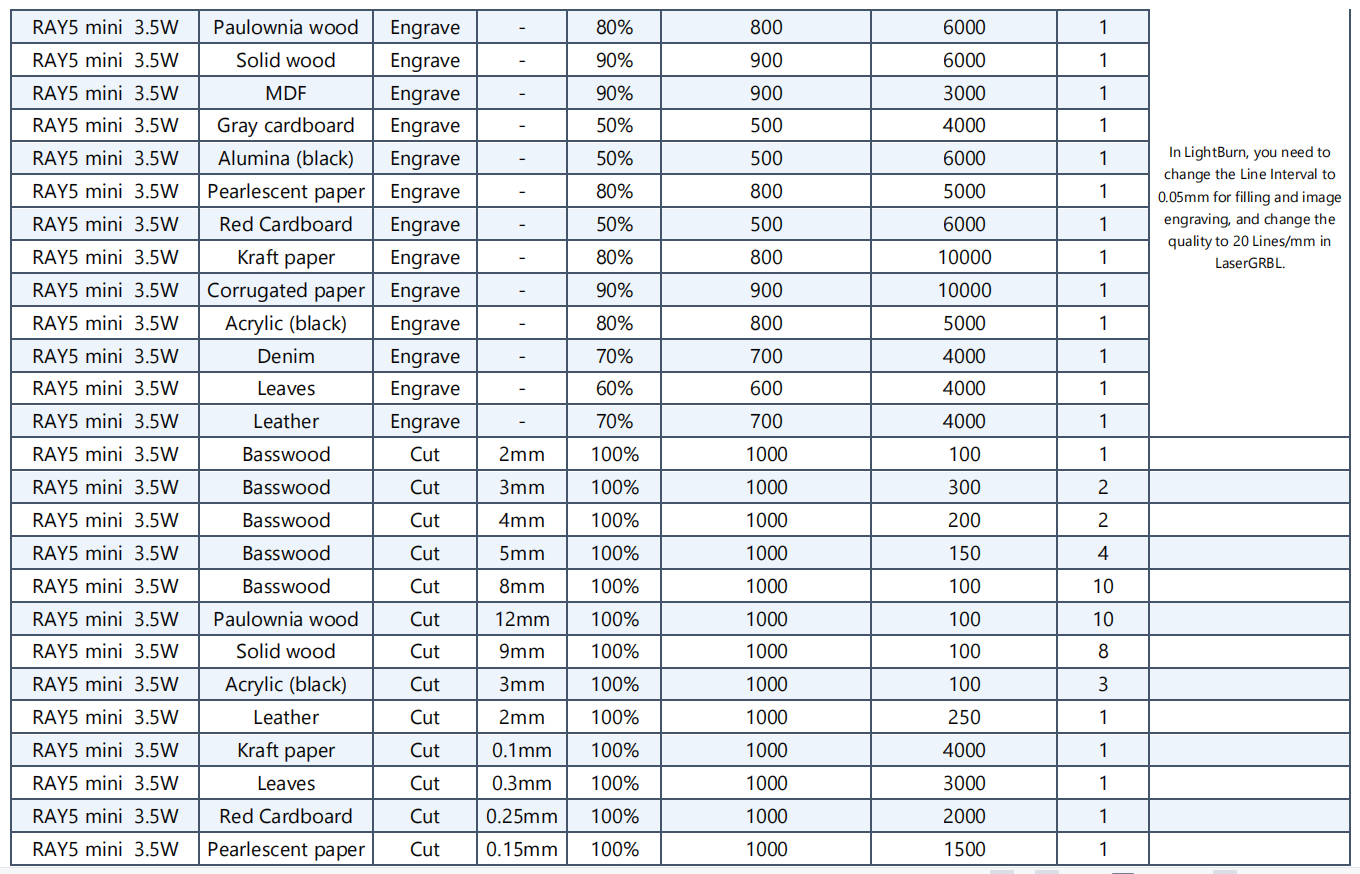
¶ 1.1.6 Ray5 mini Material engraving parameters
¶ 1.2 Laser Engraver Setup
¶ 1.2.1 Machine Operation
¶ 1.2.2 Operation of the laserGRBL software
LaserGRBL is an easy-to-use, fully free software designed specifically for laser engravers, and it runs only on Windows. Please ensure to save or back up your data regularly during use to avoid data loss. However, LONGER is not responsible for any data loss caused by third-party software.
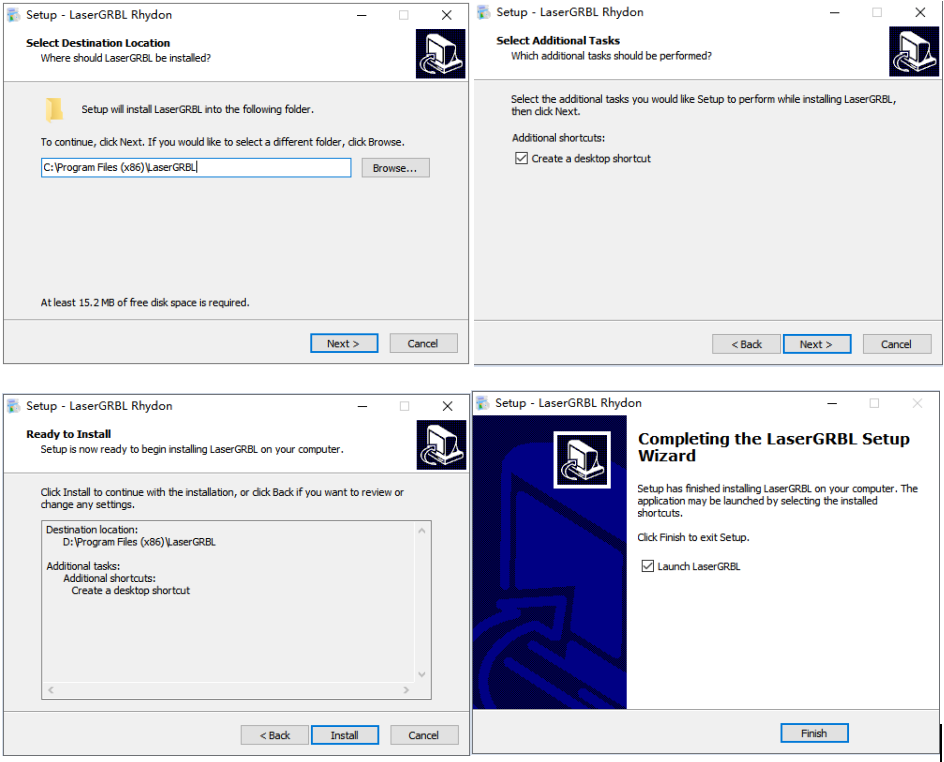
1.Software Download and Installation
Download LaserGRBL from the following link: https://lasergrbl.com/download/. Then, click Next > Next > Install > Finish to complete the installation.
2.Connect RAY5 mini to LaserGRBL
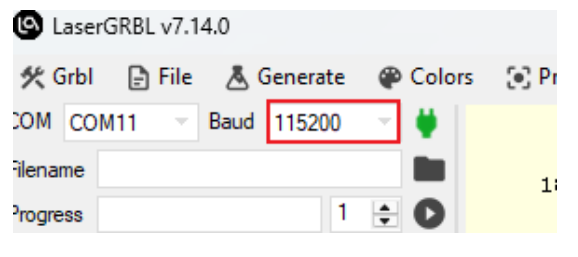
You need to connect the engraver to LaserGRBL software first. For Windows, right-click This PC and select Manage, then click Device Manager. Expand Ports (COM & LPT), find the port corresponding to the CH340 driver, and select it from the COM port list. Set the baud rate to 115200 baud rate, and click  to connect.
When connected to the correct port, GRBL will reply with a “welcome message” showing the GRBL firmware version. On the bottom-right of the LaserGRBL interface, it will show “Status: Idle”.

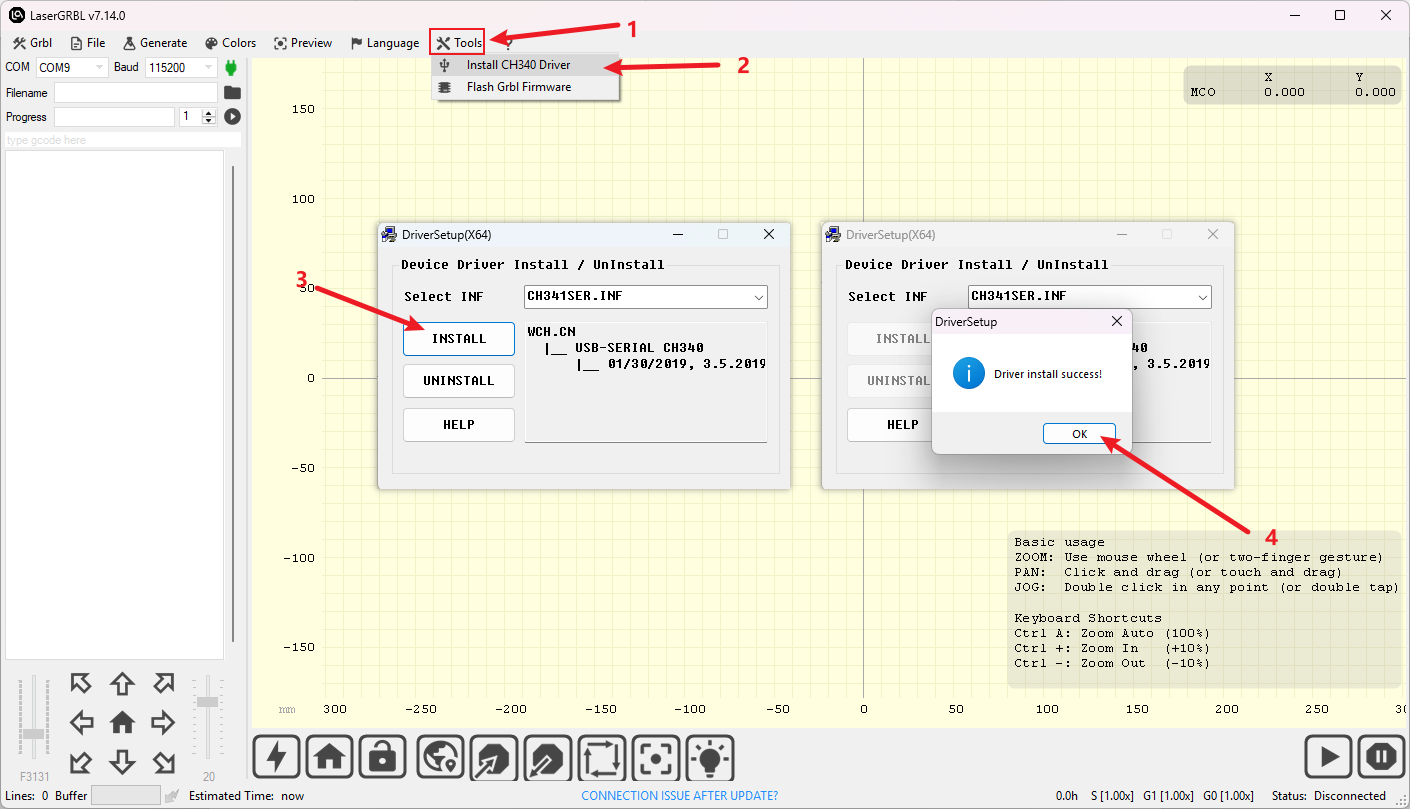
If no ports are listed in the drop-down, it means no engraver was found, which could indicate it's not plugged in correctly, is not powered, or the PC is missing a driver. In that case, click the Tools menu to install the CH340 Driver from LaserGRBL software.
3.Main Interface of LaserGRBL
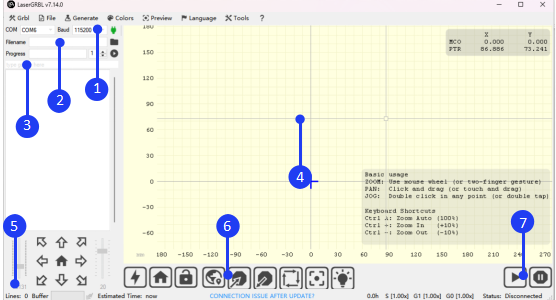
①Connection Control: Here you can select the serial port and set the proper baud rate for the connection.
②File Control: This shows the loaded filename and the engraving process progress. The green "Play" button starts program execution.
③Manual Commands: You can type any G-Code line here and press "Enter." The commands will be added to the command queue.
④Engraving Preview: This area shows a preview of the final work. During engraving, a small blue cross will indicate the current laser position in real time.
⑤Jogging Control: Allows manual positioning of the laser. The left vertical slider controls movement speed, while the right slider controls step size.
⑥Grbl Reset/Homing/Unlock: These buttons send the soft-reset, homing, and unlock commands to the GRBL board. To the right of the unlock button, you can add custom user-defined buttons.
⑦Pause and Resume: These buttons allow you to suspend and resume the engraving process.
4.Connect RAY5 mini to LaserGRBL via Wi-Fi
There are two modes for connecting the RAY5 mini to LaserGRBL via Wi-Fi: STA and AP mode. The difference is that in AP mode, the computer has no network connection, while in STA mode, the computer can maintain its network connection.
1)Connect RAY5 mini to LaserGRBL via Wi-Fi
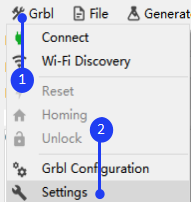
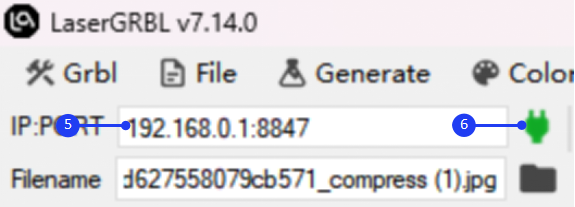
Run LaserGRBL, click Grbl > Settings, select Telnet for the Connection Protocol, and click Save. Connect the computer to the Wi-Fi network starting with LongerLaser_XXXX, input password 12345678, input the 192.168.0.1:8847 in IP:PORT, click to connect.

2)Connect RAY5 mini to LaserGRBL via Wi-Fi in STA Mode
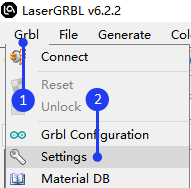
Run LaserGRBL, click Grbl > Settings, select Telnet for the Connection Protocol , and click Save. Enter the following commands in the console: sta/ssid=Your_SSID
wifi/begin
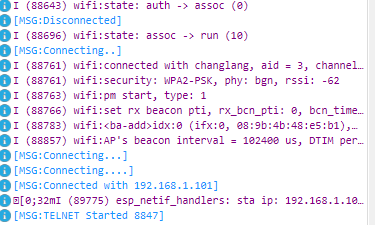
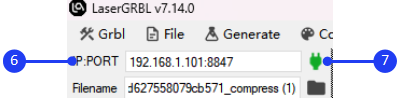
change Your_SSID and Your_PassWord to your WIFI account and password in $sta/ssid and $sta/password command,Press Enter after each command. Now you switch to STA mode. After the connection is successful, the console prompts the the IP address. Please note that the computer network and WIFI must be in the same LAN (local area network). Input IP and port such as 192.168.1.101:8847 in IP:PORT, click to connect

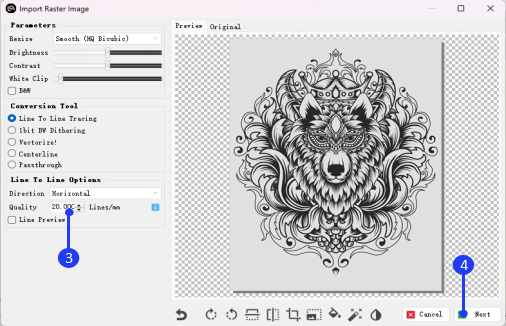
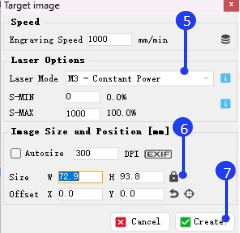
5.Create a Project in LaserGRBL
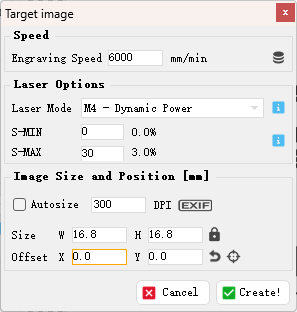
Click File > Open File to add the design you want to engrave. Set the Quality to 20 Lines/mm (quality has two values options, 20Lines/mm or 10Lines/mm. For those who require high precision, it can choose 20Lines/mm. For those who require high efficiency, it can choose 10Lines/mm). Click Next then refer to the parameter table to set the appropriate engraving power (S-MAX) and speed. Please note that the laser mode should be selected as M4-Dynamic Power, and the value of S-MAX should be 10 times the target laser power. For example, if the laser power is set to 100%, S-MAX should be set to 1000%; if the laser power is 60%, set S-MAX to 600%. Next, adjust the size of the image to scale the design. If the design position falls outside the working area, you can set the XY axis offset to adjust the graphic's position.
After successfully importing the graphics and setting the parameters, it needs to set the focus of RAY5 mini, focusing with the focus block, then click  Frame button to determine the material placement, and finally click
  Start button to start engraving.
For more detailed information on LaserGRBL software operations, https://lasergrbl.com/usage/.

¶ 1.2.3 Operation of the LightBurn software
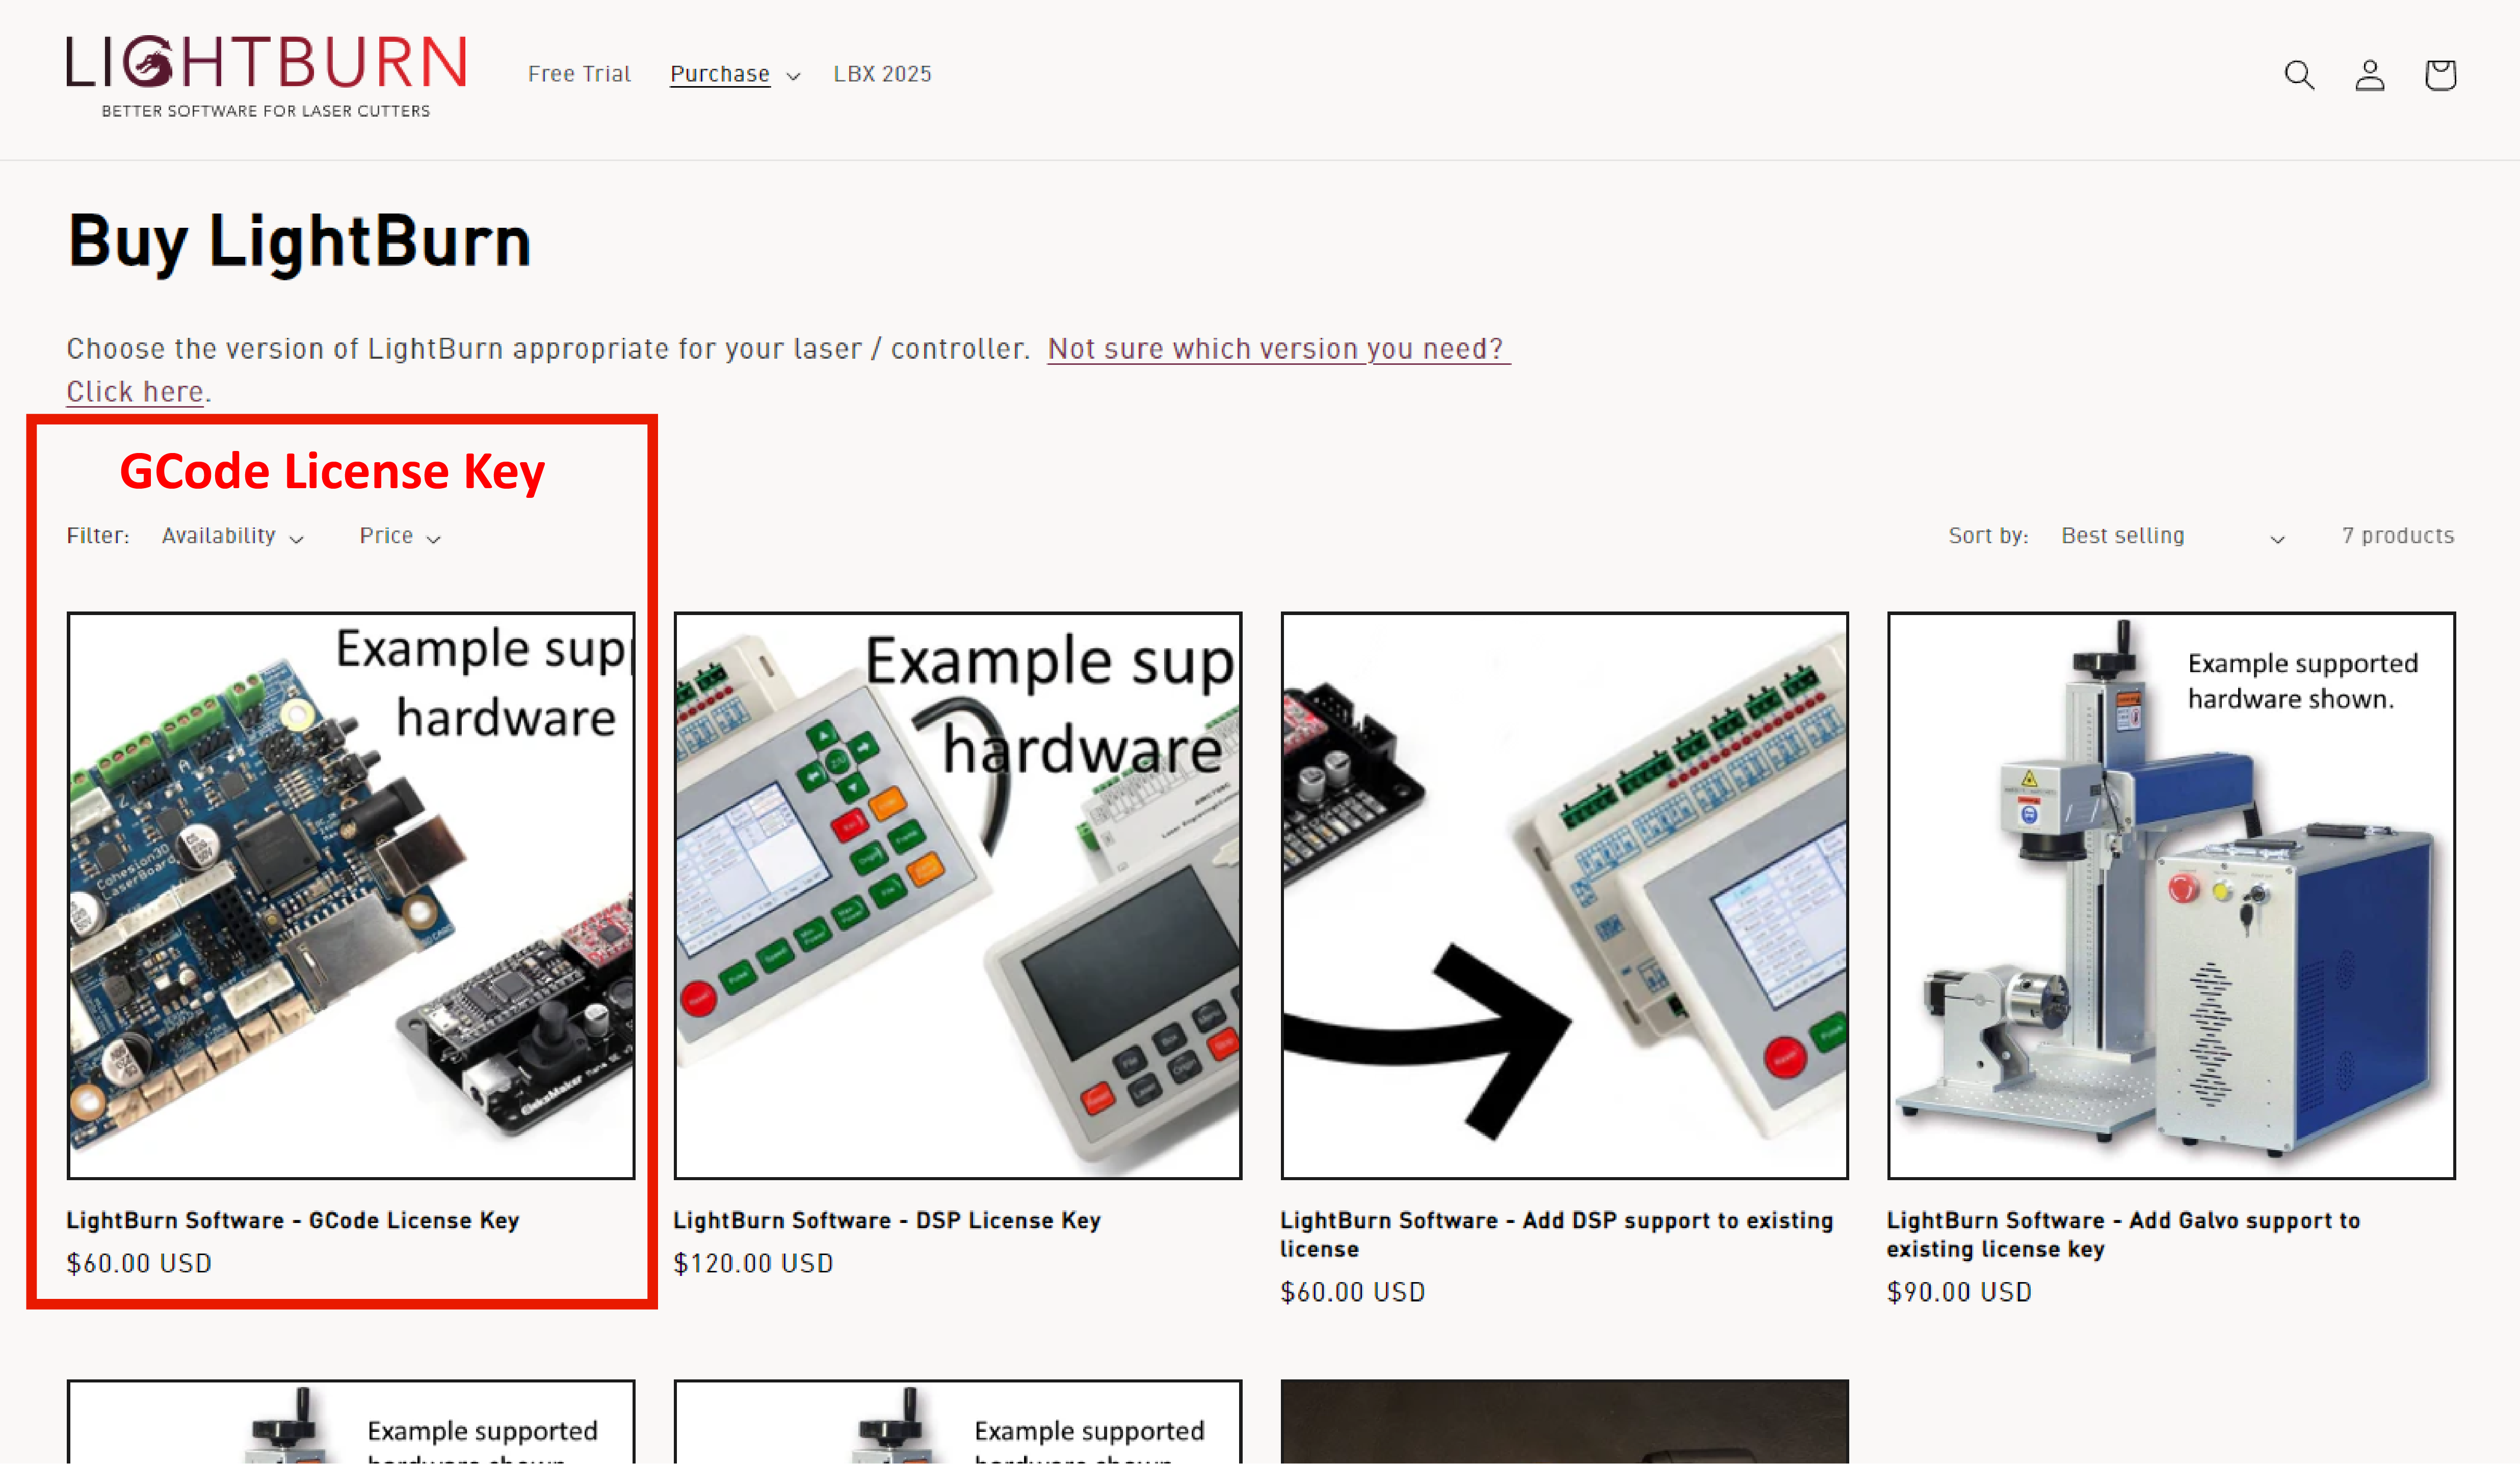
LightBurn is a professional layout, editing, control, and paid software for engravers, compatible with Windows, MacOS, and Linux. It offers a 30-day free trial period. Please remember to save or back up your data regularly to avoid data loss; however, LONGER is not responsible for any data loss caused by third-party software. If the software has been installed previously, or if the 30-day trial period has expired, you will need to purchase a license key to continue using it, according to LightBurn’s trial policy. To purchase a license and obtain your key code, please visit the LightBurn online store and select the "GCode License Key".
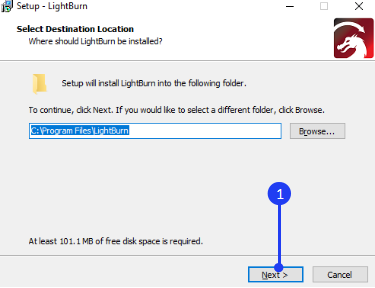
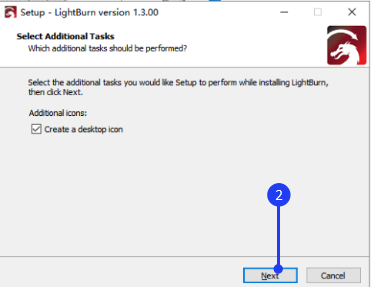
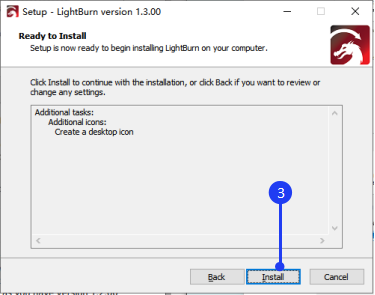
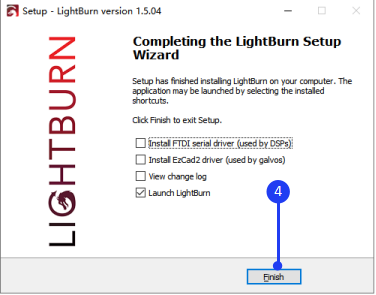
1.Software Download and Installation
Download LightBurn from the following link: https://LightBurnsoftware.com/pages/download-trial to install the trial version of LightBurn.
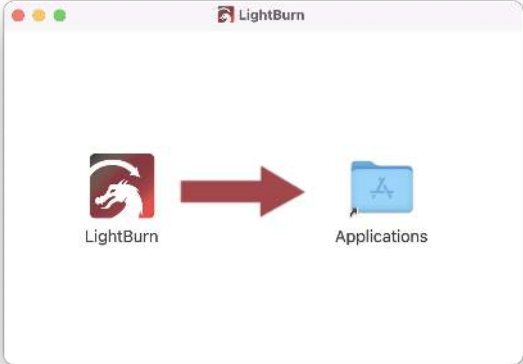
For Mac users, after downloading the .DMG file, double-click it and drag LightBurn into the Applications folder. When launching LightBurn for the first time, open a Finder window, navigate to the Applications folder, hold the Control key, and click the LightBurn icon. From the menu, select 'Open' . When MacOS prompts you to confirm if you want to open the program, click Yes. It will then be listed as an exception in your launcher, and you can launch the application normally from there.
2.Import Configuration File
Before using LightBurn with RAY5 mini for the first time, you need to import the RAY5 mini.lbdev configuration file. Download it from the following link:
https://www.longer3d.com/pages/download-firmware
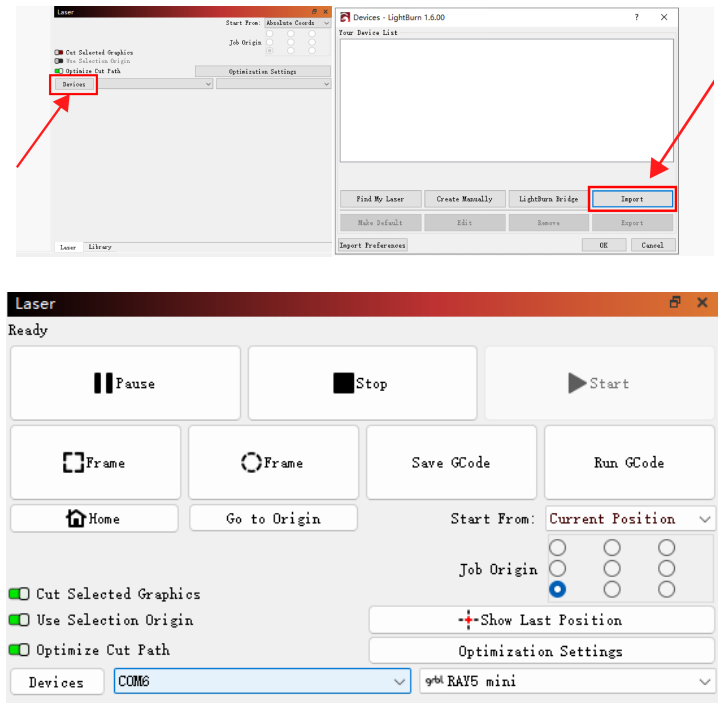
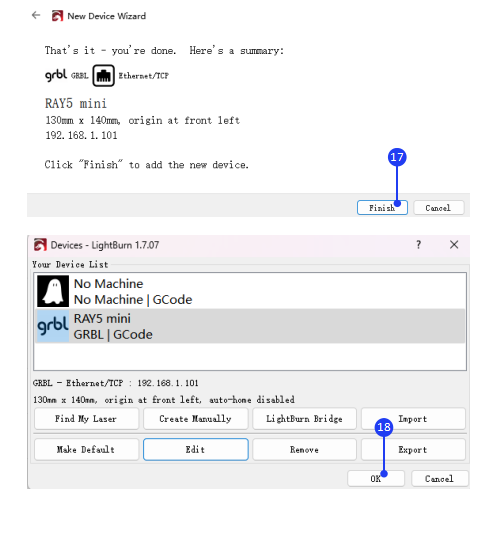
When launching LightBurn for the first time, the 'New Device Wizard' will appear. If not, click Devices in the Laser control module to manually import the engraver. Click Import, select the RAY5 mini.lbdev file, and click OK to add the configuration to LightBurn. Once successfully imported, the macro commands will appear in the Console window, and RAY5 mini will be listed under Devices in the Laser window.
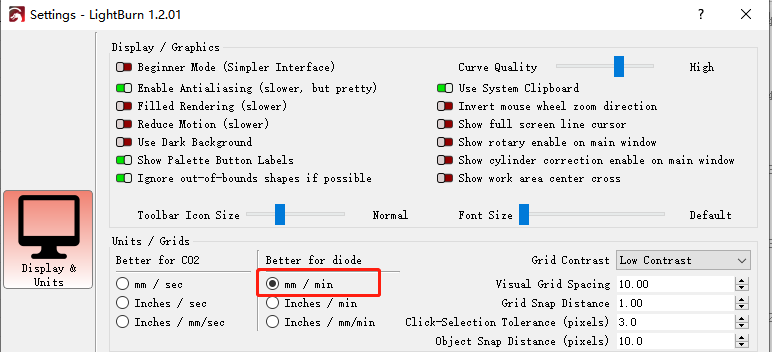
After adding the device, it is recommended to set the speed unit to mm/min. To do this, go to Edit in the taskbar, select Settings, choose mm/min as the unit, and click OK.
3.Connect the RAY5 mini to LightBurn
To use LightBurn, the engraver must be connected to the software first.
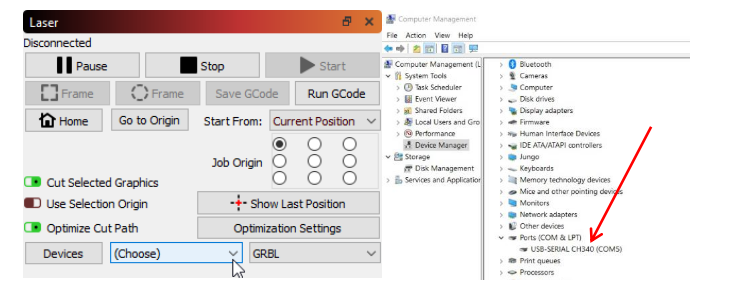
For Windows, right-click This PC and select Manage, then click Device Manager. Expand Ports (COM & LPT), find the port corresponding to the CH340 driver, and manually select it in LightBurn by clicking (Choose) in the Laser window.
For MacOS, go to About This Mac > Overview > System Report, then select USB under Hardware. If the driver is installed automatically, USB Serial will appear. In LightBurn, select cu.wchusbserial by clicking (Choose) in the Laser window.
If no ports are listed in the drop-down, it means no engraver was found, which could indicate that the device is not plugged in correctly, is not powered on, or the driver is missing. In that case, download the CH340 driver from the following link and install it:
https://drive.google.com/drive/folders/1Sc-TKuez-mz--38Vp6DeL-pGmQcQdHW4.
For macOS Version 15:
https://www.youtube.com/watch?v=JX-XsjLFei0
For macOS Version 14 and Earlier:
https://www.youtube.com/watch?v=FBd1uEA9QUw
4.The Main Window of LightBurn
The default layout of the LightBurn main window includes several key sections: Menus, Main Toolbar, Creation & Modifier Tools, Color Palette, Cuts/Layers, Laser Window, Move Window, and more.
Menus: The menu bar at the top of the main window provides access to almost every feature available in LightBurn, like File, Edit, Tools, etc.

Main Toolbar: The main toolbar in LightBurn provides quick access to commonly used functions, such as opening or importing files, saving, using the clipboard (copy & paste), and moving or zooming the view. Right beside it is the Arrangement toolbar, which contains frequently used tools for arranging and aligning shapes.

Tooltips: If you hover the mouse over a control, a small bit of text will pop up to describe that button or feature. For example, in the
Creation & Modifier Tools,

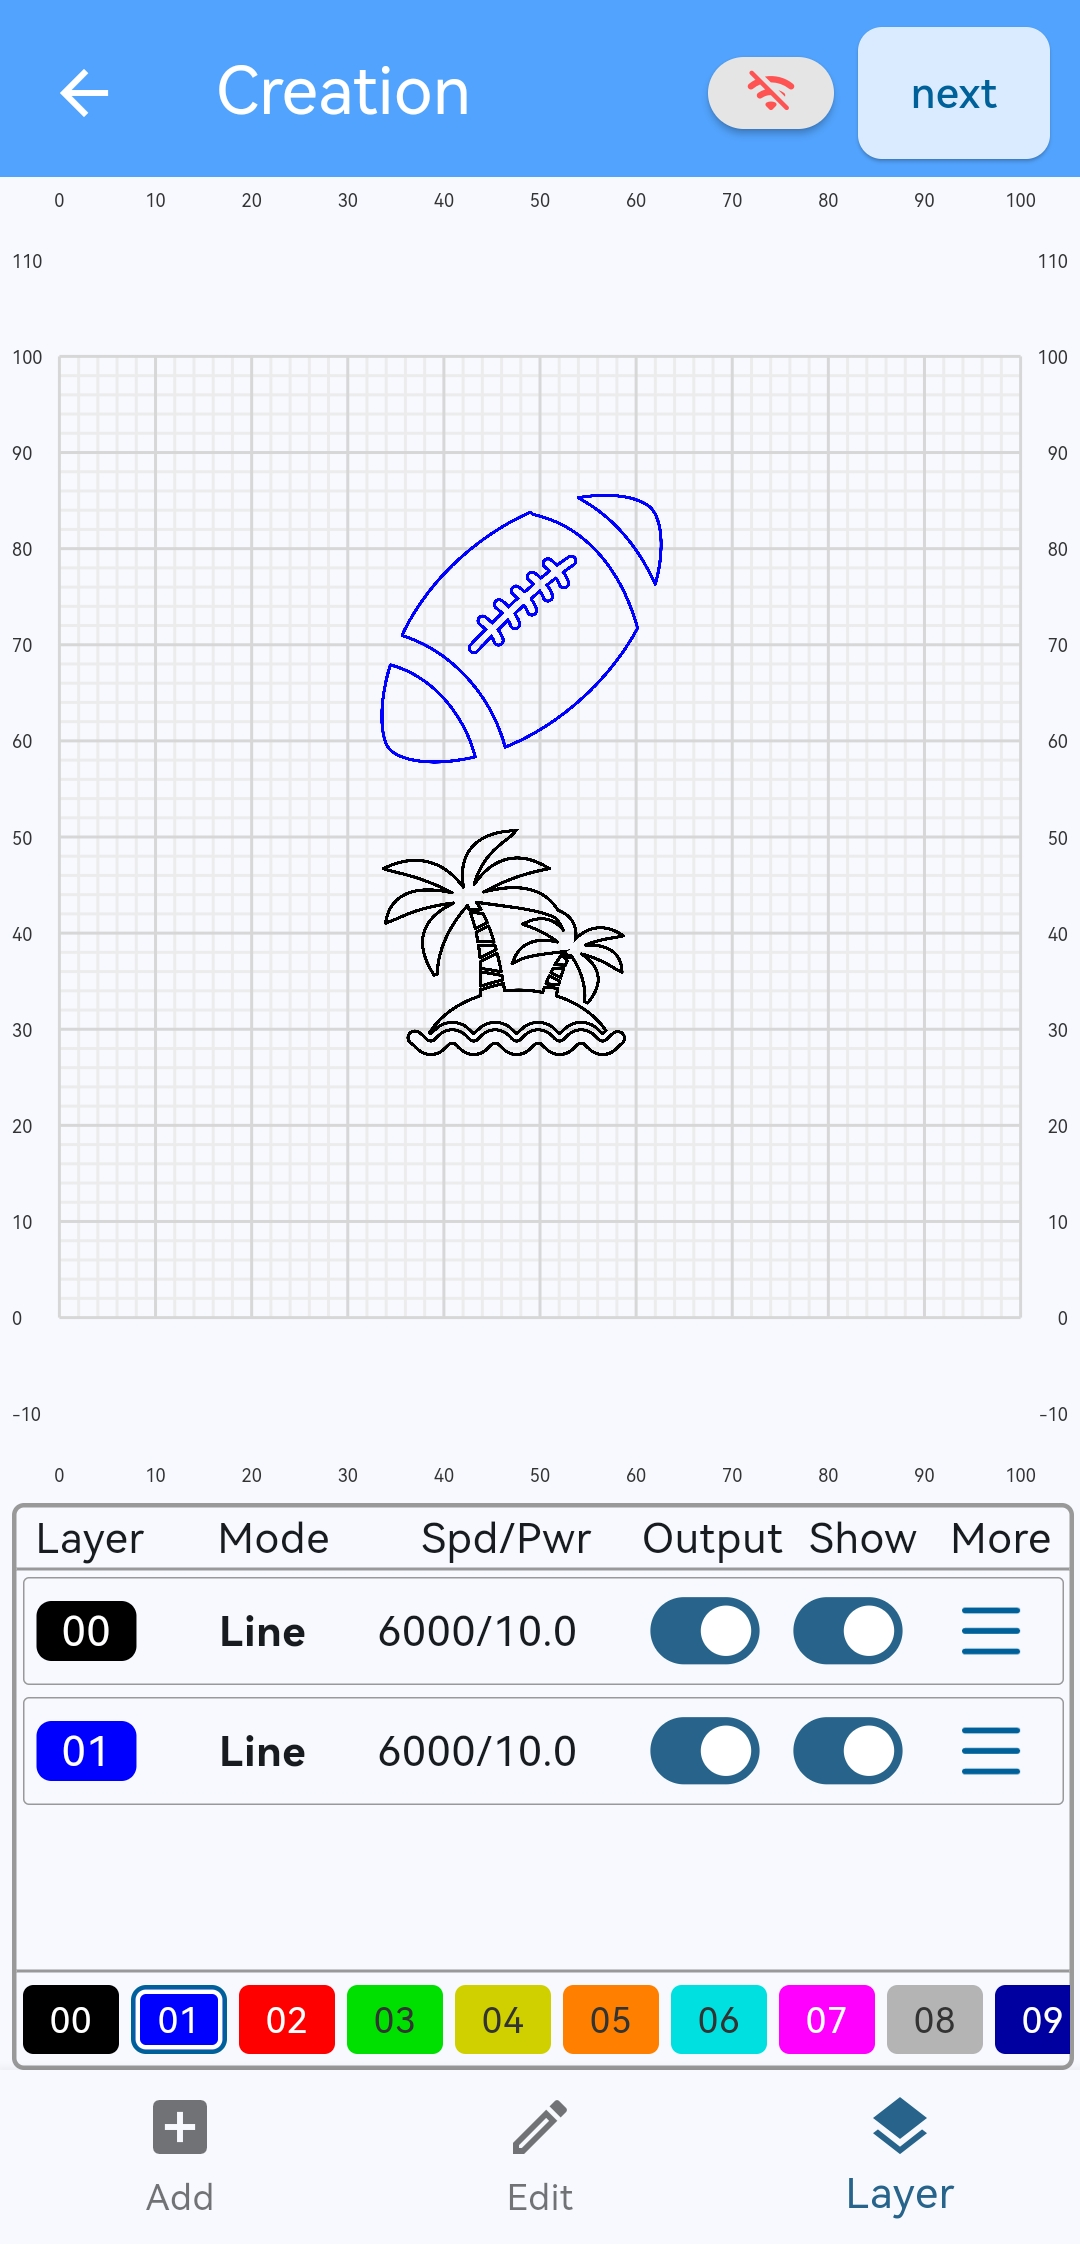
and Color Palette, these colors are used to assign different parameters to the shapes in your design. If a design is selected, clicking a color entry will apply that color to the shapes in your selection. The colors currently in use in your design will also appear as entries in the Cuts / Layers window, where you can choose the operations each color will represent.

Cuts / Layers: The first column shows the name you've assigned to this layer, followed by the color, Mode (Line, Fill, both, or Image), and then the speed and power settings. It also shows the options to enable or disable sending this layer to the laser or displaying it in the workspace. Below the layer list, you can see and change the basic settings for the currently selected layer. Double-clicking an entry in the layer list will bring up a larger Cut Settings Editor with a more complete set of options.
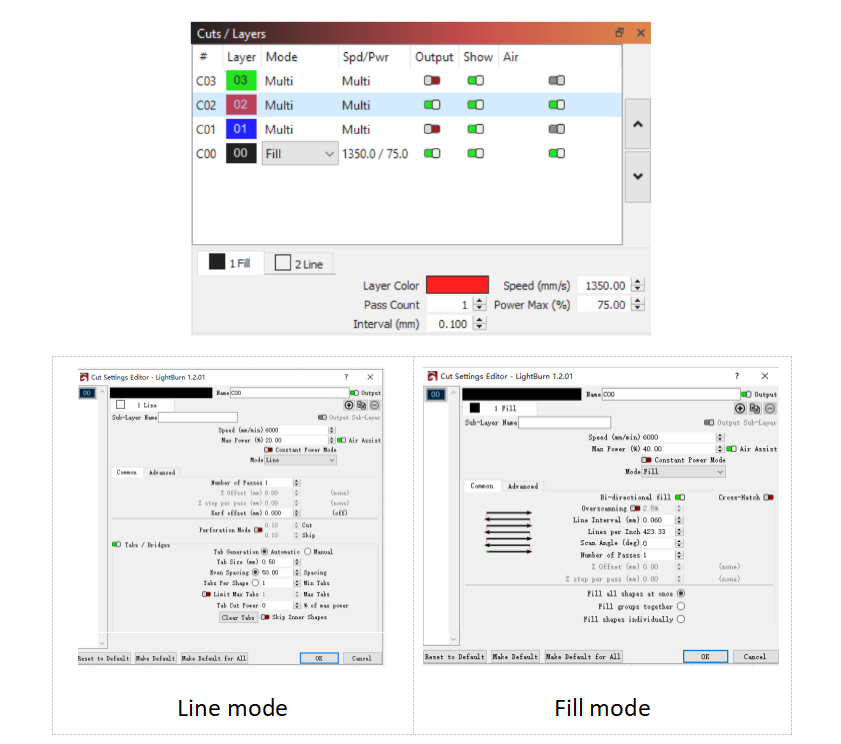
Double-clicking an entry in the layer list will bring up the full Cut Settings window, allowing you to edit all the settings. There are three modes commonly used: Line, Fill, and Image.
In Line mode, the laser follows the exact path of the selected design, tracing the lines with the beam enabled at the set power and speed. If the laser moves quickly or with low power, it will likely etch the surface. If it moves slowly and with high power, it will cut through the material. The difference between surface marking and cutting is primarily in the power and speed settings.
Fill mode allows the laser to scan line by line to fill in the selected shape. This mode fills closed shapes but not open ones.
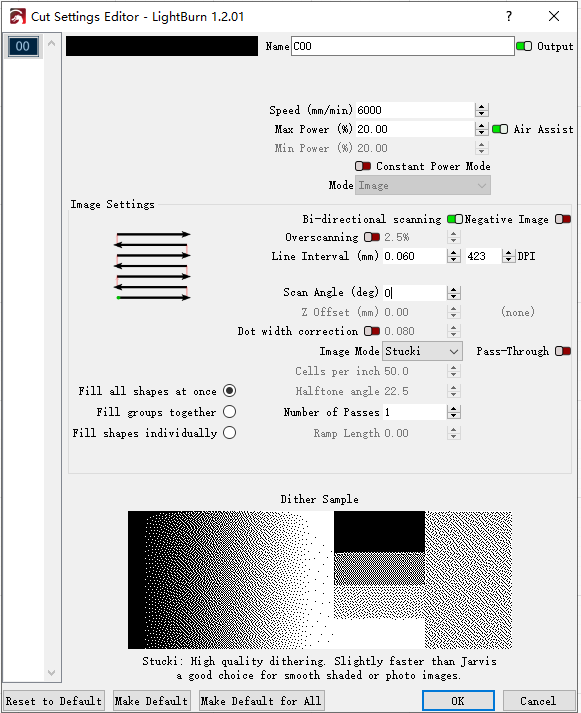
Image mode is specifically for images and controls how LightBurn renders the image data on the laser. There are three commonly chosen image modes: Atkinson, Stucki, and Jarvis.
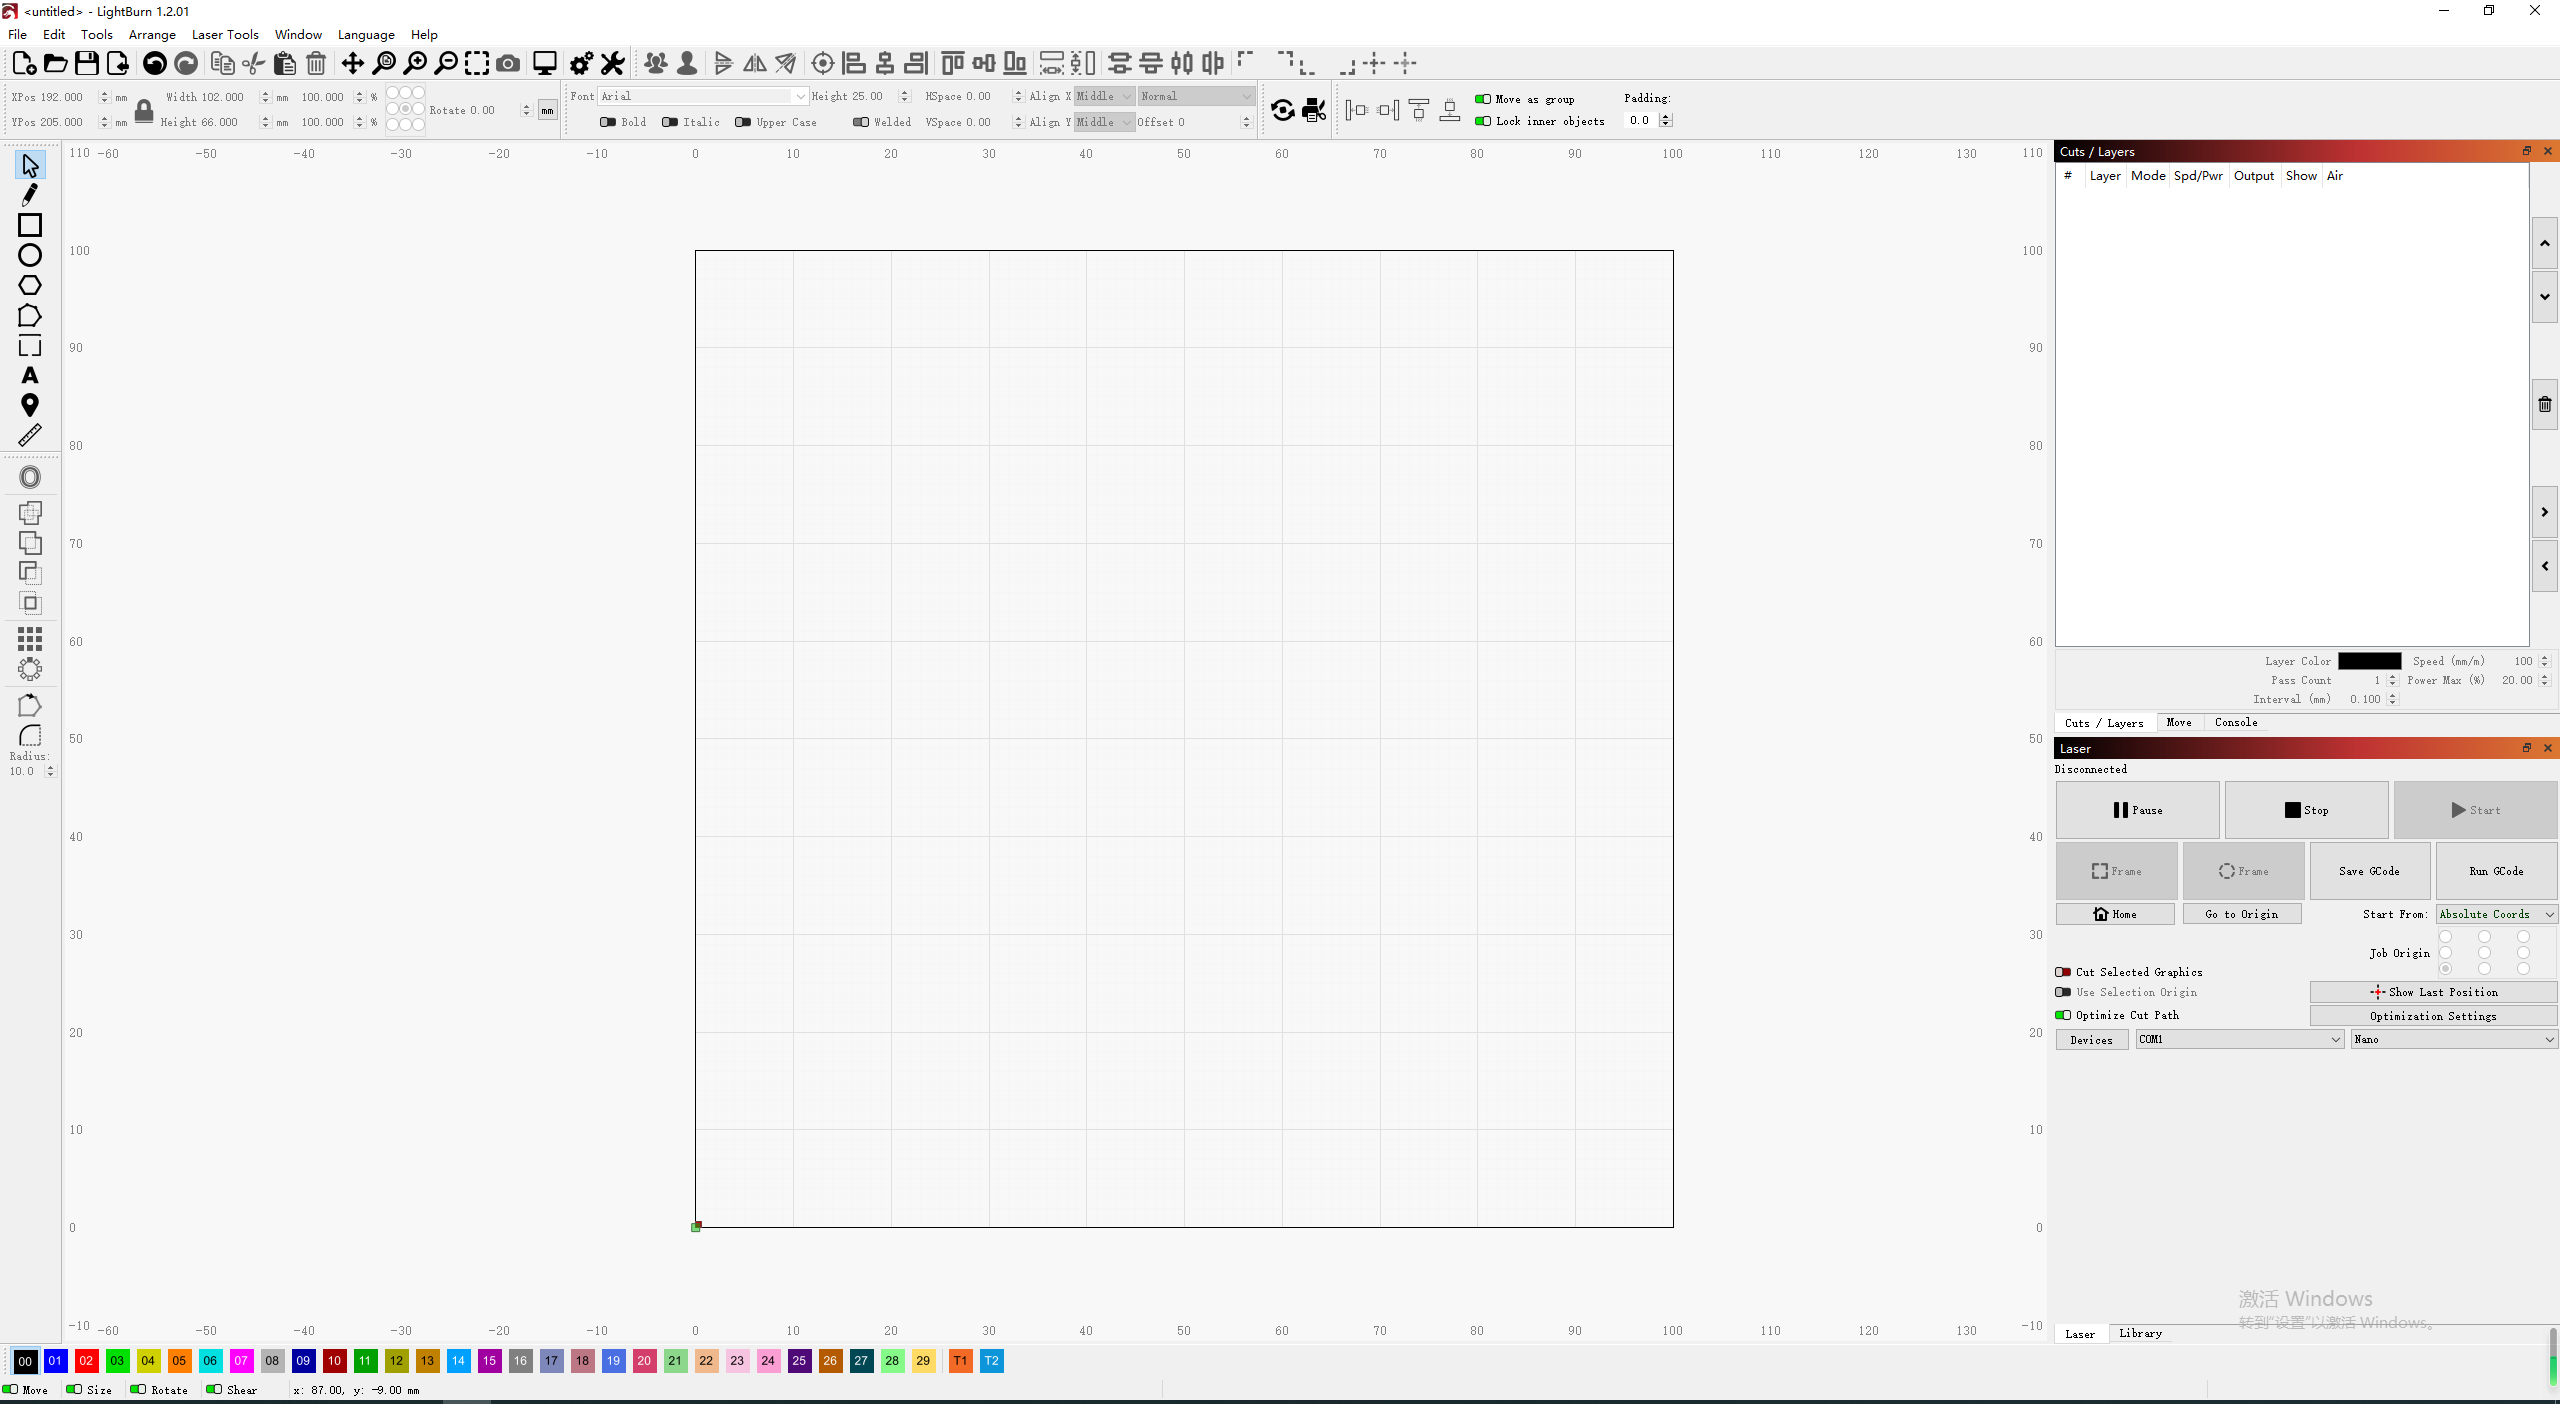
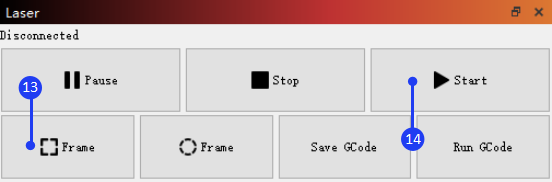
Laser Window: The Laser Window is used to select the active machine, test the framing (the artwork's outer bounds), run and stop the machine, and choose the file processing, order, and artwork positioning within the workspace.
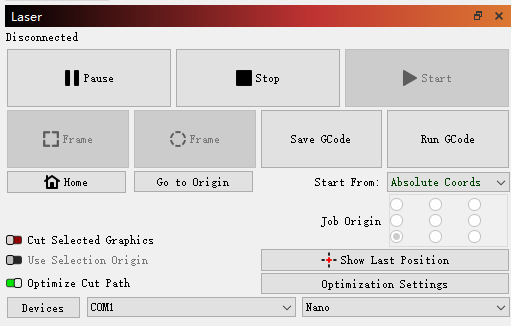
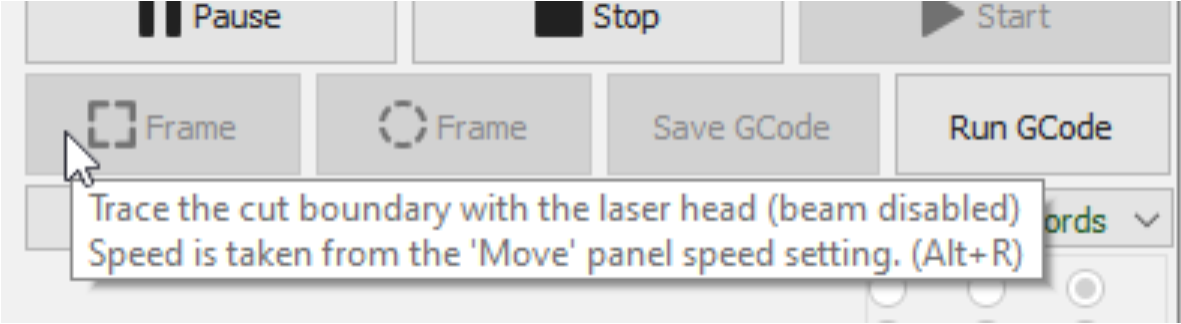
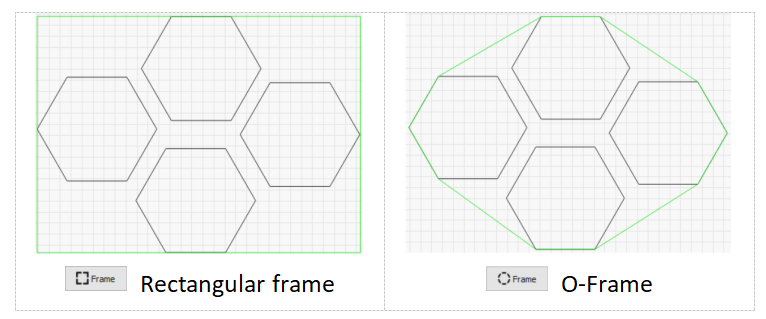
There are two Frame buttons used to preview the position of the job on the laser. The first is a standard rectangular frame, also called a 'Bounding Box'. This is the smallest rectangle that will fully contain the selected shapes. The second is O-Frame button, also known as the ‘Rubber Band Frame,’ which traces a path around the selected design, similar to a rubber band stretched around it. The speed and laser power during framing can be adjusted in the MOVE window. Due to software limitations, the maximum speed during framing is 12,000 mm/min.
These two different frame effects are illustrated in the following figure:
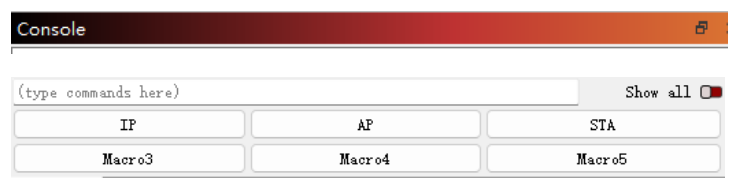
Console Window: The Console window displays messages from the controller and commands sent to it by LightBurn, and some macro commands designed for RAY5 mini engraver. You can also input direct commands to the engraver through this window, such as $$ to display GRBL settings, or $X to unlock the machine if it has been locked due to an alarm or error. The Console window will also display alarm or error messages sent by the laser's controller, indicating any issues with the machine's operation.
5.Create a Project in LightBurn
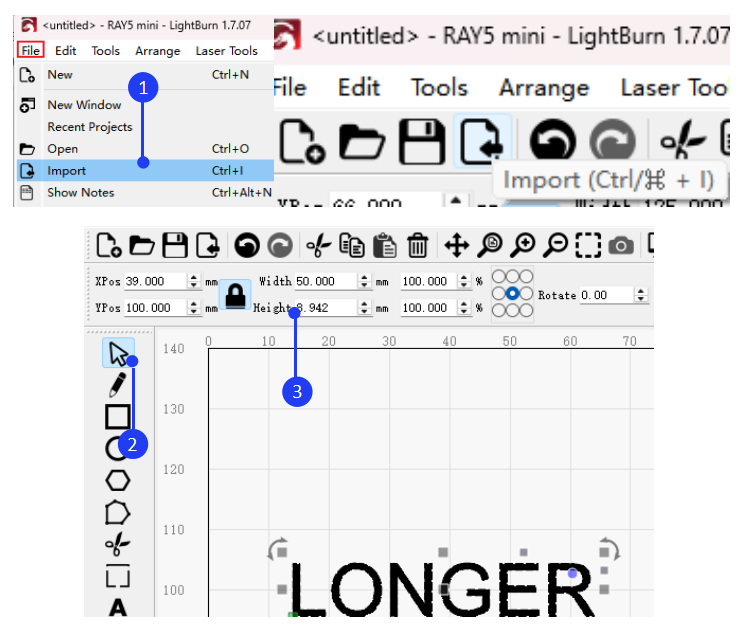
Generally, creating an engraving task involves importing graphics, editing them, setting parameters, previewing, framing, and engraving. For example, to engrave the LONGER LOGO and cut after engraving:
Click File > Import or click  import icon in the Toolbar to add the image to LightBurn. Select the image by clicking
  select icon, then adjust the image width to 50.00mm. The height will automatically adjust in proportion to the width.
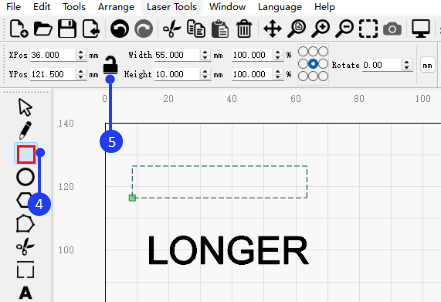
Click  Create rectangle. Then, click
  to unlock and set the rectangle's width to 55.00mm and height to 10.00mm.
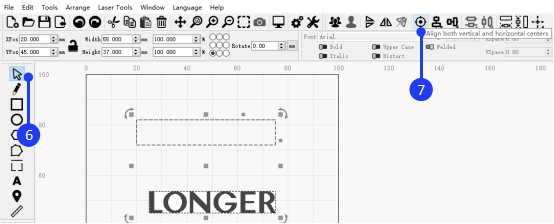
Click  Select button, hold down the Shift key on the keyboard, select both the rectangle and image, and click
  Align Center button on the toolbar to center-align the image and rectangle.
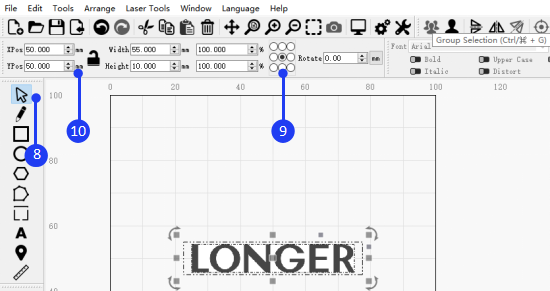
Set the coordinate point to the center of the image and enter the XY position coordinates as 50, 50 to move the design to the center of the working area.
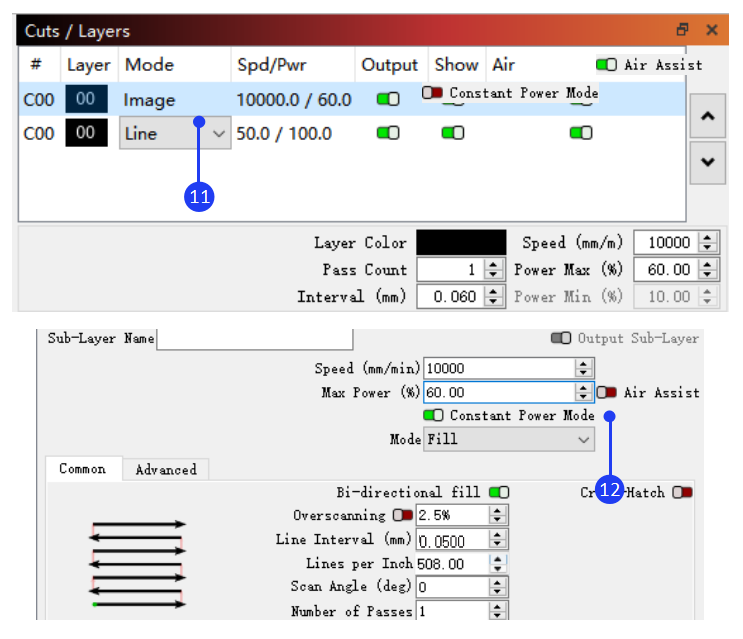
Click on different layers in the Cuts and Layers window to set the corresponding parameters, and disable Constant Power Mode (Please note : For image or fill engraving, the Y interval is 0.05mm The Y interval has two options: 0.05mm for high precision or 0.10mm for high efficiency. ) Adjust the specific parameters according to the actual materials and parameter table. Then, adjust the focus of the RAY5 mini and click Frame button m56.png. to confirm the engraving placement. Finally, click Start !
6.Connect RAY5 mini to LightBurn via Wi-Fi
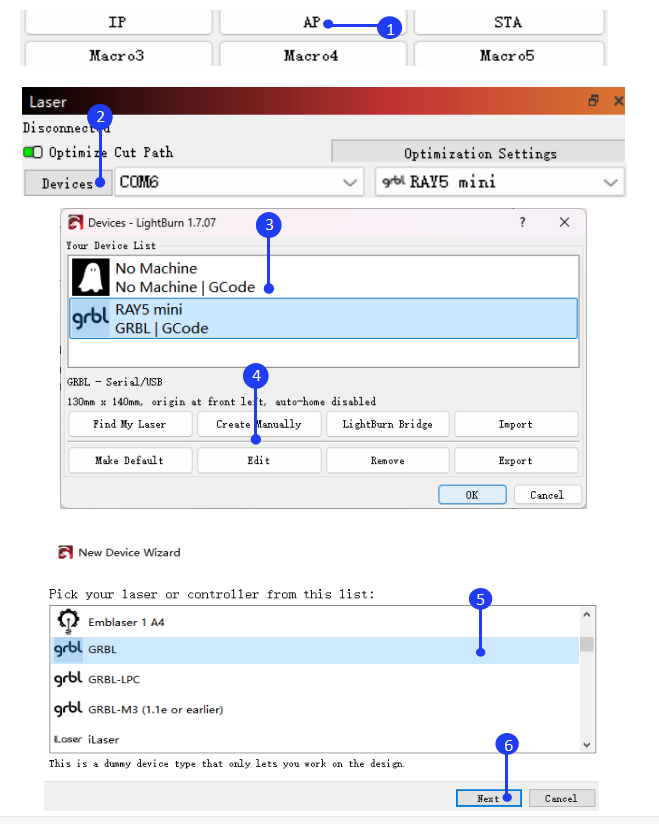
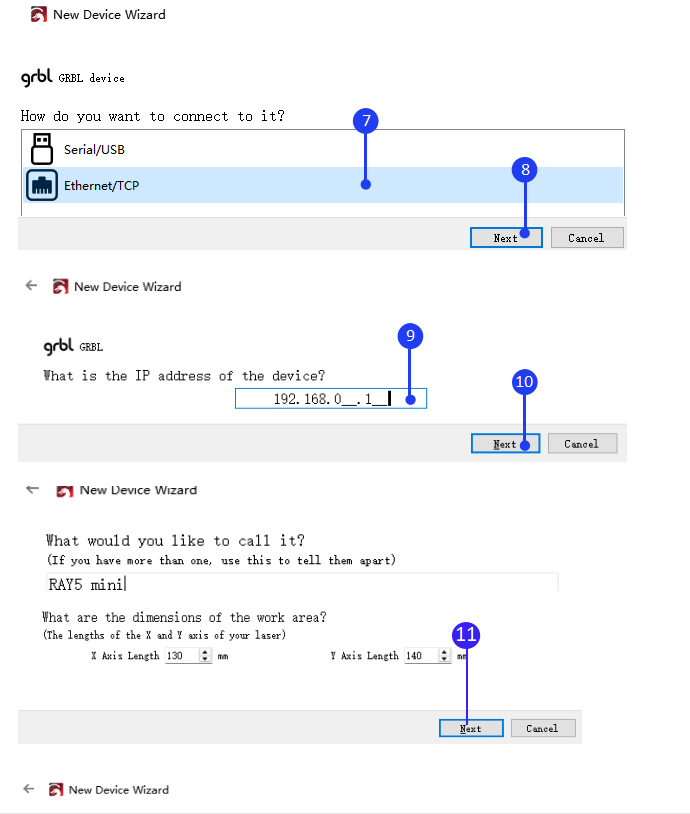
There are two modes available for connecting the RAY5 mini to LightBurn via Wi-Fi: STA mode and AP mode. The main difference is that in AP mode, the computer does not have network access, while in STA mode, the computer can maintain its network connection.
1)Connect RAY5 mini to LightBurn via Wi-Fi in AP Mode
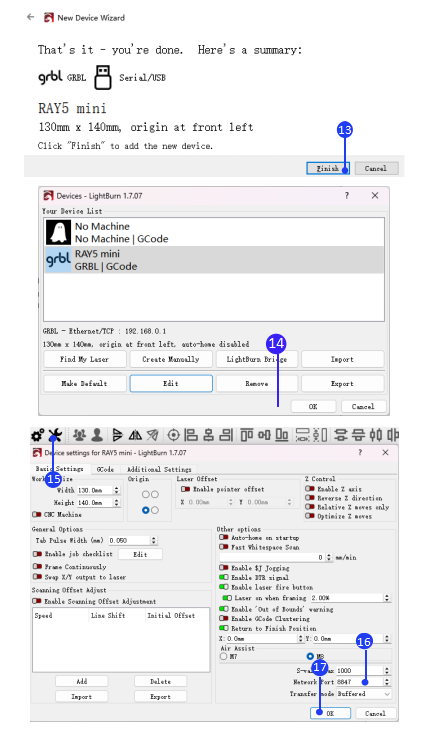
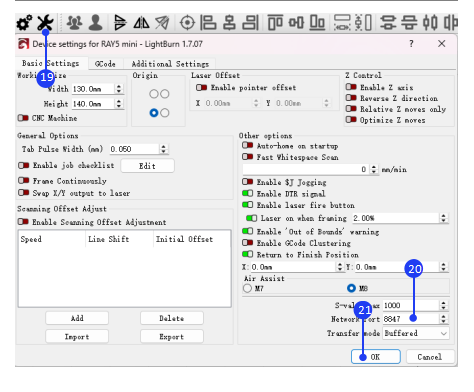
Run LightBurn and connect your PC to RAY5 mini. In the Console window, click ‘AP’ to set the Wi-Fi to AP mode. Next, connect your computer to the Wi-Fi network that starts with LongerLaser_XXXX and enter the password 12345678.In the Laser window, click Devices, select RAY5 mini, then click Edit > GRBL > Next > Ethernet/TCP > Next, then input 192.168.0.1 > Next > Next > Next > Finish > OK. Click Device Settings , enter 8847 in the Network Port field, and click OK
OK.

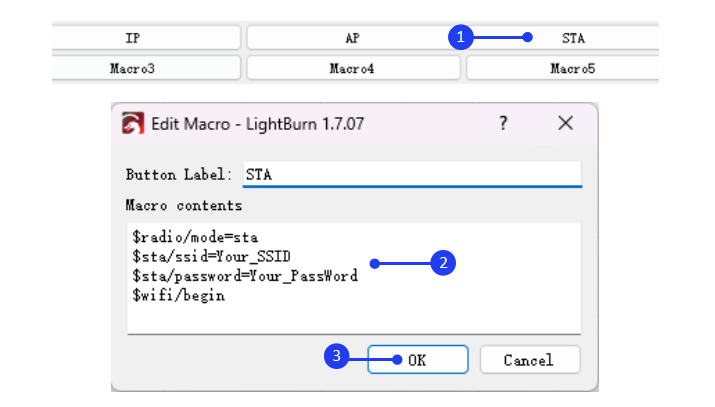
2)Connect RAY5 mini to LightBurn via Wi-Fi in STA Mode
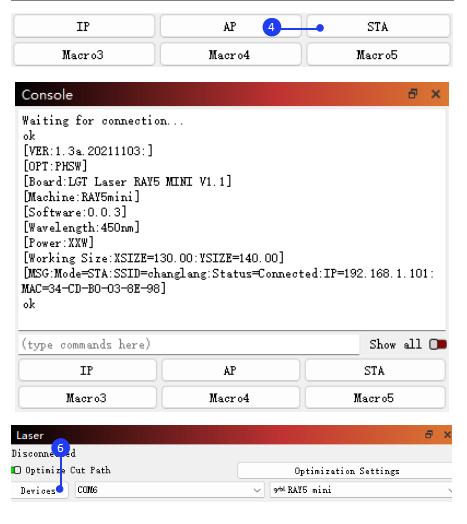
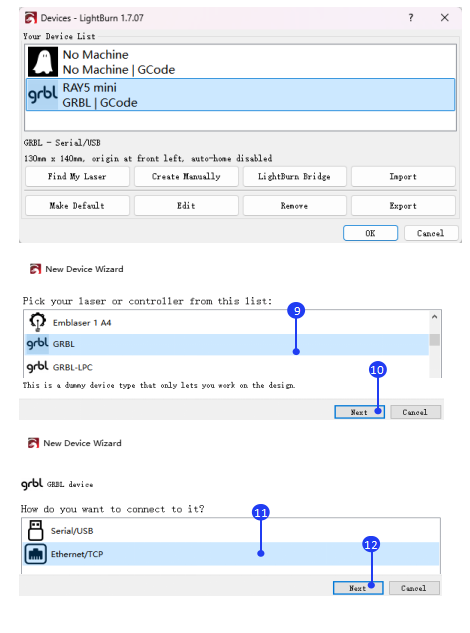
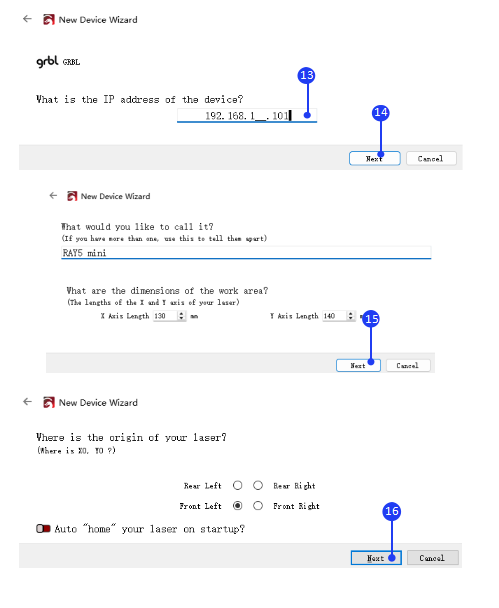
Run LightBurn and connect your PC to the RAY5 mini. In the Console window, right-click ‘STA’ to set the Wi-Fi information, and change Your_SSID and Your_PassWord to your WIFI account and password in $sta/ssid and $sta/password command. Click OK, then left-click ‘STA’ to switch to STA mode. Once the connection is successful, the console will prompt ‘status = connected’ along with the IP address. Please note that both your computer network and Wi-Fi must be on the same Local Area Network (LAN). In the Laser window, click Devices, select RAY5 mini then click Edit > GRBL > Next > Ethernet/TCP > Next , then input the IP address > Next > Next > Next > Finish > OK. Click Device Settings, enter 8847 in Network Port field, and click OK.
¶ 1.2.4 APP Operation
1.Download and Installation
To download the LaserBurn app for Android, search for "LaserBurn" in Google Play or visit the following link:
https://play.google.com/store/apps/details?id=com.longer.longerlaser&hl=en_US
For iOS devices, search for "LaserBurn" in the Apple App Store or visit the following link:
https://apps.apple.com/us/app/laserburn/id6451089363
Alternatively, you can download the app from LONGER’s official website:
https://www.longer3d.com/pages/longer-app
You can also scan the QR code to download the app:

For complex grayscale engraving, it is recommended to transfer the image to your mobile phone’s album and then import it into the app for engraving, as this method tends to produce better results.
2.Connect to Wi-Fi in AP mode
Note: There are two modes, AP and STA, for connecting the RAY5 mini via Wi-Fi. The key difference is that in AP mode, the phone will lose internet access, while in STA mode, it can stay connected to the network.
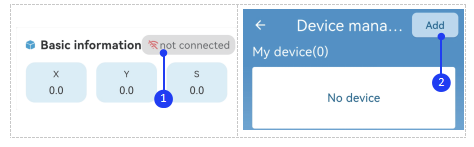
1)Run the LaserBurn app and go to the Home page. Click the not connected icon! . When prompted with ‘Allow LaserBurn to access this device?’, select ALLOW ONLY WHILE IN USE to ensure the app can search for the RAY5 mini's Wi-Fi network.
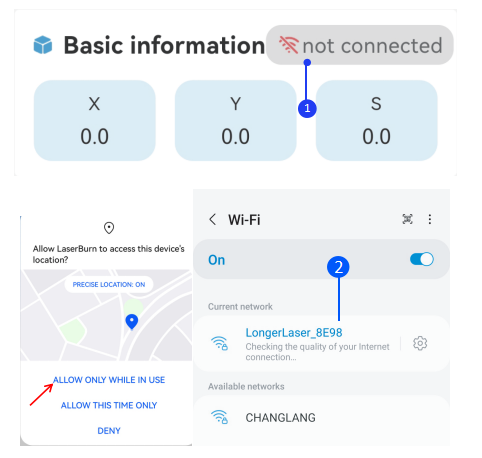
Open your phone’s WLAN settings, search for the Wi-Fi network starting with LongerLaser_XXXX and connect using the password 12345678 . Then, enter the IP address 192.168.0.1 , click Connect, and wait for the "connection succeeded" confirmation message.
3.Connect to Wi-Fi in STA mode
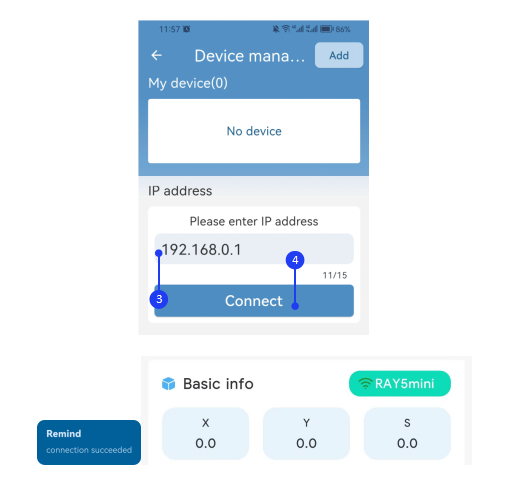
1)Open your phone’s WLAN settings. Run the LaserBurn app, go to the Home page, and click the not connected icon , to enter the network configuration page. Click Add in the upper right corner.
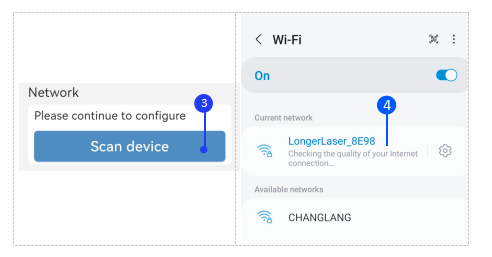
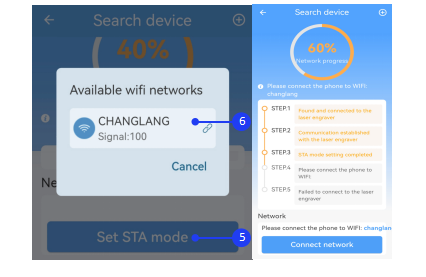
3)Once connected, return to LaserBurn and select Set STA mode to connect the RAY5 mini to a router (supports 2.4G only). Enter the router’s password. The indicator light on the front of the RAY5 mini will turn orange (breathing light) while connecting and switch to green if the connection is successful. If the connection fails, the indicator will remain orange, and you will need to restart the process from step 1).
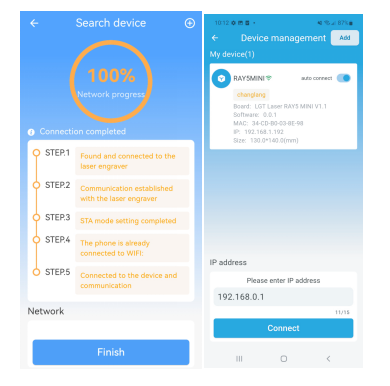
4)Return to LaserBurn, click Connect network at the bottom of the page, and ensure your phone is connected to the same Wi-Fi network as set in STA mode. Wait for network configuration to complete. When the connection is successful and the progress reaches 100%, click FINISH to return to the device list.
Note: Once the device is connected, clicking anywhere on the device list will disconnect it. Conversely, clicking when disconnected will automatically reconnect your phone to the device.
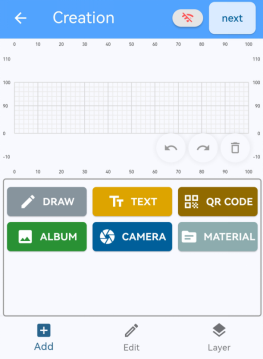
4.Creation
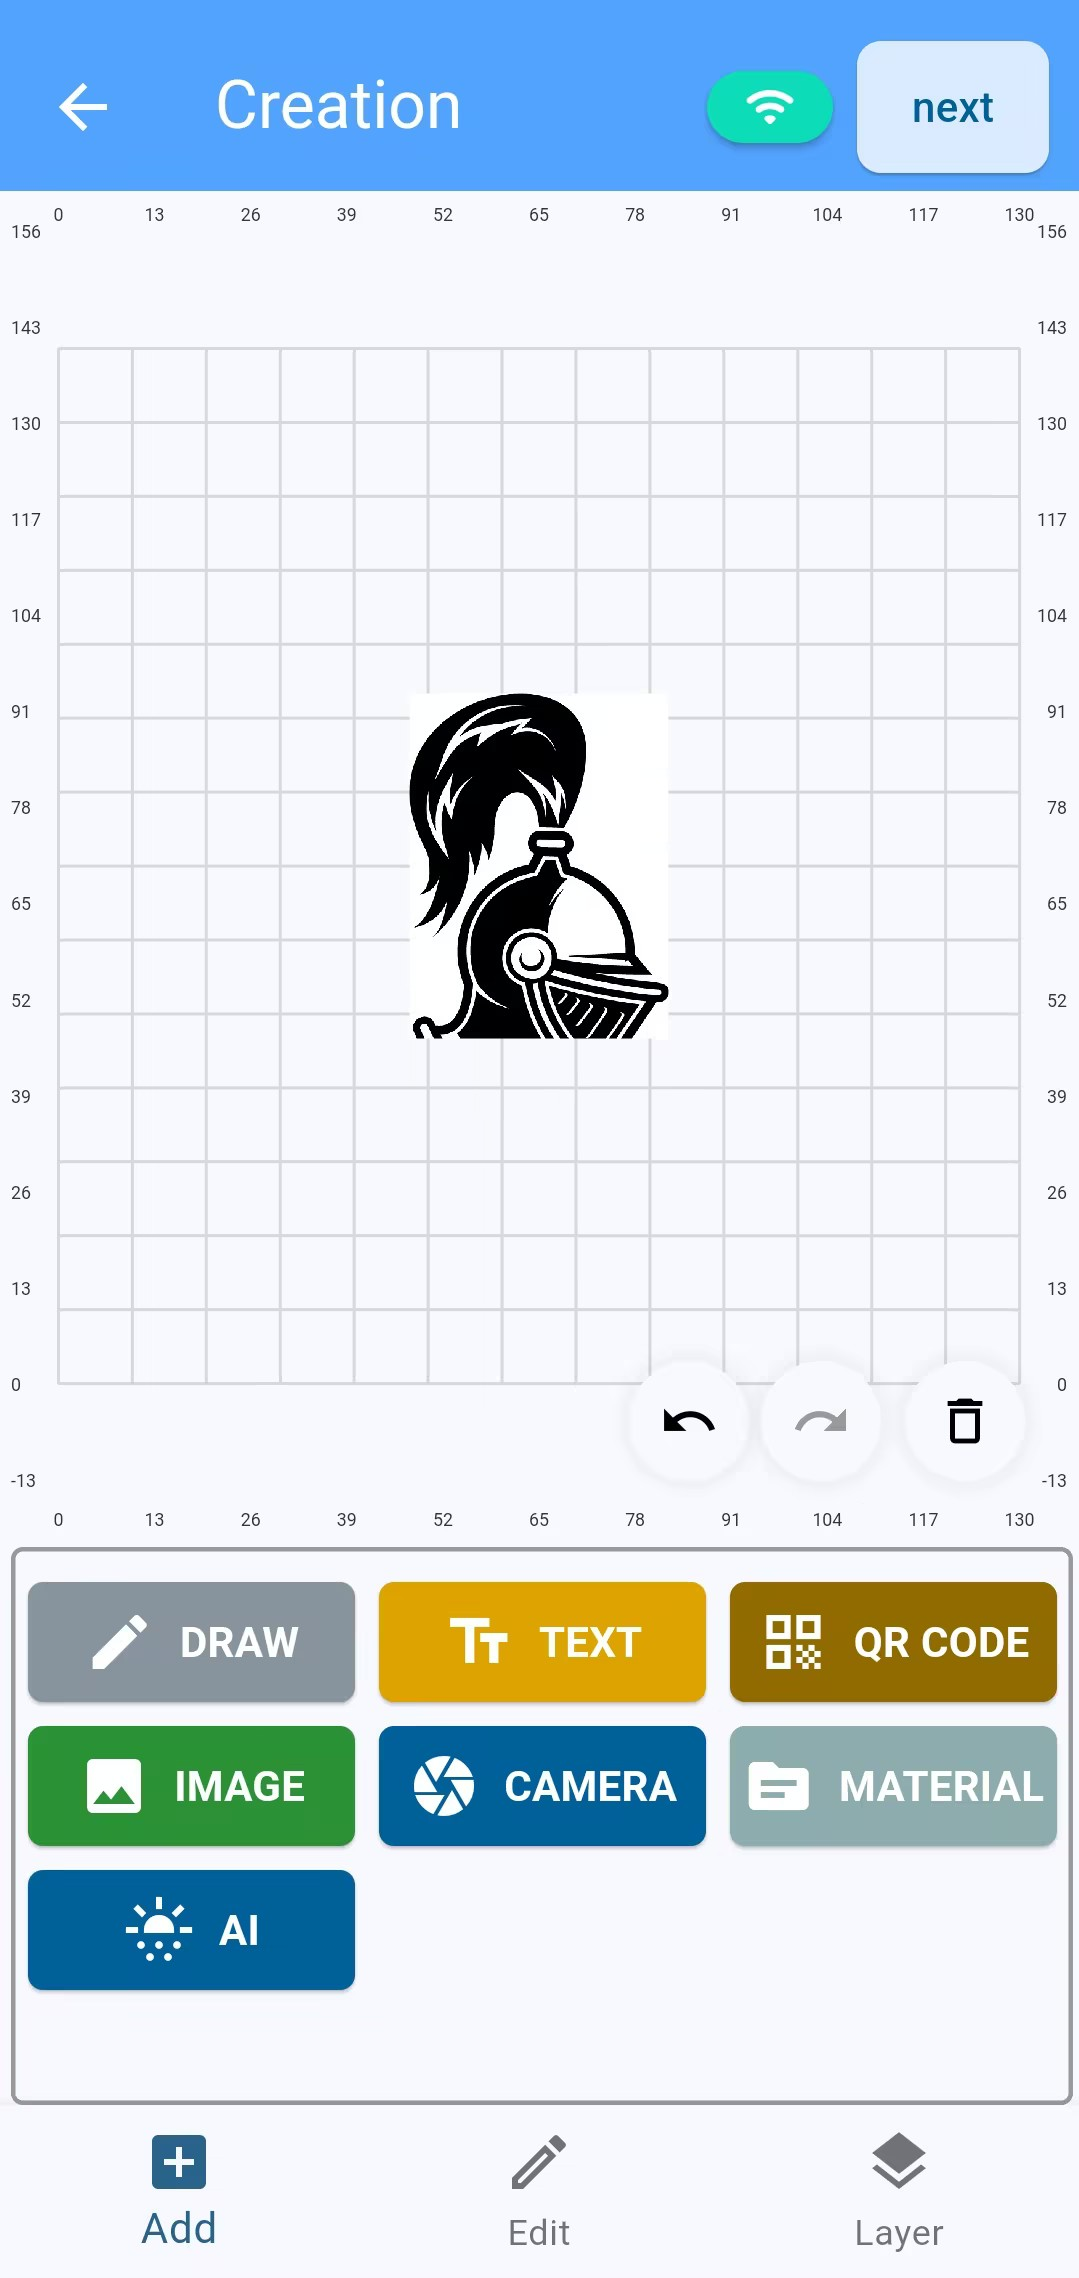
In the creation interface, you can import graphics through various methods, including drawing, text, QR codes, photo albums, cameras, material library, etc.
1)Draw
Draw simple images, such as circles, rectangles, triangles, etc.
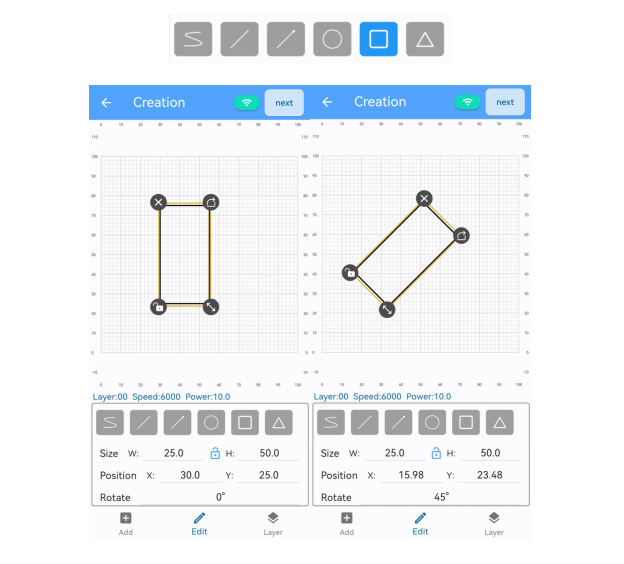
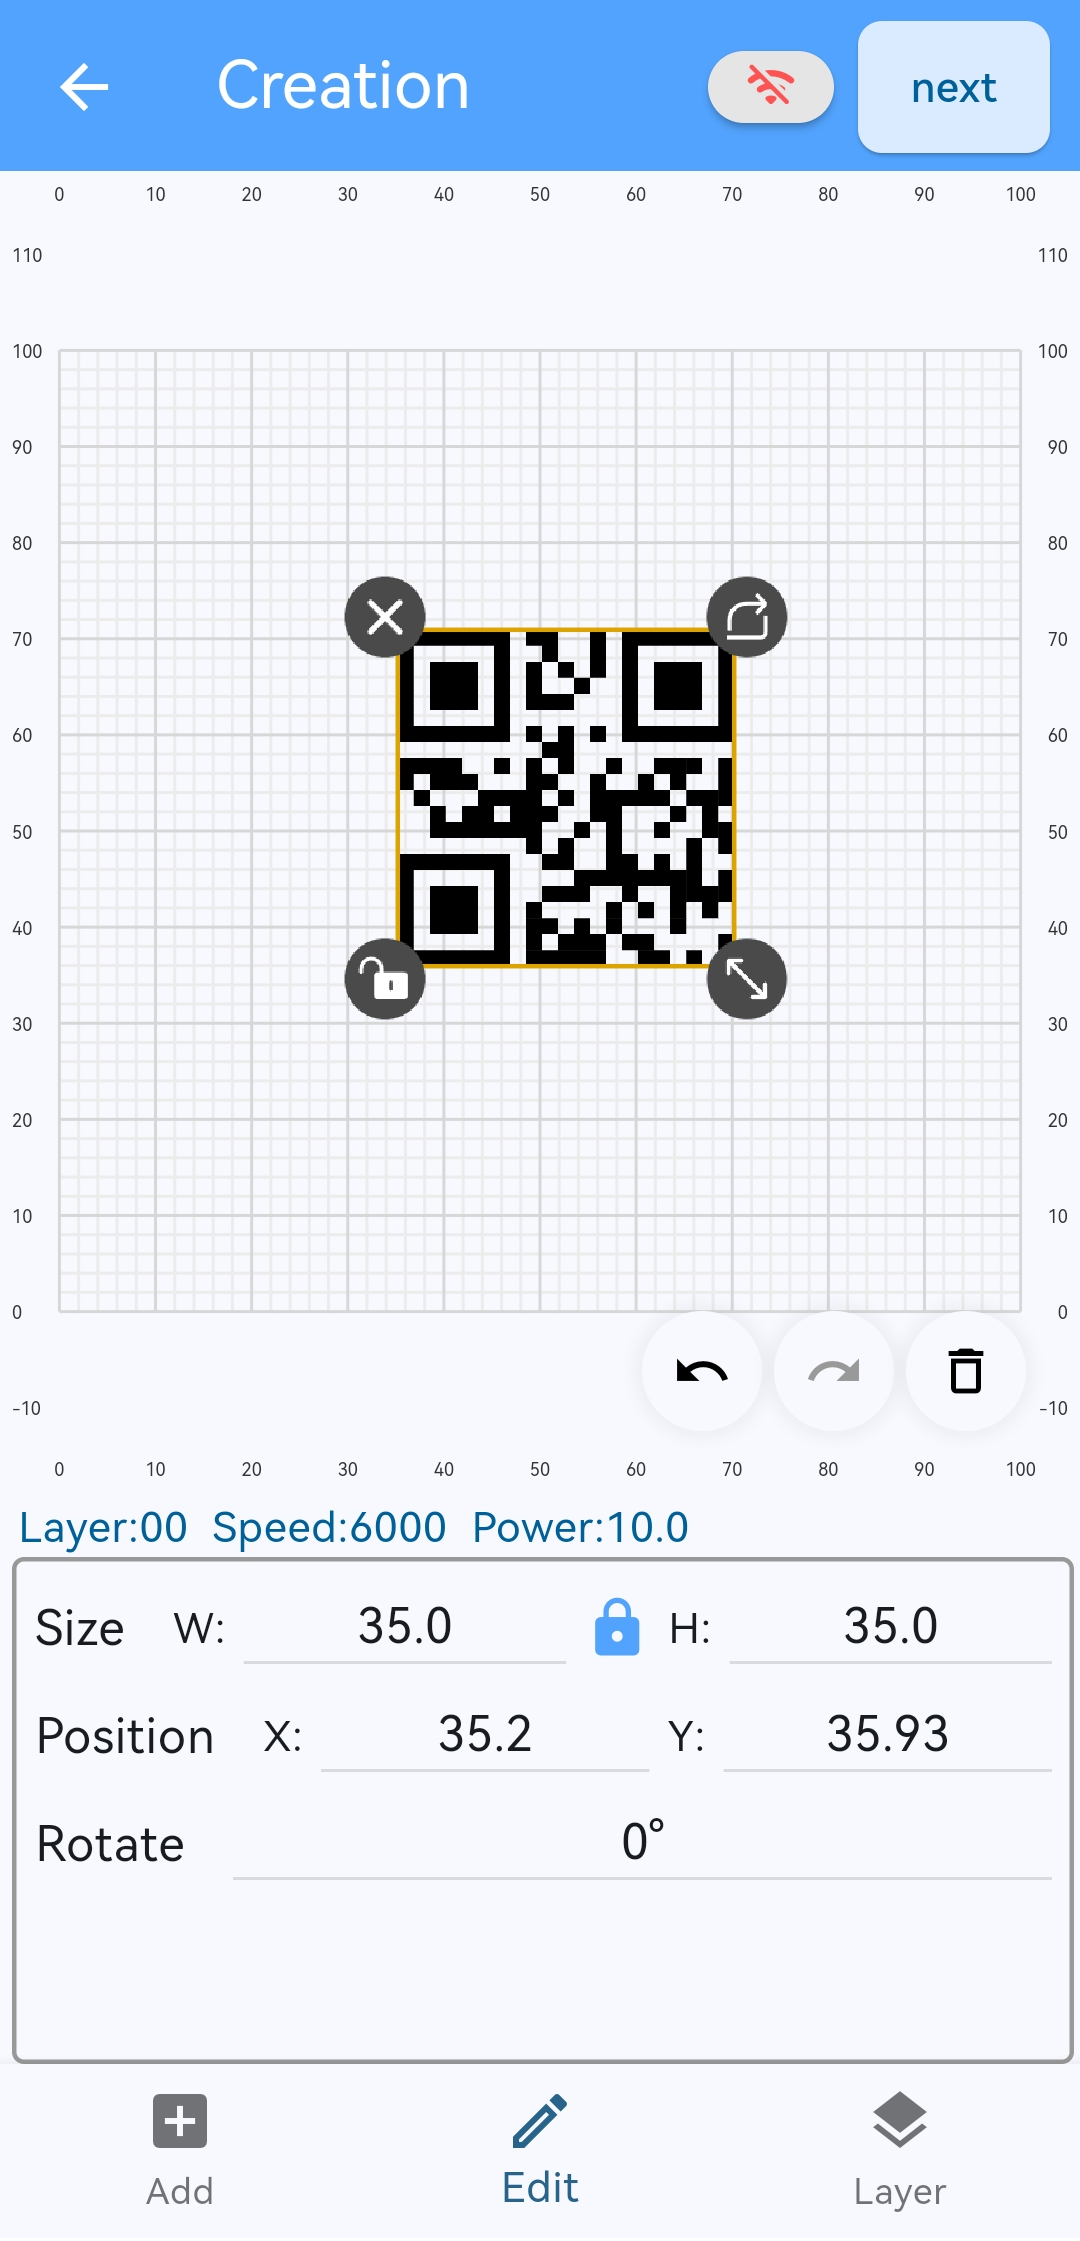
Enter a value in Size to scale the graphic proportionally or hold down the button to drag. If you need to adjust the length and width separately, click the button to unlock the proportional lock. Enter a value in Position to change the Graphic’s position, or select and move it within the canvas by dragging. Enter a value in Rotate to rotate the graphic counterclockwise to the corresponding angle, or hold down the button to rotate it freely. If you click the button , the size, position or angle of graphic can only be changed by entering a value. Clicking the button will delete the graphics.
2)Text
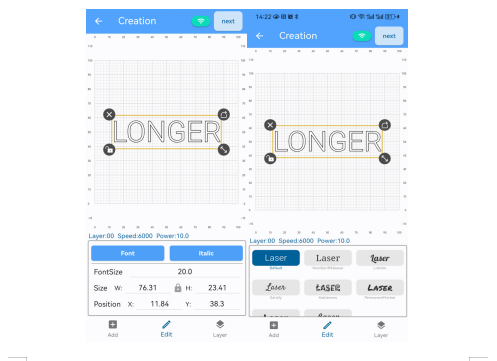
Enter text and adjust the font, text size, position and angle.
3)QR code
Generate a QR code based on the input content and adjust its size, position, or angle.
4)Layer
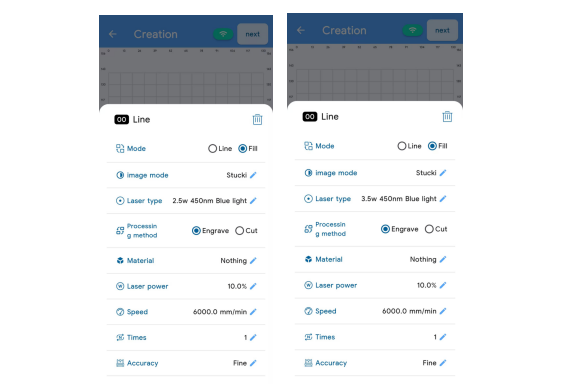
Layer mode: Set line or fill
Laser type: Choose from 2.5W or 3.5W 450nm Blue light
Processing method: Engrave or cut
Material: Choose the corresponding material from the material library, and the app will automatically set the appropriate parameters based on the selected processing method and laser power. If adjustments are needed, click the edit button to modify the settings.
Different colored layers allow you to set specific parameters for your design, enabling you to engrave or cut multiple files simultaneously. You can customize parameters such as layer mode, laser type, processing method, material, laser power, speed, number of passes, and accuracy. Up to 11 parameters can be set in the app. To set the parameters, select the design, click Layer, and choose the corresponding colored layer.
5)Album
Import pictures from your mobile phone album.
6)Camera
Use your phone’s camera to take pictures and import them into the app.
7)Undo
Undo the last operation The app supports up to 20 steps of undo.
8)Redo
Redo the last undone operation. The app supports up to 20 steps of redo.
9)Clear
Clear all graphics from the canvas.
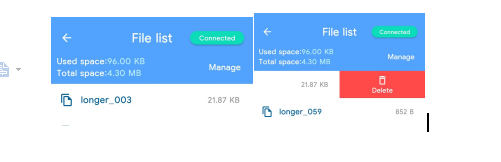
5.Files
When connected to the engraving machine, you can preview the files uploaded to the RAY5 mini. To delete a file, select it from the list and slide it to the left. When the available memory is nearly full, please delete unnecessary files to ensure new files can be uploaded.
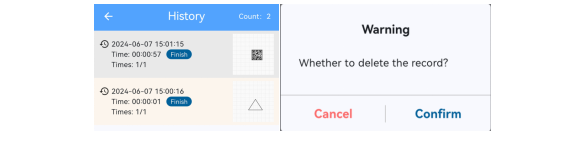
6.History
The History section displays a list of graphics from previous operations on the app. To delete unwanted images, simply long-press a file in the list.
7.Material
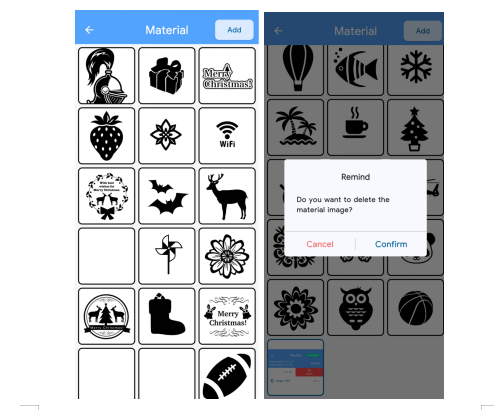
The Material section is the graphic library within the app. To add graphics, click the ADD button in the upper right corner to import from your phone's album or memory. You can delete self-imported images by long-pressing them, but built-in images cannot be deleted.
8.Create a Project in LaserBurn APP
1)Run the LaserBurn app and connect it to the RAY5 mini. Add a graphic, click Edit to set the size and position, then click Layer to adjust the graphic parameters. After setting, click next in the upper right corner.

There are 4 values for accuracy: Ultra Fine, Fine, Fast, and Ultra Fast. The default value is Fine. For more precision, select Ultra Fine. For more efficiency, select Fast or Ultra Fast.
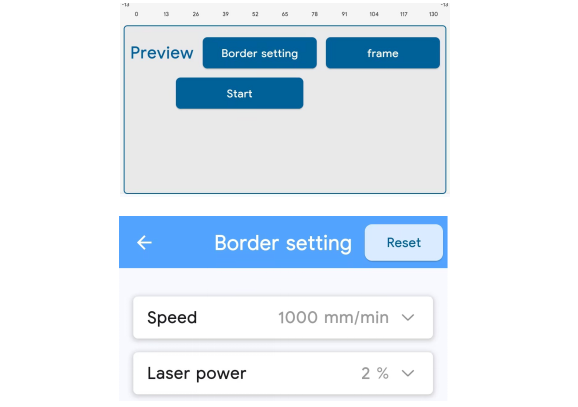
2)Click Border setting to set the speed and patrol power. After setting, click frame to patrol the border. After confirming that the engraving position is correct, click Start to start engraving.
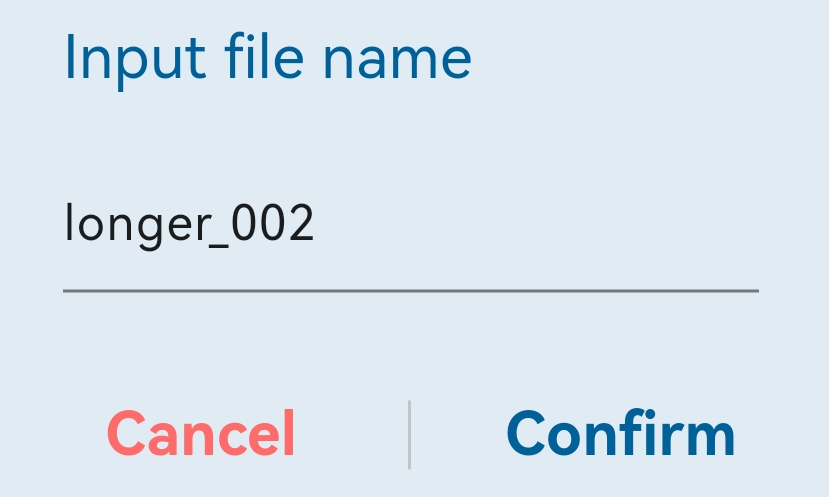
3)Once you’ve confirmed the focus is properly adjusted and goggles are worn, click Confirm to confirm the file name. The file will then upload to the RAY5 mini. After the upload is complete, click Confirm to start the engraving task.
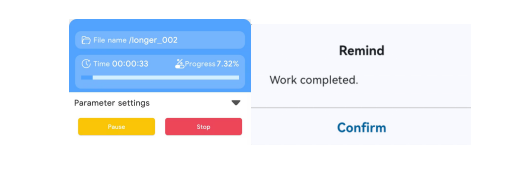
4)The app will display the task progress. You can click Pause to pause the task or click Stop to cancel it. When the task is completed, a 'Work completed' prompt will appear. Click Confirm to return to the Home page.
¶ 1.3 RAY5 mini Material engraving parameters
¶ 2. Laser Engraver Features
In the Laser Engraver Features section, you can find detailed guides related to various features available on the Laser RAY5 mini Laser Engraver.
¶ 2.1 Laser RAY5 mini Touch Screen Instructions
¶ 2.2 Download of network firmware
¶ 2.3 Upgrade firmware
¶ 3. Operation Guide
¶ 4. Troubleshooting & Solutions
In the Troubleshooting & Solutions section, you can find guides related to the RAY5 mini Series where potential issues are listed with solutions on how to solve them.
¶ 4.1 Troubleshooting
¶ 4.1.1 How to fix the problem of laser module
¶ 4.1.2:The engraver automatically home when turned on
¶ 4.1.3 The laser module does not emit laser when framing
¶ 4.1.4 The flame protection or alarm 3 is triggered
¶ 4.1.5 The movement protection is triggered
¶ 4.1.6 Found that the laser skipped some areas during engraving and cutting.
¶ 4.1.7 I cannot open all the information on the TF card.
¶ 4.1.8 LightBurn will continuously send the code 'ad:??', where the question marks represent what seems to be a random number between 35 and 45.LightBurn
¶ 4.1.9 How to connect to Wi-Fi using LightBurn
¶ 4.2 Remote diagnosis
¶ 4.2.1 How to create a new work order?
¶ 4.2.2 How to upload the log files of the engraving machine to the existing work order?
¶ 4.2.3 Export logs
¶ 5. Maintenance Guide
¶ 5.1 Regular Maintenance Recommendation for RAY5
¶ 6. Parts Replacement Guide
¶ 7. download
¶ 7.1 Product Manual
FAQ of RAY5 mini series Laser Engraver
RAY5 mini Material engraving parameters
Ray5 mini user manual
¶ 7.2 Quick Start Guide
¶ 7.3 Firmware
¶ 7.4 Software
CH340 Driver
LaserGRBL
LightBurn