¶ 1. Quick Start
¶ 1.1 Introduction to the RAY5 40W
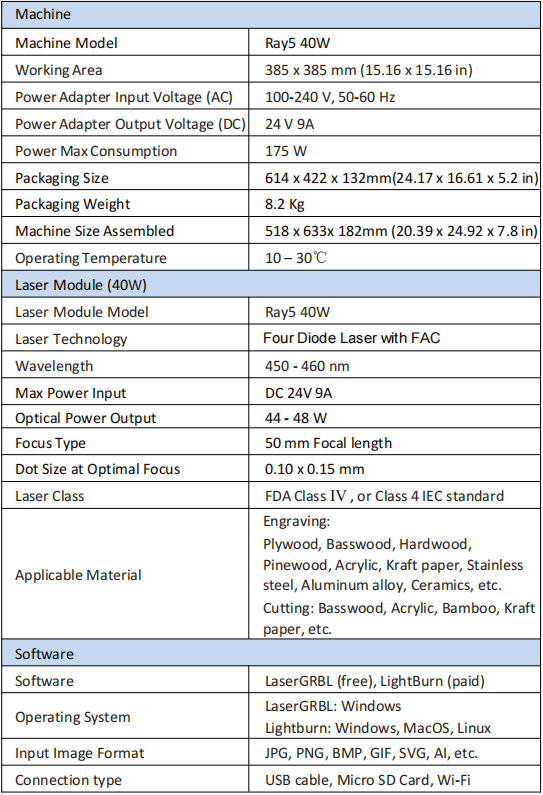
¶ 1.1.1 Product Specification
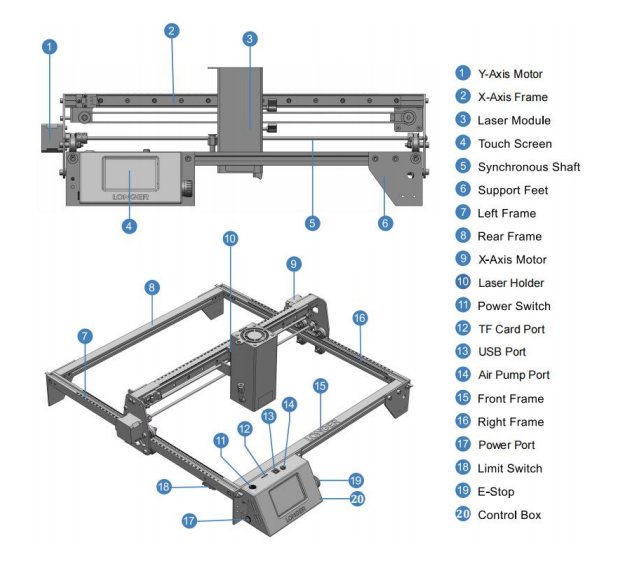
¶ 1.1.2 Introduction to RAY5 40W
¶ 1.1.3 Supplementary instructions for accessories in the box

¶ 1.1.4 Quick Start Guide
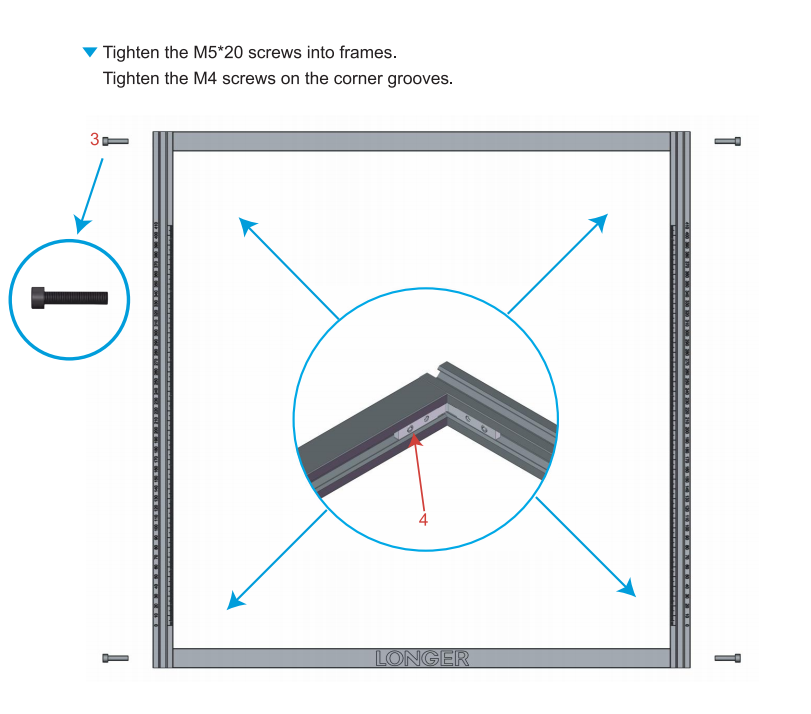
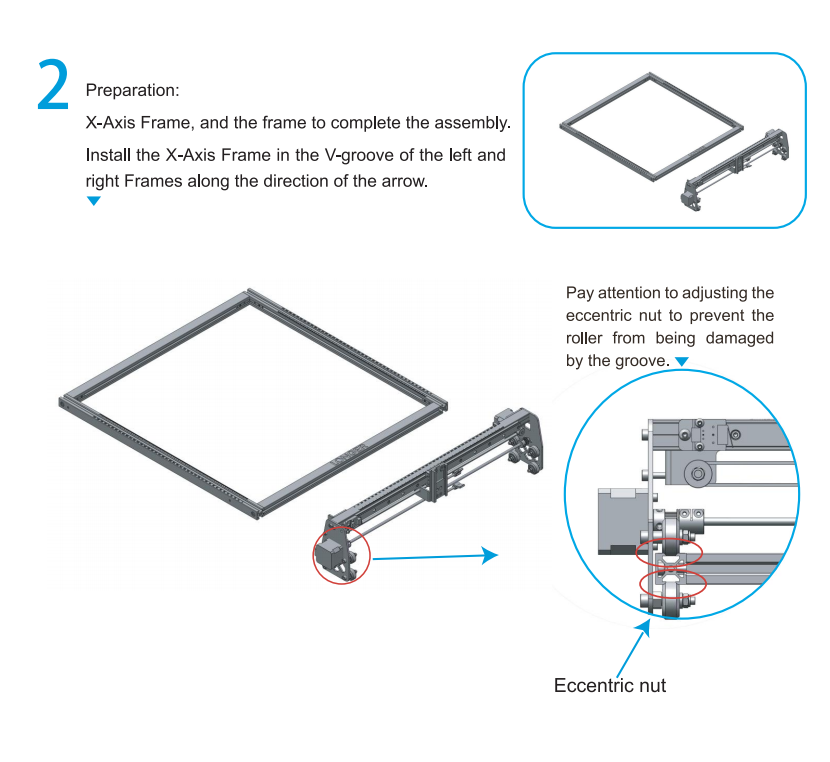
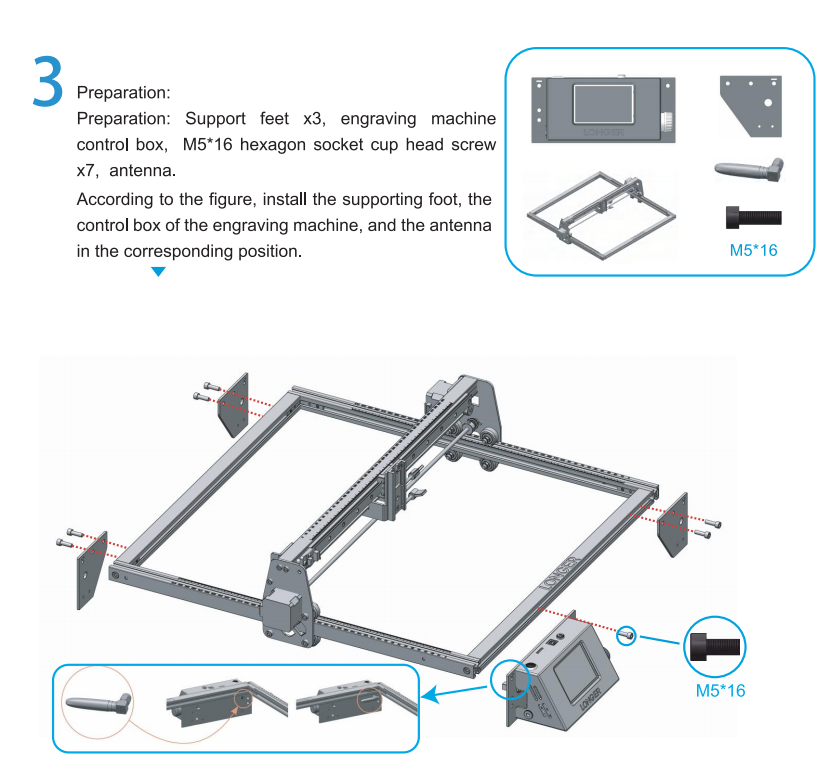
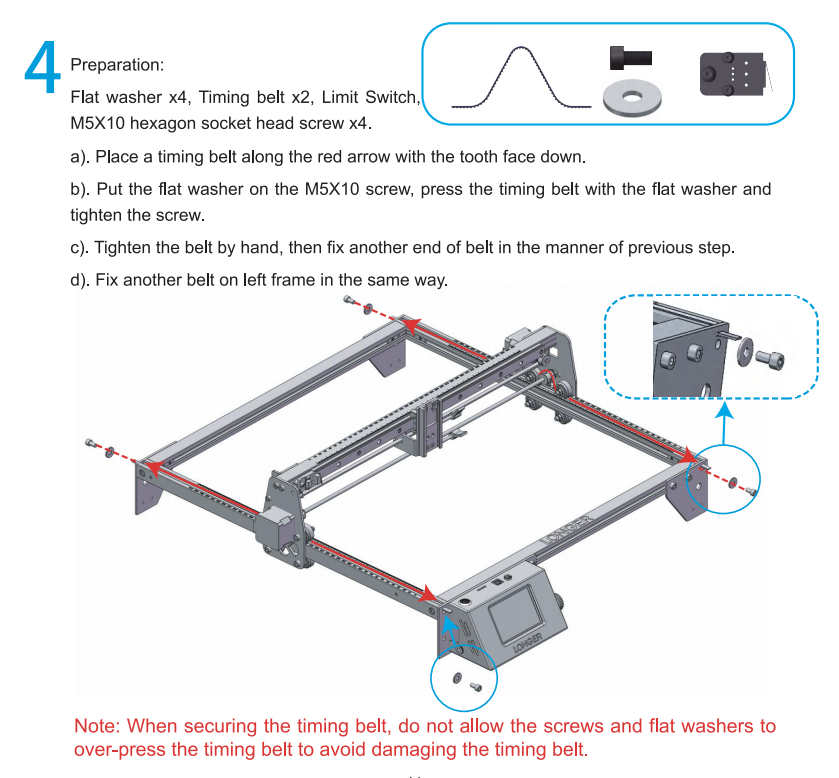
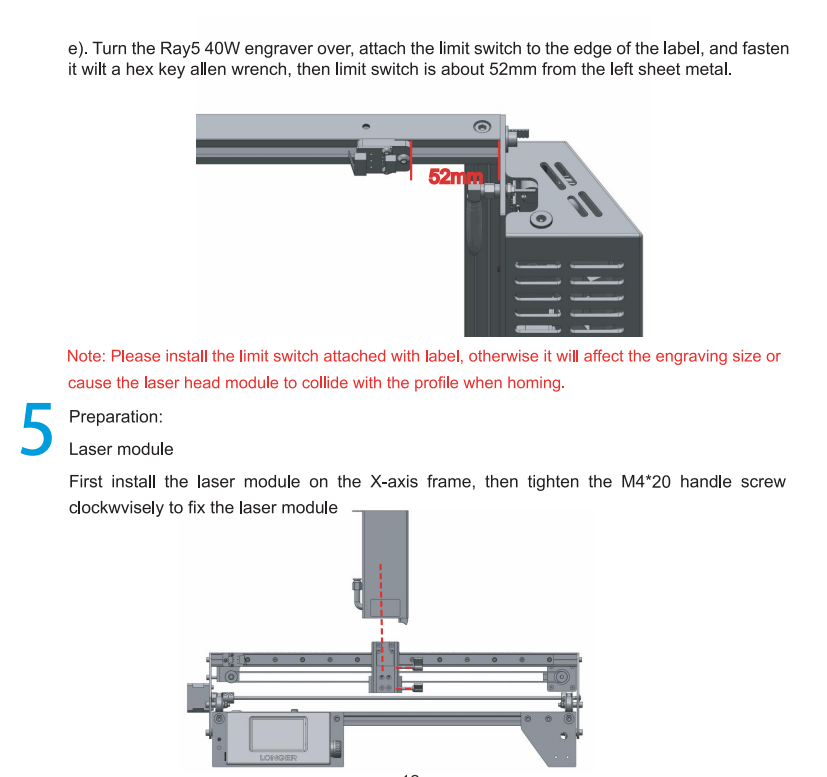
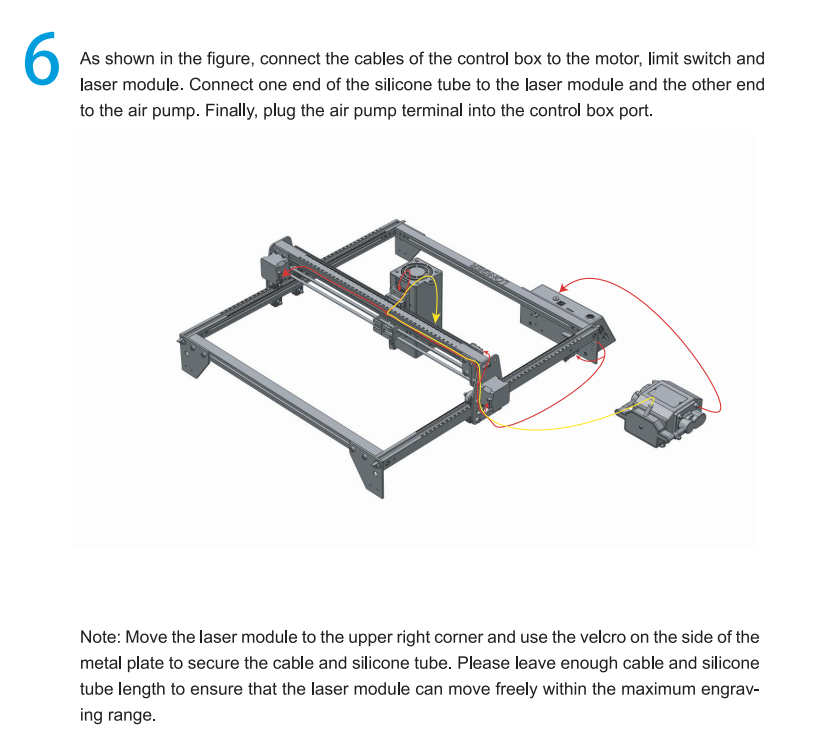
The machine step-by-step assembly process is described in the document “Ray5 40W Quick Start Guide”. Please follow the guide to assemble machine.
• During the machine assembly, if there is any unclear place, please refer to the video “Ray5 40W Quick Start Guide”.
• Each unit of the engraving machine has been inspected and tested. Therefore, in some cases, very small traces may be left on the profile and the metal shell. These will not affect the quality. It is normal that it does not affect normal engraving. Thank you very much for your understanding.
• Be cautious during assembly as some parts may have sharp edges.
• If you have any questions after receiving the product, please contact our customer service first.

¶ 1.1.5 RAY5 40W Series FAQ
Question 1: Are there recommended engraving and cutting parameters?
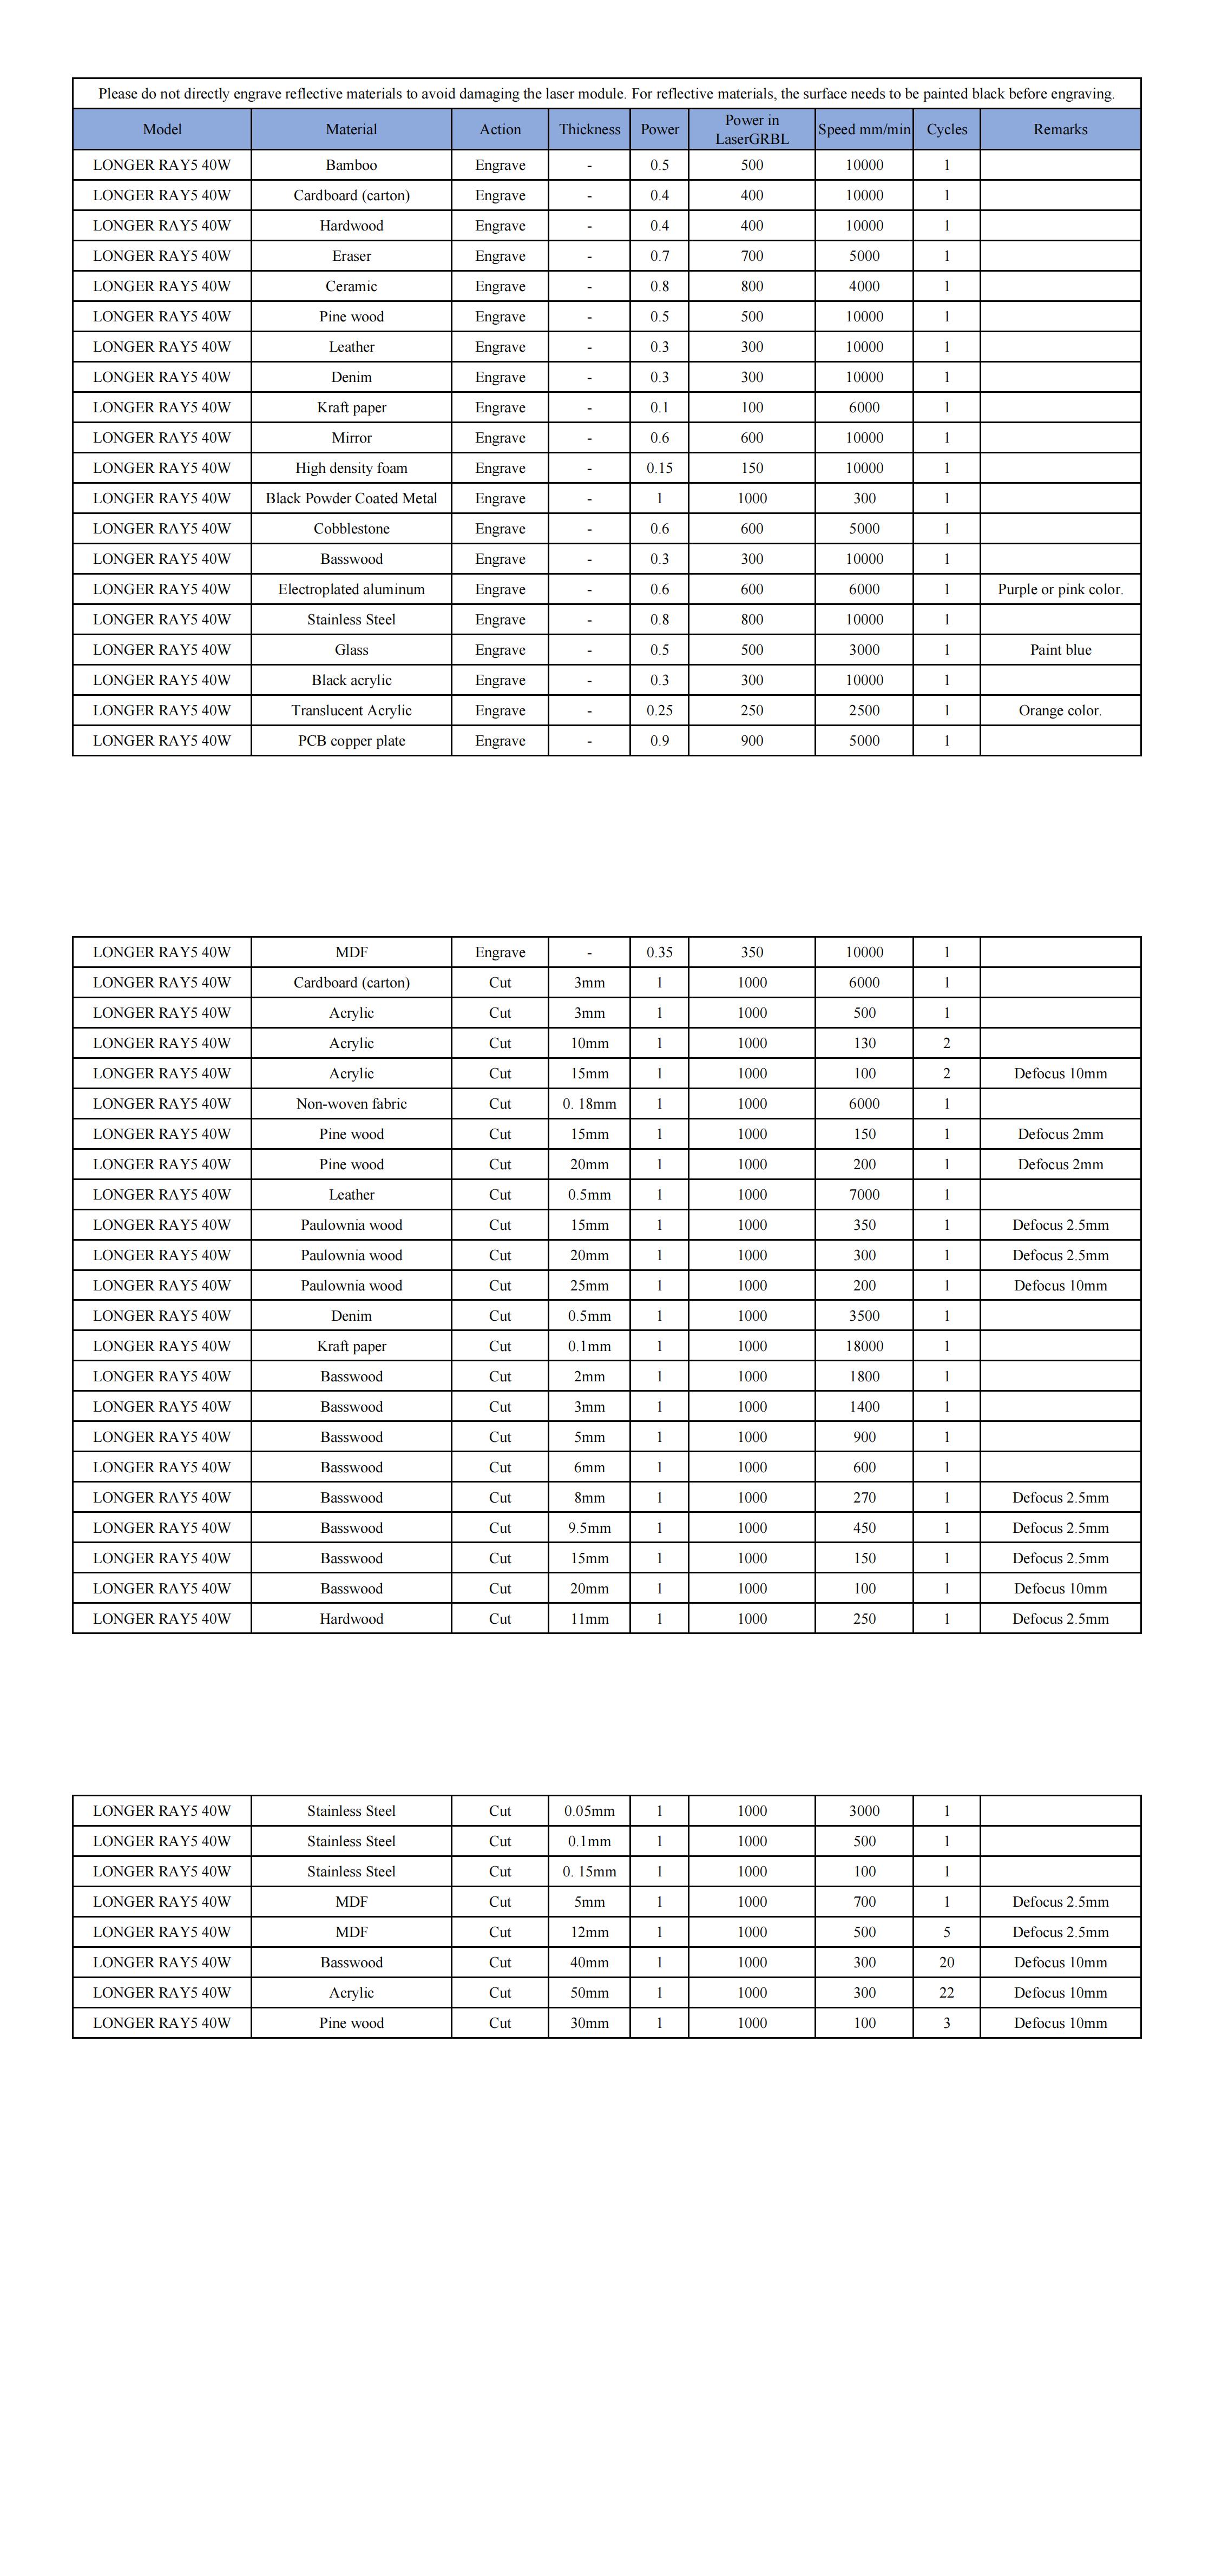
Please refer to the table “LONGER Laser Engraver Material Profiles” which describes the common materials engraving and cutting parameters for Ray5 40W. If there is no information you need. Please wait for our updates in the future.
Question 2: The engraved pattern appears vibration, or is not closed?
· Adjust the eccentric nut to make the parts move smoothly without shaking.
· Re-tension the timing belt.
· Adjust the synchronous wheel to prevent the synchronous belt from rubbing against the side of the synchronous wheel during movement.
Question 3: How about the warranty policy?
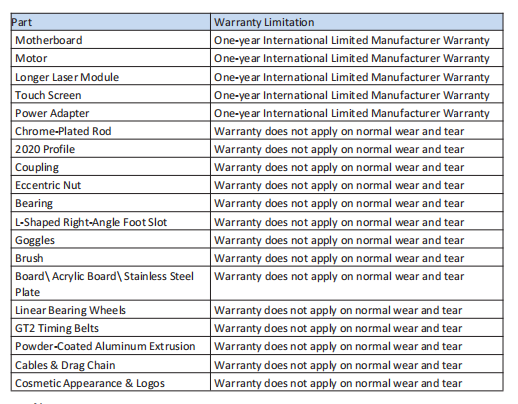
For LONGER official stores and LONGER designated distributors, Ray5 40W has a One-year International Limited Manufacturer warranty from the date of purchase of Ray5 40W.
Please note the following warranty terms. One-year International Limited Manufacturer Warranty means that LONGER will provide the following free warranty services: • Diagnostics and Evaluation. • Technical Support. • Replacement Parts under Warranty terms. How to handle a warranty case: Any warranty case must be submitted to our official support channels (Email: support@longer3d.cn). In case the product was bought from a reseller, contact us first so that we can help you diagnose the problem, then turn to your reseller for spare parts if needed.
Documentation needed for a warranty case:
- Machine purchase order number and channel, nameplate number on the machine.
- A brief description of the problem along with the clear evidence of its presence (e.g., photos or videos).
- On the initial contact for customer support further tests and diagnostic steps might be required to identify the cause of the problem.
- Some parts of the Ray5 40W inevitably “get used up” over time. For these parts, specific conditions apply, unless failure has occurred due to a defect in materials or workmanship
Note:
· The warranty does not cover normal, expected wear and tear caused by using the Ray5 40W for its intended purpose.
· In case we have provided a free replacement part, the warranty does not reset. The original warranty period still applies.
This warranty is voided by:
· Any damages caused by improper assembly of the product.
· Any damage caused by improper use, maintenance, or operation of the engraver.
· Any damage caused by long-term lack of maintenance.
· Using the Ray5 40W in improper conditions (temperature, dustiness...).
· Upgrades, modifications, or add-ons that are not officially supported. Our Technical Support Team is always available to help you out under any circumstances, even if the issue is not covered under warranty
Question 4: How to maintain Ray5 laser module?
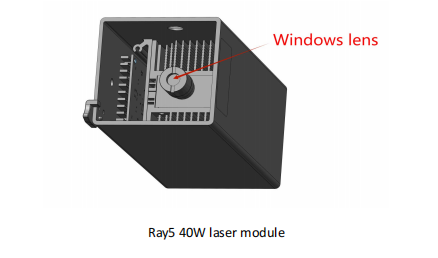
Ray5 40W's lasers are carefully designed to resist stains, but after long-term use, there may still be dust and grease on the laser hood, air guide, and even the lens. This will affect the appearance and performance. It is recommended to clean the laser regularly to keep it in good performance. You need to perform the following steps to clean the laser.
Preparation: hex wrench, non-woven fabric, alcohol/isopropanol solution. Start:
- Remove the laser hood and air guide
- Dip a little alcohol/isopropyl alcohol solution with a non-woven fabric
- Carefully wipe the laser lens with a non-woven fabric
- Reinstall the laser hood and air guide Warning: Excess solution may immerse inside the laser and cause damage to the laser.
Question 5: How to solve alarm 2 error or hard limit?

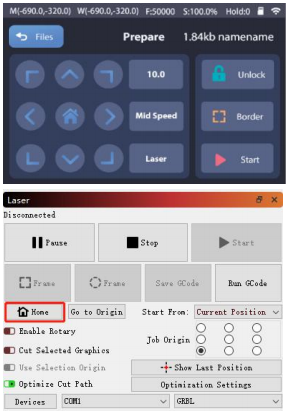
It adds two limit switch in Ray5 40W laser engraver, the firmware has hard limit and soft limit features to locate the laser module position precisely. The position of the laser module is assumed to be the home position by default when powered on. So the engraver will trigger the alarm 2 or hard limit error if the laser head is moved in the X or Y negative direction at this time. Then it needs to home the engraver as shown in the picture below.
Question 6: How to solve the upload error of the APP?
To use APP for engraving, it needs to insert the SD card into the motherboard firstly to ensure that the data can be received normally; otherwise it will prompt upload error.
¶ 1.1.6 LONGER Ray5 40W Laser Engraver Material Profiles
¶ 1.2 Laser Engraver Setup
¶ 1.2.1 Machine Operation
a) Place the machine on a flat table and make sure that the machine is stable and will not shake.
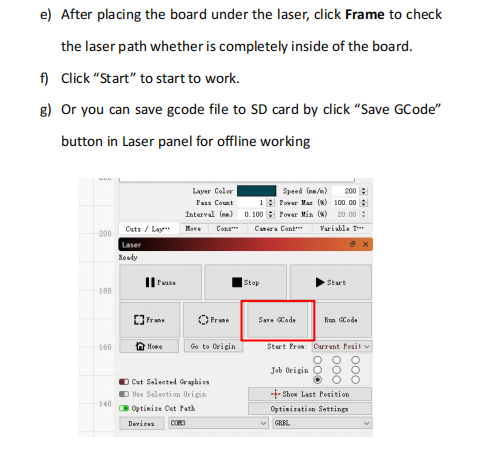
b) Place the wood board to be engraved or cut under the laser.
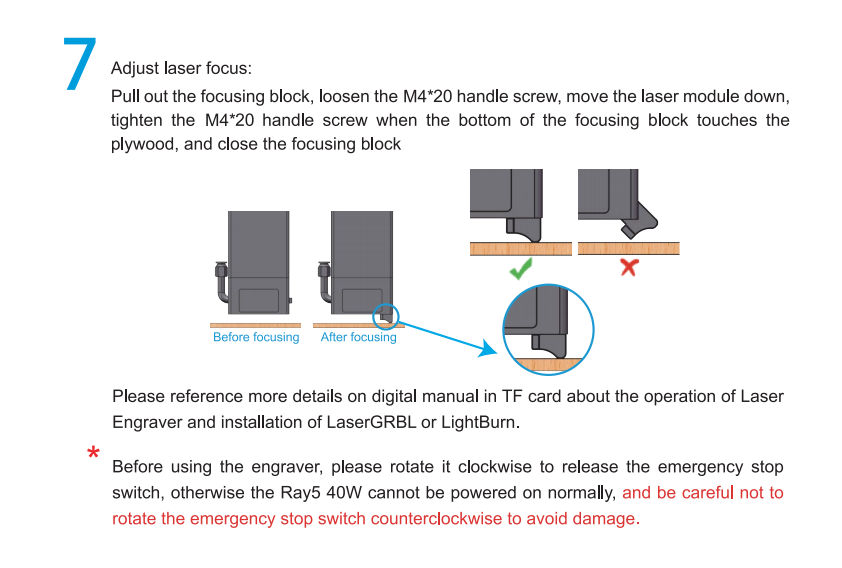
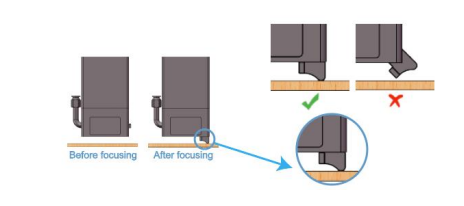
c) Pull out the focusing block, loosen the M425 handle screw, move the laser module down, tighten the M425 handle screw when the bottom of the focusing block touches the plywood, and close the focusing block
(2) Power On
a) Find the adapter and power cable and connect them. Please make sure the output of Ray5 40W adapter is DC 24V 9A.
b) Connect the power cord to the power supply and connect the other end of the adapter to the power port of the motherboard.
c) Connect the computer and the engraving machine through a USB computer (or insert a Micro SD card).
d) Turn ON your Ray5 40W by press the power switch (To Turn OFF your Ray5 40W by press the power switch once again.)
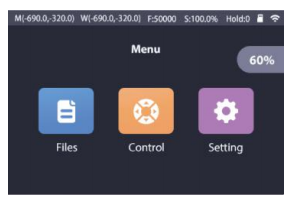
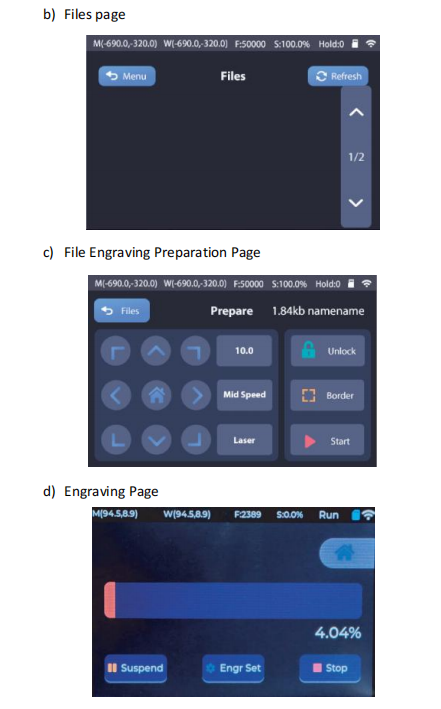
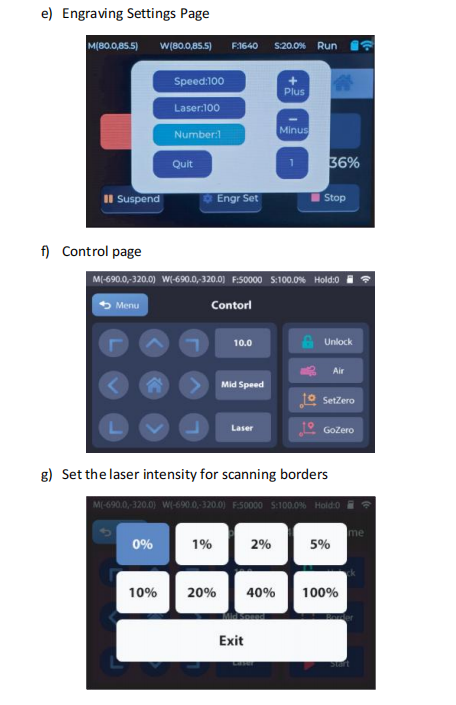
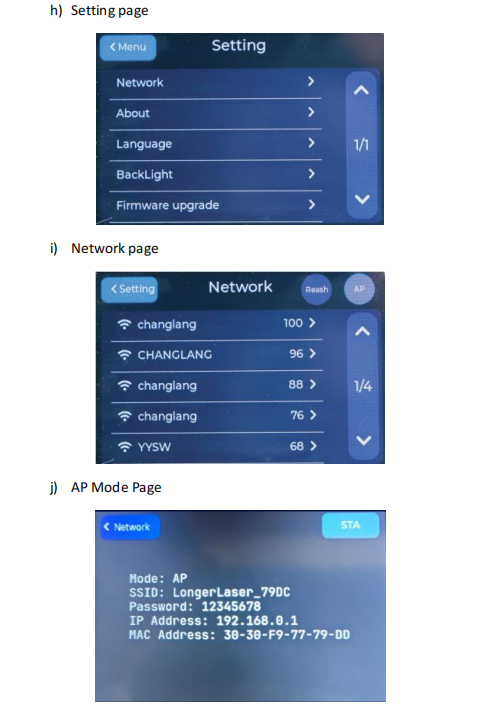
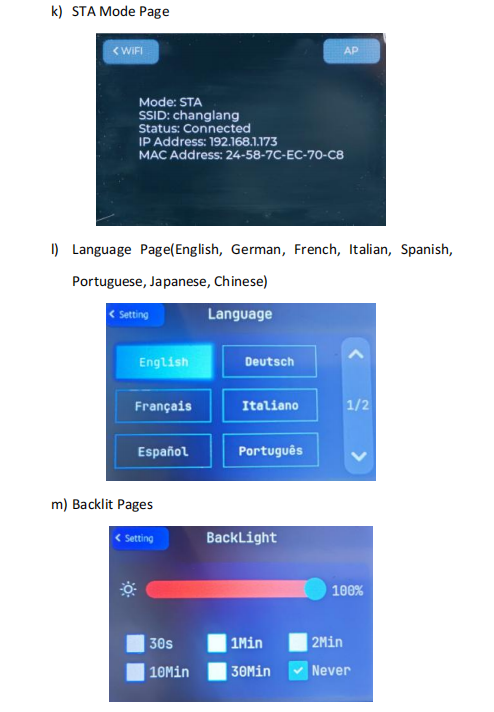
(3) Touch Screen Operation Ray5 40W has a full-color 3.5-inch touch screen with a user-friendly user interface. Engraving and cutting work can be operated with touch screen and SD card.
a) Home page
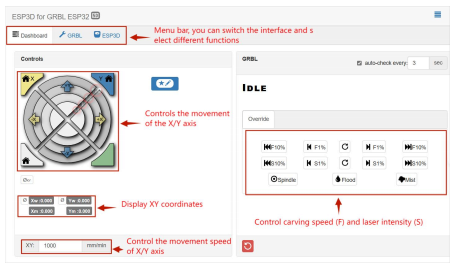
(4) Wi-Fi Control operation
a) Connect the computer and machine to the same WiFi or hotspot, then obtain the IP address.
b) copy it to the browser, enter IP: 8848 in the address bar, and the control interface will pop up.
c) Slide the mouse down to the SD file page.
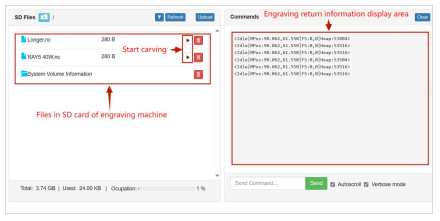
d) Upload “.gcode/.nc” files generated by “LaserGRBL” or “LightBurn” software(The two software are introduced in the following sections). Then go and play!
¶ 1.2.2 Operation of the laserGRBL software
LaserGRBL is an easy-to-use and fully free software for laser engraver only running on Windows.
Setup
a) Find LaserGRBL software in attached SD card(path: /software), Or download from the link: https://lasergrbl.com/download/
b) After installing laserGRBL, power up the Ray5, press the power switch button, and connect the laser engraver and computer via USB cable.
c) Open LaserGRBL, select correct port(depend on your PC),baud rate: 115200. Then click connect button.(If you cannot find correct port, please install CH340 driver manually by click Menu >> Tools >> Install CH340 Driver in LaserGRBL)

More help information about LaserGRBL, please refer to the link: https://lasergrbl.com/usage/
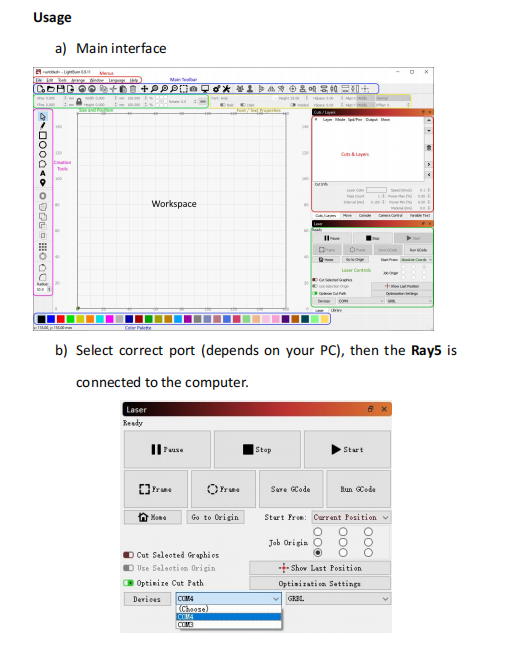
¶ 1.2.3 Operation of the LightBurn software
LightBurn is a professional software for engraver, a charging software running on Windows, MacOS, and Linux. It provides a trial period. You could pay for it afterward if you like it.
Setup
a) Find Lightburn software in SD card(path: /software) came with the package. Or just download from the link: https://lightburnsoftware.com/download/
b) After installing Lightburn, power up the Ray5, press the Power Switch button, and connect the laser engraver and computer via USB cable.
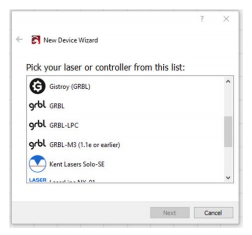
c) For the first time launching LightBurn, it will prompt a “New Device Wizard” for help you setup machine.
d) Select GRBL form the list, then click “Next” button
e) Select Serial/USB and press “Next” button.

f) Fill your Device Name, X, Y axis, then click “Enter” button Name: Ray5 40W X = 385 Y = 385 The max engrave size of Ray5 40W is different from Ray5 10W or 20W, so if you own RAY 10W or 20W before, please add the new engraver manually before using the Ray5 40W.
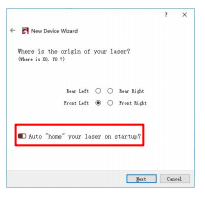
g) Select “Front Left” as your Origin X,Y and deactivate “Auto ‘Home’”, then click “Next” button.
h) Select Ray5 and press Make Default. Your Ray5 is ready to be used in LightBurn software.
More help information about LightBurn, please refer to the link: https://lightburnsoftware.com/pages/tutorials
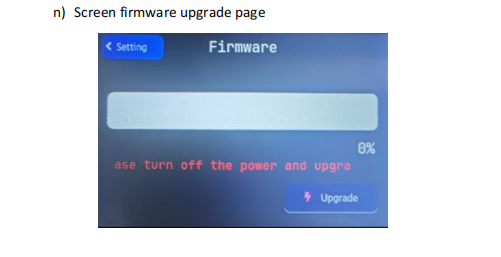
(7) Firmware Upgrading
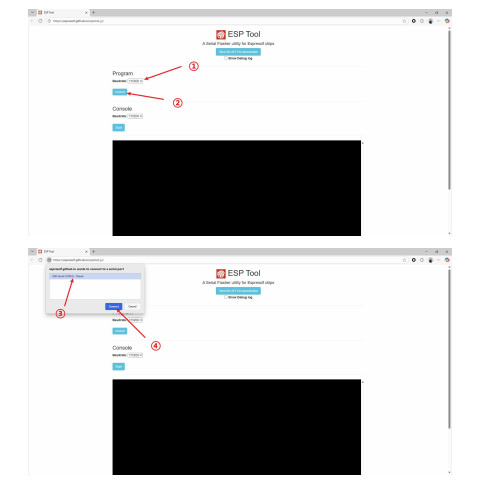
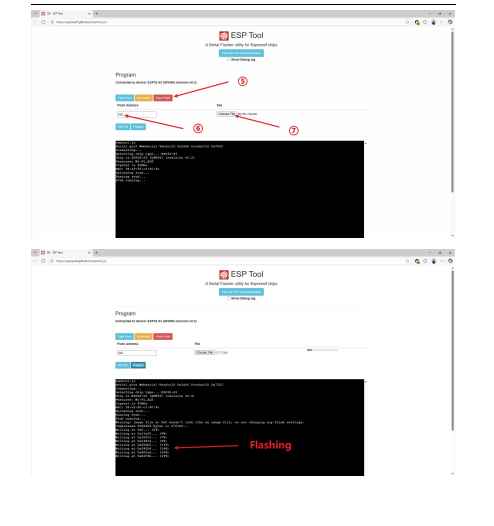
The Firmware of Ray5 is continuously updated for fixing bugs and add new features. The firmware upgrade operations are different for different systems. The detailed tutorial about firmware upgrading is contained in the firmware package. Please download
Ray5 firmware package from the LONGER official website: www.longer3d.com/pages/download Enter https://espressif.github.io/esptool-js/ in the browser. This webpage can connect to the serial port to flash the firmware online.Select the baud rate 115200 and connect to the CH340 serial port, then Click “Erase Flash” first, then enter the Flash address 0x0 and select the firmware, then click Program to start burning
¶ 1.2.4 APP Operation
Ray5 can be controlled or engraved through LaserBurn APP when the engraver and APP are connected to the same WIFI.
A) How to download the LaserBurn APP
the address below to download Android system
https://play.google.com/store/apps/details?id=com.longer.longerlaser&hl=en_US
Please search for "LaserBurn" in the app store or visit the address below to download https://apps.apple.com/us/app/laserburn/id6451089363 Or download from LONGER’s offical website: https://www.longer3d.com/pages/longer-app Or scan the code to download the APP:Please search for "LaserBurn" in Google play or app store or visit

For complex grayscale engraving, it is recommended to transfer the image to the mobile phone album and import it into the APP for engraving, which will have a better effect.
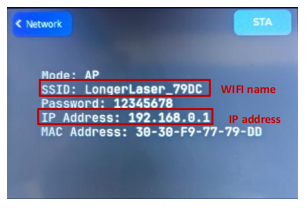
B) Connect to WIFI in AP mode
Note: There are two modes, AP and STA, to connect Ray5 via WIFI. The difference is that in AP mode the phone will have no network, but in STA mode the phone can maintain network.
- Run the LaserBurn APP and enter the Home page, click not connected icon. when there is a ‘Allow LaserBurn to access this device prompt, you need to click ‘Allow only while in use’, otherwise you may not be able to search for WIFI of Ray5.
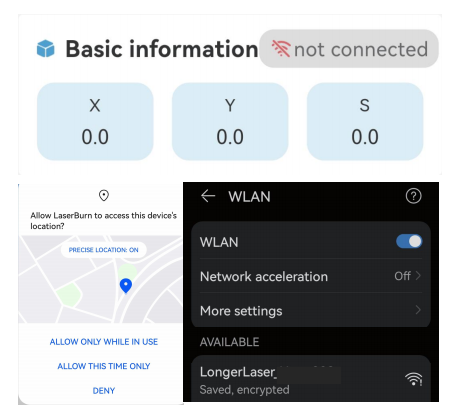
-
Open the WLAN settings on your phone, search for the WIFI starting with LongerLaser and input password 12345678 to connect the wifi of Ray5.
-
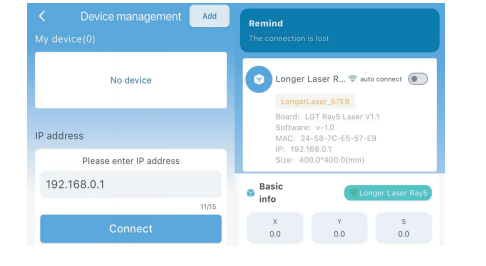
Enter the IP address 192.168.0.1 below, click Connect. There will be a remind ‘connection succeeded’ when connect successful
C) Connect to WIFI in STA mode
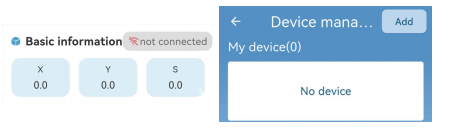
- Open the WLAN settings on your phone. Run LaserBurn and enter the Home page, click not connected icon enter the network configuration page , click Add in the upper right corner.
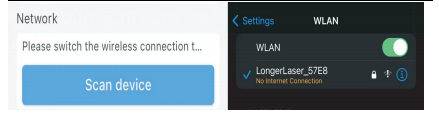
- Click Scan Device, search and find the WIFI that starts with LongerLaser_, click it, jump to the mobile phone WIFI list, enter the password 12345678, and connect to Nano Duo's WIFI.
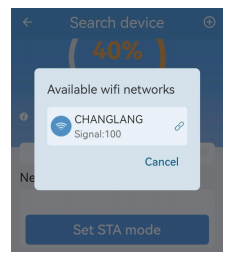
- After the connection is successful, return to LaserBurn, select Set STA mode to connect WIFI of router (only supports 2.4G), and enter the password
- Back to LaserBurn, click Connect network at the bottom of the page, connect the phone to the same WIFI as the STA mode in the previous step, wait for network configuration. When the connection is successful and the network process reaches 100%, c lick FINISH at the bottom to return to the device list interface
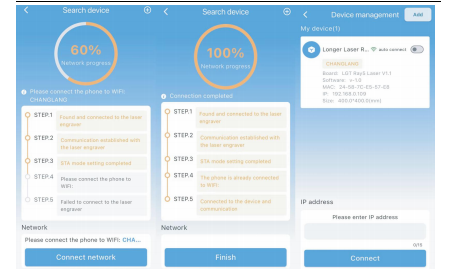
Note: After the device is connected, when click anywhere on the device list label, the machine will disconnect; conversely, if click when the device is disconnected, the phone will automatically connect to the device.
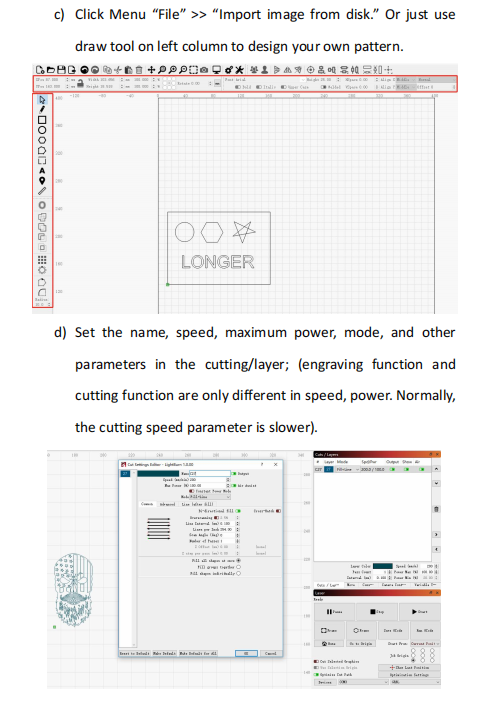
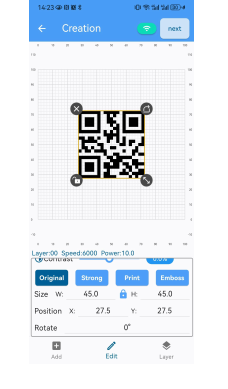
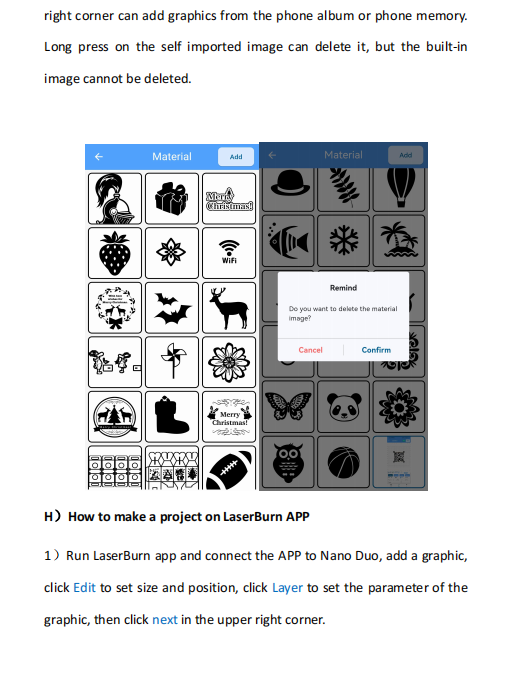
D)Creation
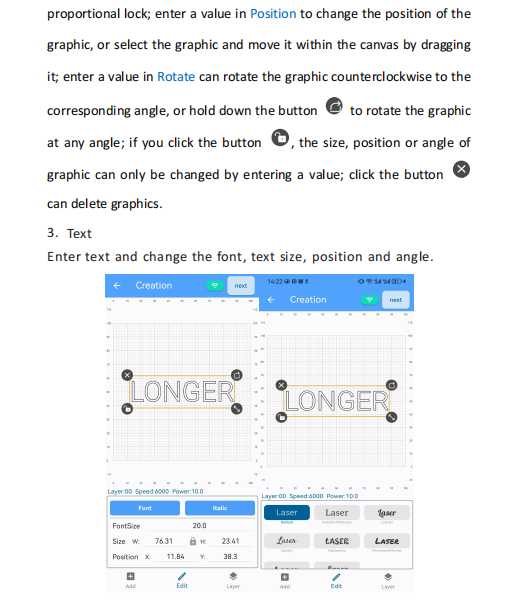
- In the creation interface, graphics can be imported through painting, text,QR code, photo album, camera, material library, AI generation, etc.
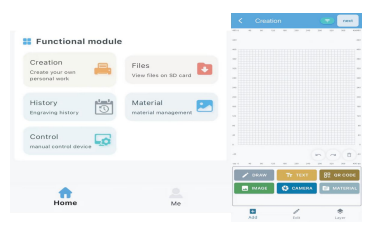
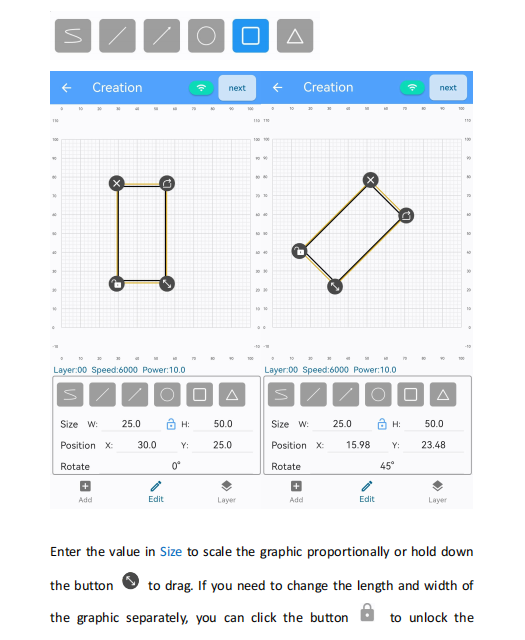
- Draw Draw simple images, such as circles, rectangles, triangles, etc.
4.QR code Generate QR code based on the input content, and change the size, position or angle of the QR code
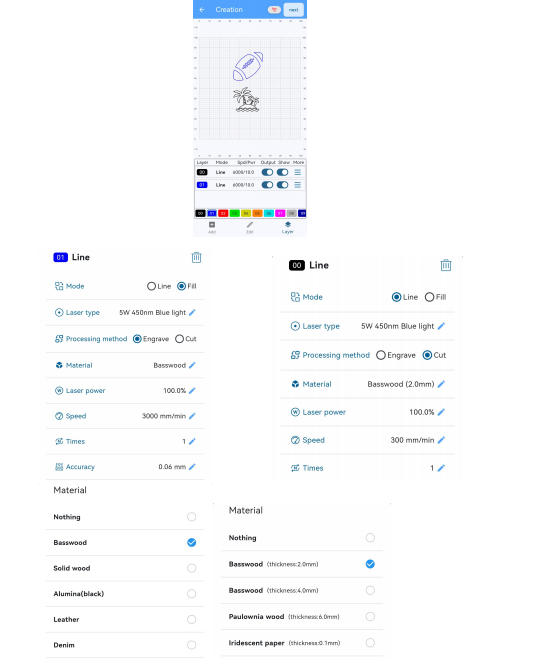
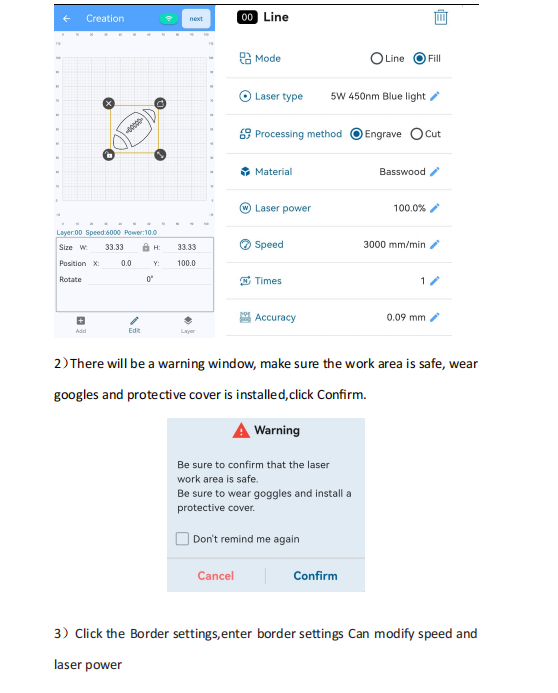
5. Layer
Layer mode: set line or fill
Laser type: choose 5W for Ray5,10W for Ray5,20W for Ray5, 30W for Ray5,40W Processing method: engrave or cut Material: select the corresponding material from the material library , and the APP will automatically set the appropriate parameters according to the processing method and laser power selection. If the parameters need to be modified, click the edit
6. Album
¶ 2. download
¶ 2.1 Product Manual
Ray5 40W User Manual.pdf
LONGER Ray5 40W Laser Engraver Material Profiles.pdf
FAQ of Ray5 40W series Laser Engraver.pdf
¶ 2.2 Quick Start Guide
Ray5 40W Laser Engraver Quick Start Guide.pdf
¶ 2.3 Firmware
¶ 2.4 Software
RAY5- lightburn
RAY5 -laserGRBL
RAY5- WIFI APP for googleplay
RAY5- WIFI APP for appstore